A comprehensive guide to Office 365 license reporting
Table of contents
Tracking, analyzing, and managing licenses is crucial in today’s ever-changing licensing environment. Reporting on Office 365 licenses is key for organizations to gain detailed insights into how licenses are being used, user behavior, past patterns, and, ultimately, the expenses.
Why license reporting matters
In a nutshell, a solid Office 365 license reporting strategy will help your business make smart choices, reduce Office 365 licensing expenses, and meet vendor agreement requirements.
How to run a license reports in Office 365
Running a license report from Office 365 is a straightforward process that provides essential insights into license allocation and usage. Typically, these are the steps taken:
- Sign in to Office 365 Admin Portal: Log in to the Office 365 admin portal through your administrator account credentials.
- Access the Admin Center: Once you’re logged in, proceed to the Admin Center. This is where you’ll manage various aspects of your Office 365 subscription.
- Choose “Billing” or “Billing & Subscriptions”: The option might be labeled as “Billing” or “Billing & Subscriptions,” depending on the layout changes. Click on this option to access billing-related information.
- View Subscriptions or Licenses: Look for an option to view your subscriptions or licenses. This section should provide an overview of the licenses assigned to different users within your organization.
- Generate a License Report: Within the subscriptions or licenses section, there should be an option to generate a report. This report might include details such as the number of licenses used, available licenses, assigned users, etc.
- Customize and Export the Report (if available): Depending on the capabilities of the portal, you might have the option to customize the report by selecting specific parameters or time frames. After customizing, you can often export the report in formats like Excel or CSV for further analysis.
Utilizing the Admin Center or Admin portal for license management
The Office 365 Admin Center comes with built-in tools that streamline license management. Leveraging these tools provides several benefits:
- Efficiency: The Admin Center offers a centralized location for managing licenses, making the process more efficient and user-friendly.
- Granular Control: Administrators can assign licenses based on user roles, ensuring that employees have access to the services they require for their specific responsibilities.
- Real-Time Updates: The Admin Center provides real-time information about license allocation and usage, enabling administrators to make informed decisions.
- License Optimization: By accurately assigning licenses based on user needs, organizations can optimize costs and eliminate unnecessary spending.
How to generate an Office 365 license report through PowerShell
Generating an Office 365 license report through PowerShell involves connecting to the Office 365 services using PowerShell commands, and the module to use is the Microsoft.Graph PowerShell SDK! If you do not have it yet, you will need to install it from the PowerShell gallery using the following cmdlet:
Install-Module -Name Microsoft.GraphStep 1: Connect to Microsoft 365
Before you can retrieve license information, you need to establish a connection to your Microsoft 365 tenant. Now open PowerShell and run the following command:
Connect-MgGraph -Scopes "Directory.Read.All"This will prompt you to enter your Microsoft 365 admin credentials. After successful authentication, you will be connected to your Microsoft 365 tenant.
Step 2: Retrieve User License Information
There are two cmdlets we will play around with as we want to report on users. The first one is Get-MgUser which returns us information on users, and the second one is Get-MgUserLicenseDetail which returns us information about the licenses assigned to a certain user.
For example, if I wanted to view the licenses assigned to a specific user, I would use the following example:
Get-MgUserLicenseDetail -UserId <e-mail of the user>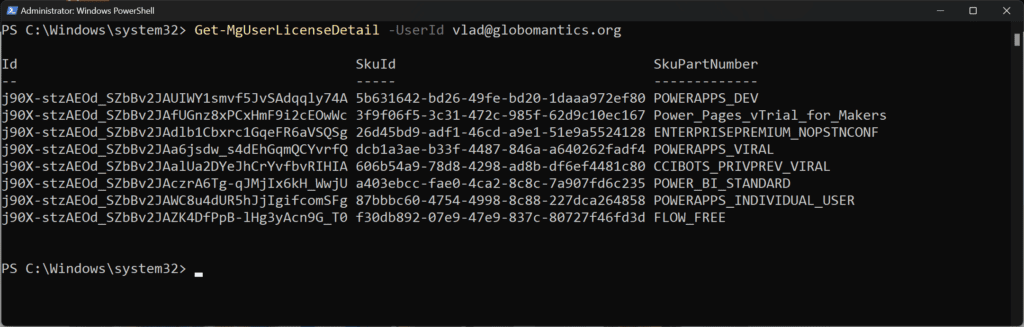
As we build our more advanced script, we probably want to filter some users out, for example unlicensed users and guests. So, in the following example we get all our users that are internal to our organizations, and that have a license assigned. This will also output the number of licensed users you have in your organization.
Get-MgUser -Filter 'assignedLicenses/$count ne 0' -ConsistencyLevel eventual -CountVariable licensedUserCount -All -Select UserPrincipalName,DisplayName,AssignedLicenses | Format-Table -Property UserPrincipalName,DisplayName,AssignedLicenses
Write-Host "Found $licensedUserCount licensed users."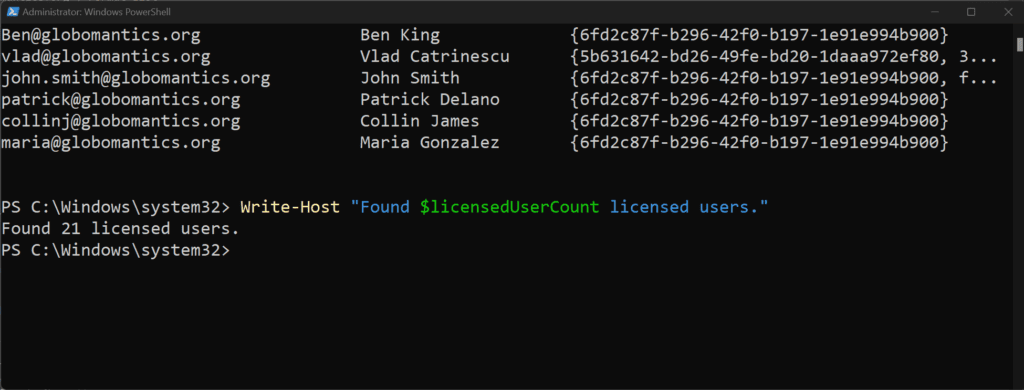
You have probably noticed I have an Assigned licenses in there, as yes, we could get the information about Assigned licenses directly from the Get-MgUser cmdlet, but we get an ID , and not an actual name, so it’s not super user friendly! You can find out what the ID is by using the Get-MGSubscribedSku PowerShell cmdlet which will return you the ID, as well as the SkuPartNumbe
Get-MgSubscribedSku | Select SkuId, SkuPartNumber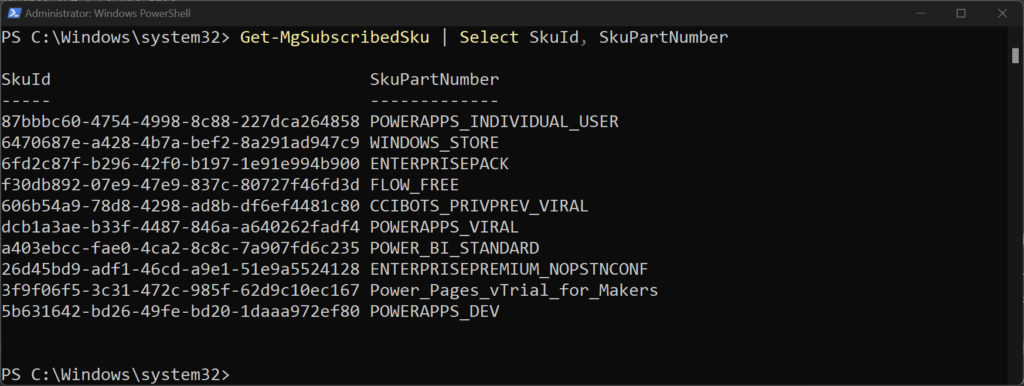
But now if you are a new user, you might not know all those names, for example, what is Enterprise Pack? Microsoft has an Excel file that actually does the mapping between the GUID, the friendly name, and all the services included in a license over here.
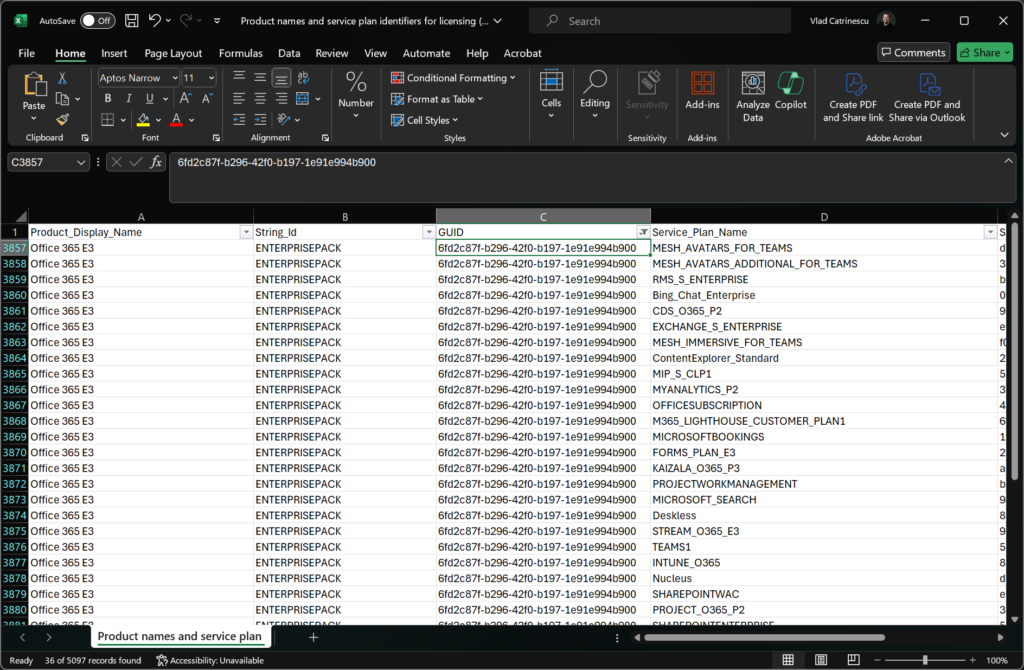
PS: Once you look at the file, you will realize whoever told you Microsoft licensing is simple, lied to you as there are over 5000 lines in that CSV File!
Now that we know all of this information, how do we put it all together in a nicer report? This could all be in one line but I formatted it on multiple lines for easier viewing in a blog post:
Get-MgUser `
-Filter 'assignedLicenses/$count ne 0' -ConsistencyLevel eventual -CountVariable licensedUserCount -All | Select-Object `
@{N='DisplayName';E={$_.DisplayName }}, `
@{N='Licenses Assigned';E={(Get-MgUserLicenseDetail -All -UserId $_.id).SkuPartNumber -join ';'}}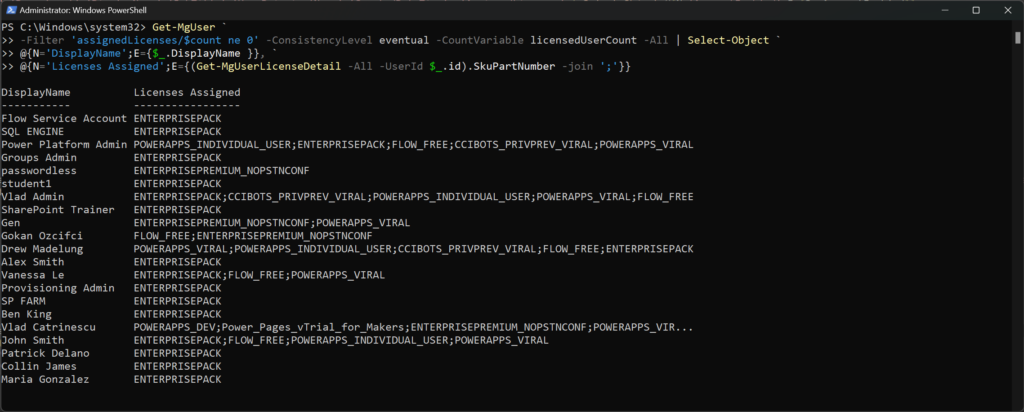
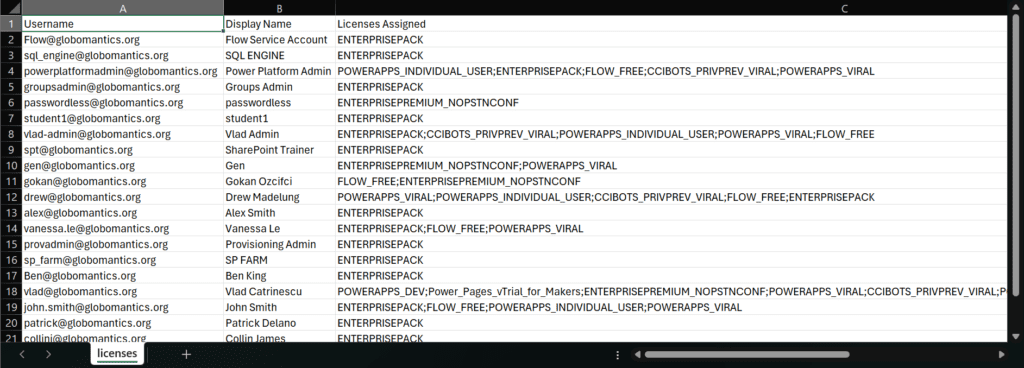
If you want to export your report to CSV, you can run something like this:
Get-MgUser `
-Filter 'assignedLicenses/$count ne 0' -ConsistencyLevel eventual -CountVariable licensedUserCount -All | Select-Object `
@{N='Username';E={$_.UserPrincipalName }}, `
@{N='Display Name';E={$_.DisplayName }}, `
@{N='Licenses Assigned';E={(Get-MgUserLicenseDetail -All -UserId $_.id).SkuPartNumber -join ';'}} `
| Export-Csv -Path $env:USERPROFILE\Desktop\licenses.csv -NoTypeInformationAnd this is the result in Excel. You will notice I also added the Username to this example:
Step 3: Record License Information
To generate a comprehensive license report, it is best to record the license information in a structured format. You can export the license information to a CSV file using the following command:
Get-MsolUser | Select-Object DisplayName, Licenses | Export-Csv -Path "C:\Path\To\LicenseReport.csv" -NoTypeInformation Replace “C:\Path\To\LicenseReport.csv” with the desired path and filename for your license report. This command will export the user’s display name and licenses to a CSV file.
Step 4: Display User-Friendly License Names
The license information retrieved in Step 2 may contain cryptic identifiers. To make the report more user-friendly, you can map these identifiers to user-readable license names.
Run the following command to display the license names instead of identifiers:
$licenseMap = Get-MsolAccountSku | Select-Object AccountSkuId, SkuPartNumber
$licenseReport = Import-Csv -Path "C:\Path\To\LicenseReport.csv"
foreach ($user in $licenseReport) {
$licenses = $user.Licenses -split ", "
$friendlyLicenses = foreach ($license in $licenses) {
$licenseMap | Where-Object { $_.AccountSkuId -eq $license } | Select-Object -ExpandProperty SkuPartNumber
}
$user.Licenses = $friendlyLicenses -join ", "
}
$licenseReport | Export-Csv -Path "C:\Path\To\LicenseReport.csv" –NoTypeInformationThis script will update the license report CSV file with human-friendly license names.
Step 5: View Service Details
If you want to include service details in your license report, you can retrieve the information using the following command:
$services = Get-MsolAccountSku | Select-Object -ExpandProperty ServiceStatus
foreach ($service in $services) {
$service | Select-Object -ExpandProperty ServicePlan | Select-Object ServiceName, ProvisioningStatus
} This will display the service name and provisioning status for each license in your Microsoft 365 tenant. You can then proceed to further customize this result and include it in your license report if desired.
By following these steps, you will be able to generate a comprehensive license report for Office 365 using PowerShell.
Managing Office 365 licensing
Navigating the intricate landscape of Office 365 licensing requires a strategic approach that aligns with organizational goals and user needs.
To help you get there, our Senior Software Engineer, Bojan Grubić has created the Manage Office 365 licenses the right way article. It will guide you in ensuring that the right licenses are allocated to the right users, streamlining license assignments, and optimizing costs.
Identifying inactive and underutilized licenses to minimize costs
To achieve optimal management of Office 365 licenses, you must first identify licenses that aren’t being used or are being underutilized. By taking a proactive approach, you can save money by assigning these licenses to users who require them.
Administrators can then track user activity and consumption patterns, allowing them to make better decisions regarding licensing investments and eliminating any unnecessary expenses.
Checking Office 365 license usage and history
To export a list of licensed users in Office 365, you can utilize the Office 365 admin portal. Here’s a step-by-step guide:
1. Sign in to the Office 365 admin portal using your admin credentials.
2. Navigate to the “Admin centers” section and click on “Admin centers” to expand the list.
3. Click on “Users” to access the user management dashboard.
4. In the left-hand menu, click on “Active users” to view a list of all active users in your organization.
5. To see the license usage and history for a specific user, click on their name in the list.
6. On the user details page, scroll down to the “Product licenses” section.
7. Here, you will see a list of the licenses assigned to the user, including the license name, status, and assigned date.
8. To export this list, click on the “Download” button at the top right corner of the “Product licenses” section.
9. Choose the desired format (CSV, Excel, or PDF) for the exported file and save it to your preferred location.
How to check the Office 365 license count
To check your Office 365 license count, you can follow these steps:
- Sign in to the Office 365 admin center through your admin account. Go to https://admin.microsoft.com and enter your credentials.
- Once signed in, you will be taken to the Home page of the admin center. On the left-hand side, click on “Billing” or “Billing & Subscriptions” (the exact name may vary).
- In the Billing or Billing & Subscriptions section, you will find an overview of your organization’s subscriptions and licenses. Look for a section that provides information about your Office 365 licenses.
- In this section, you should be able to see the total number of licenses that are assigned to users in your organization. The licenses may be categorized based on different plans, such as Office 365 Business, Office 365 Enterprise, or specific applications like Microsoft Word, Excel, etc.
- To view more detailed information about the licenses, click on the licenses section or the specific license plan you want to check. This will display a list of users assigned to that license and their activation status.
- You can also click on individual users to view their license details, such as the specific services and applications included in their license.
How to export a list of licensed users in Office 365
To export a list of licensed users in Office 365, you can use the Microsoft 365 admin center. Here’s a step-by-step guide:
- Open a web browser and navigate to the Microsoft 365 admin center (https://admin.microsoft.com).
- Sign in using your Office 365 administrator account credentials.
- Once signed in, click on the “Users” tab on the left-hand side menu.
- In the Users section, click on “Active users” to view a list of all active users in your Office 365 tenant.
- On the Active Users page, you’ll see a table with various columns like Name, Username, and Assigned licenses.
- Scroll horizontally to locate the “Assigned licenses” column. This column displays the licenses assigned to each user.
- Click on the “Download users” button located at the top right corner of the table.
- A dialog box will appear with two options: “Customize columns” and “Download.” Click on “Customize columns” if you want to select specific columns to include in the exported list. Otherwise, skip this step.
In the “Customize columns” dialog box, you can select the columns you want to include by checking the corresponding boxes.
Click “Apply” when you’re done. Now, click on the “Download” button in the initial dialog box. A CSV file will be downloaded to your computer, containing the list of active users and their assigned licenses.
Effective license management with Syskit Point
Syskit Point offers powerful features that will help you simplify license management in your Office 365 administration.
With Syskit Point, you can efficiently manage your Office 365 licenses and gain detailed reports on license usage that contain valuable information such as active and inactive users, license counts, and much more.
By leveraging these reports, you can identify licenses that are not being fully utilized, optimize your license budget, and maintain compliance with your licensing agreements.