5 useful PowerShell scripts every SharePoint Admin needs
Table of contents
Yes, the SharePoint admin center is amazing and has evolved significantly over the past few years. However, there are still many things that administrators need to rely on PowerShell scripts to get complete control of their SharePoint Online tenant.
We can do thousands of things with PowerShell scripts in SharePoint Online, but in this post, I wanted to focus on five of my favorite PowerShell scripts I run all the time. In this post, I will not cover the basics of connecting to SharePoint Online; we will only focus on the PowerShell scripts. However, if you would like an introduction to the SharePoint Online Management Shell, check out the Get started with SharePoint Online Management Shell page on Microsoft Learn.
1. Reporting on SharePoint Online Storage per site PowerShell script
One of the more useful PowerShell scripts turned out to be connected with reporting on SharePoint Online storage script. A few years ago, the Terabytes we had in SharePoint Online seemed more than enough. But now, we create so much data that many companies are starting to run low on free storage. To learn how storage works, check Syskit’s YouTube channel on March 7, where a video I did with Microsoft MVP Drew Madelung about how it all works is coming out.
As companies are watching storage more closely, a lot of them are switching from the “automatic management” of storage, where each site gets 25TB of storage assigned, to a more manual approach to make sure that there isn’t a single site that gets out of control and takes the space of whole organization. But how do we balance our control of storage and proactive reporting to ensure our users never get stopped from collaborating and saving documents?
The PowerShell script below can help. Let me start by showing you the script and the result, and we’ll explain it right after.
The Script:
Get-SPOSite -Limit All | Select Url, StorageUsageCurrent, StorageQuota, @{ Name = '% Used'; Expression = {'{0:P2}' -f ($_.StorageUsageCurrent / $_.StorageQuota) }} | Sort-Object StorageUsageCurrent -Descending
The Result:
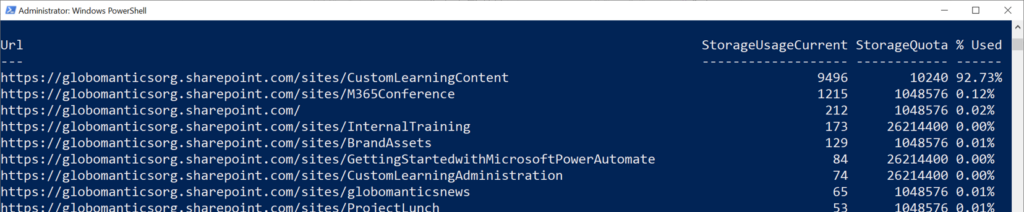
This script will show you the following:
- All the different sites in your tenant.
- How much storage each site is currently using.
- The quota it’s presently configured at.
- The percentage of the quota it used.
It will then sort sites by the ones that use the most storage at the top. Let’s break it down.
Get-SPOSite -Limit AllThis command retrieves all SharePoint Online sites and the -Limit All parameter specifies that all site collections should be returned, even if you have thousands. We then have the second part of the script.
| Select Url, StorageUsageCurrent, StorageQuota, @{ Name = '% Used'; Expression = {'{0:P2}' -f ($_.StorageUsageCurrent / $_.StorageQuota) }}The | (pipe) character passes the previous command output as input to the Select cmdlet. Select is used to select specific properties to display. In this case, it selects the sites’ Url, StorageUsageCurrent, and StorageQuota properties. The script also adds a custom property named % Used. This property is calculated by dividing StorageUsageCurrent (the storage amount currently being used) by StorageQuota (the total amount of storage available). The result is then formatted as a percentage with two decimal places ({0:P2}).
| Sort-Object StorageUsageCurrent -Descending
Finally, the Sort-Object cmdlet is used to sort the output by the StorageUsageCurrent property in descending order. This means the sites using the most storage will be listed first. This is just a starter; feel free to save the information to a CSV file or modify the script however you want.
2. Setting the default sharing link type to existing people PowerShell script
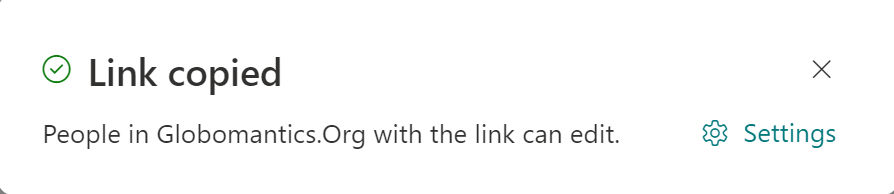
The next script I end up running all the time, and while I love the result, I wish I didn’t have to run it. Let me explain! When configuring external sharing settings for SharePoint Online, one of the settings we have is the type of link selected by default when users share files and folders in SharePoint and OneDrive.
In simpler terms, what kind of link gets created if a user clicks Copy Link and doesn’t change any settings?
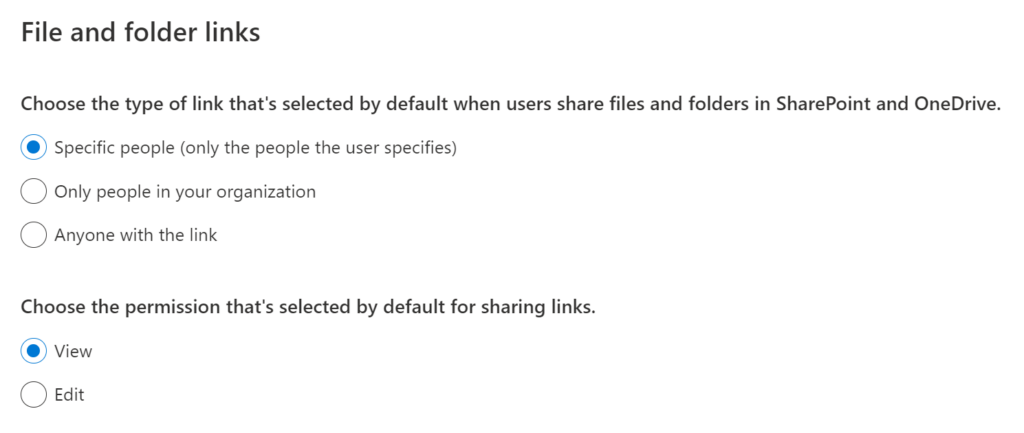
At the SharePoint Online tenant level, we can configure three different options as you can see in the image below.
- (Share with) Specific people that the user specifies.
- Only people in your organization.
- Anyone with the link.
In addition, you can also decide the default permission for those links to either be view or edit.
I always recommend that the default link created be as restrictive as possible. This way, even if we enable anonymous, for example, I want my user to consciously decide to make a link more permissive than the default. You can learn more about my recommendations for external sharing best practices in the Microsoft 365 oversharing solutions blog post.
There is an even more restrictive option that is not available to be configured at the tenant level, but it is at the site level, and that permission is “People with Existing Access”. This permission is available on a per site basis from the SharePoint Online Admin Center – you can see it in the picture below.
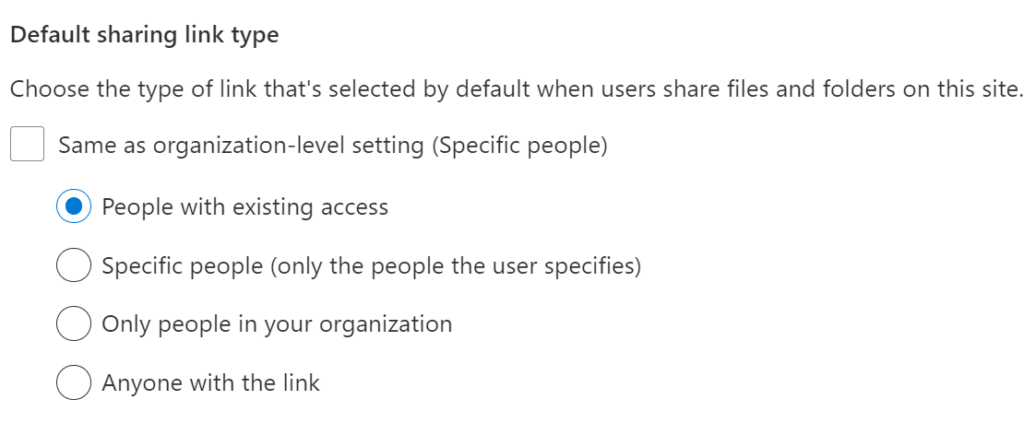
So I created the following script that will loop through each SharePoint Online site, except a few built-in templates or old templates that do not support the setting, and configure the Default sharing link type to be “People with existing access.” Remember, this will not change the level of sharing of your site; it is simply the default link that users get.
$sites = Get-SPOSite -Limit ALL | Where {$_.Template -ne "REDIRECTSITE#0" -and $_.Template -ne "SPSMSITEHOST#0" -and $_.Template -ne "POINTPUBLISHINGPERSONAL#0" -and $_.Template -ne "POINTPUBLISHINGHUB#0"}
foreach ($site in $sites) {
Write-Host -NoNewline "Changing settings for " $site.url
Try {
Set-SPOSite -Identity $site -DefaultLinkToExistingAccess $true -ErrorAction SilentlyContinue
Write-Host -ForegroundColor Green " Settings Changed Successfully"
}
Catch {
Write-Host -ForegroundColor Red " Failed to get info from " $site.url ". This can be because the site is locked or is using a template that does not support it"
}
}
The result should look like here, including the error on a currently locked site.

You can run the script regularly to ensure it applies to all newly created sites.
3. Sites that are about to be permanently deleted PowerShell script
When you delete a site in SharePoint Online, that site goes to the Site Collection recycle bin, giving you a second chance, just in case that deletion was accidental. Sites will remain there for 93 days, after which those sites and all their content and settings are permanently deleted, including lists, libraries, pages, and subsites.
I like to have a monthly review of sites in the recycle bin. This way, if there is a site there that I am not sure about, I can always double-check with the owner or with another admin if it’s expected that the site is there.
The following script is easy, but it shows us all the sites in the SharePoint Online recycle bin and how many days they have left until they are permanently deleted.
Get-SPODeletedSite |Select Url, DaysRemaining | Sort-Object DaysRemaining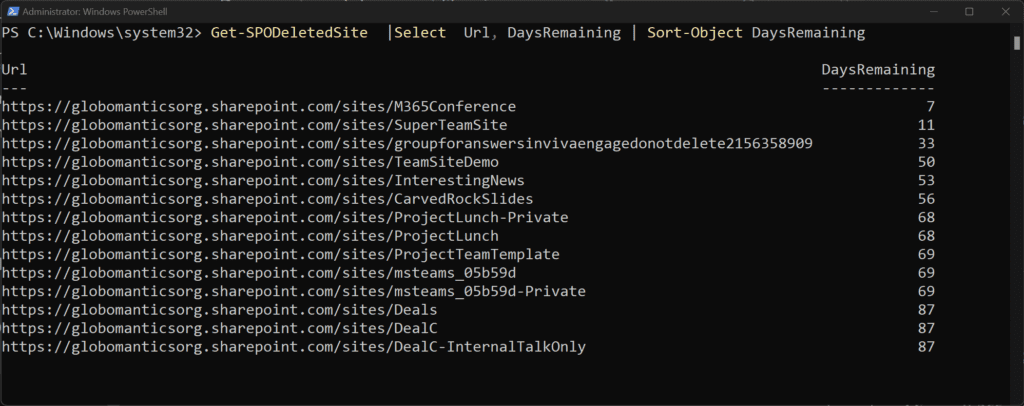
While recovering a site past the 93-day mark is possible by contacting Microsoft Support within 14 days, I would always rather avoid opening Microsoft support tickets. Keeping an eye on sites about to be permanently deleted is a great way to spend more time doing cool things in SharePoint and less time on the phone with support.
4. Reporting on SharePoint Online external users PowerShell script
As a SharePoint administrator, we want to keep an eye on external users in our tenant. While a few PowerShell scripts out there enable us to find external users, many of them have some omissions inside that do not give us the whole picture. For example, many use the Get-SPOExternalUser PowerShell cmdlet, but do not loop to make sure you do not have more than 50 users in your tenant, and some do not take into account that the Get-SPOExternalUser cmdlet might not return users that have been invited with modern sharing to a specific document or folder.
For the purpose of this blog, I will also output the users, but you can, of course, save them in a CSV file or any output of your choosing. We start by getting all the SharePoint Online sites – and similar to previous PowerShell scripts, we filter out some old templates such as a Delve Blog or redirect sites.
$sites = Get-SPOSite -Limit ALL | Where {$_.Template -ne "REDIRECTSITE#0" -and $_.Template -ne "SPSMSITEHOST#0" -and $_.Template -ne "POINTPUBLISHINGPERSONAL#0" -and $_.Template -ne "POINTPUBLISHINGHUB#0"}We will then loop through each site and find all the users with #ext# in the name or urn:spo:guest, as this tells us they are external users. We then select their DisplayName, LoginName, and site on which we found them in a variable and, finally, add them into an array.
$sites = Get-SPOSite -Limit ALL | Where {$_.Template -ne "REDIRECTSITE#0" -and $_.Template -ne "SPSMSITEHOST#0" -and $_.Template -ne "POINTPUBLISHINGPERSONAL#0" -and $_.Template -ne "POINTPUBLISHINGHUB#0"}
foreach ($site in $sites) {
Try {
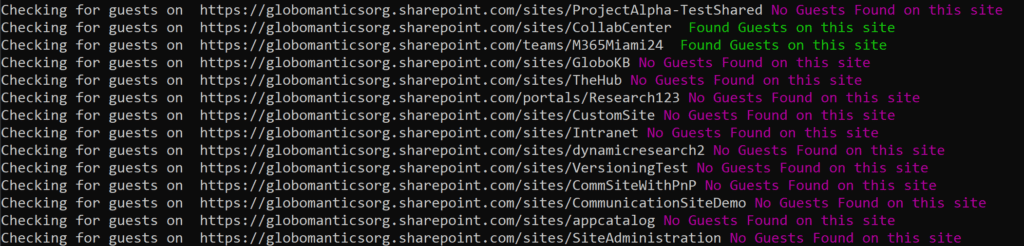
Write-Host -NoNewline "Checking for guests on " $site.url
$Guests = Get-SPOUser -Limit All -Site $site.Url | Where {$_.LoginName -like "*urn:spo:guest*" -or $_.LoginName -like "*#ext#*"} | Select DisplayName,LoginName,@{Name = "Url" ; Expression = { $site.url }}
$ExternalUsers += $Guests
if ($Guests) {
Write-Host -ForegroundColor Green " Found Guests on this site"
}
else {
Write-Host -ForegroundColor Magenta " No Guests Found on this site"
}
}
Catch {
Write-Host -ForegroundColor Red " Change failed on" $site.url ". This can be because the site is locked or is using a template that does not support it"
}
$Guests = $null
}
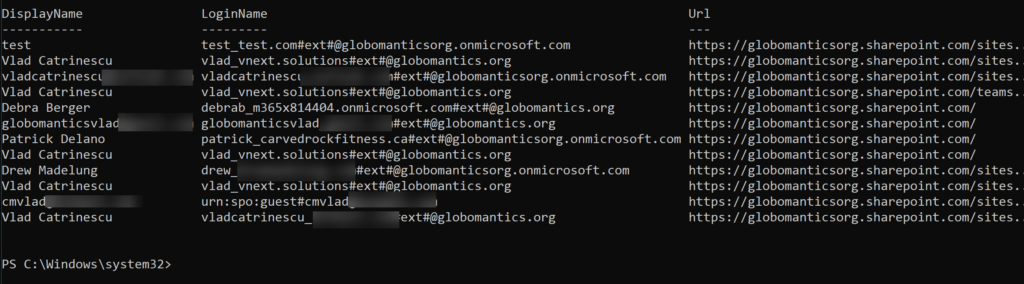
$ExternalUsersFinally, we can decide to output the array, or you can save it into a CSV file or any other storage location of your choosing.
$ExternalUsersHere are the results:
5. Finding redirect sites in your tenant PowerShell script
A few years ago, Microsoft enabled SharePoint administrators to change the URL of their sites in SharePoint Online. The way it works in the back is that Microsoft changes the site URL and creates a site with the template RedirectSite#0, which redirects users with the old URL to the new one. It’s very user-friendly, but those redirect sites are not visible in the SharePoint Online admin center and can only be seen via PowerShell.
The problem is that after a few years, you might have a lot of redirect sites hidden in your tenant and for sites that do not exist anymore. Also, since the redirect sites still use the URL, you cannot use the same URL for a new site either.
This PowerShell script will get all the redirect sites inside your tenant by filtering by the RedirectSite#0 template. Next, we will
select the URL of the redirect site. Finally, we create a custom property called “Redirects to” in which we use PowerShell’s web request capabilities to find out where the site redirects to. You can find the script and the results from my test tenant below.
Get-SPOSite -Template RedirectSite#0 | Select Url, @{ Name = 'Redirects to'; Expression = { (Invoke-WebRequest -Uri $_.Url -MaximumRedirection 0).Headers.Location}}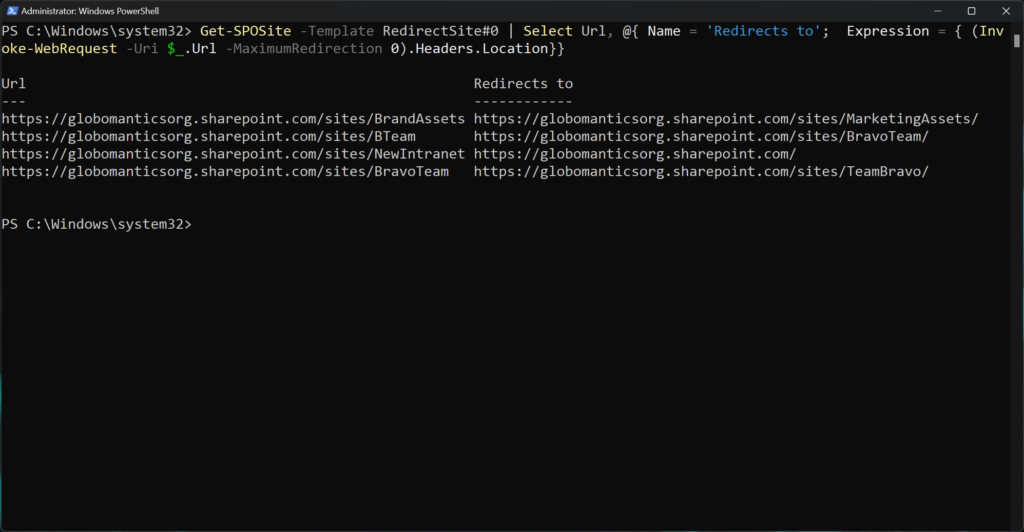
Looking for more useful PowerShell scripts?
PowerShell scripts are the best friend of any Microsoft 365 Administrator. While the SharePoint Online admin center does a fantastic job at making most settings readily available for admins, nothing compares to the capabilities PowerShell has to help us unlock all the settings of our PowerShell tenant.
I hope you have enjoyed the five PowerShell scripts from this post – and hopefully, they will be useful to you! If you are looking for more PowerShell scripts – I highly recommend checking out the PnP Script Samples repository, where community members publish multiple samples that use the SharePoint Online PowerShell Module, as well as PnP.PowerShell and even CLI for Microsoft 365.