Advanced oversharing prevention
In the previous section, we learned how to prevent new oversharing, but what about existing overshared content? In this section of the oversharing guide, we will show you how to fix existing oversharing problems and ensure you can discover any potential oversharing in the future and fix it as soon as possible.
Data access governance reports and access reviews
One of the first things we must do is discover how bad our oversharing problem is. The best way to do this out of the box is by using data access governance reports. These reports are a feature of SharePoint Premium Advanced Management (commonly abbreviated as SAM), but they are also available if you have a Microsoft 365 E5 license.
We can run two types of reports: the snapshot report, which gives you a report of your tenant at a point in time, and the Recent Activity report, which limits us to activity in the last 28 days.
The way Microsoft designed those is that initially, you will run the snapshot report, which can take a couple of days to run, and then, every few weeks, you run the recent activity report to make sure there is no recent oversharing that happened.
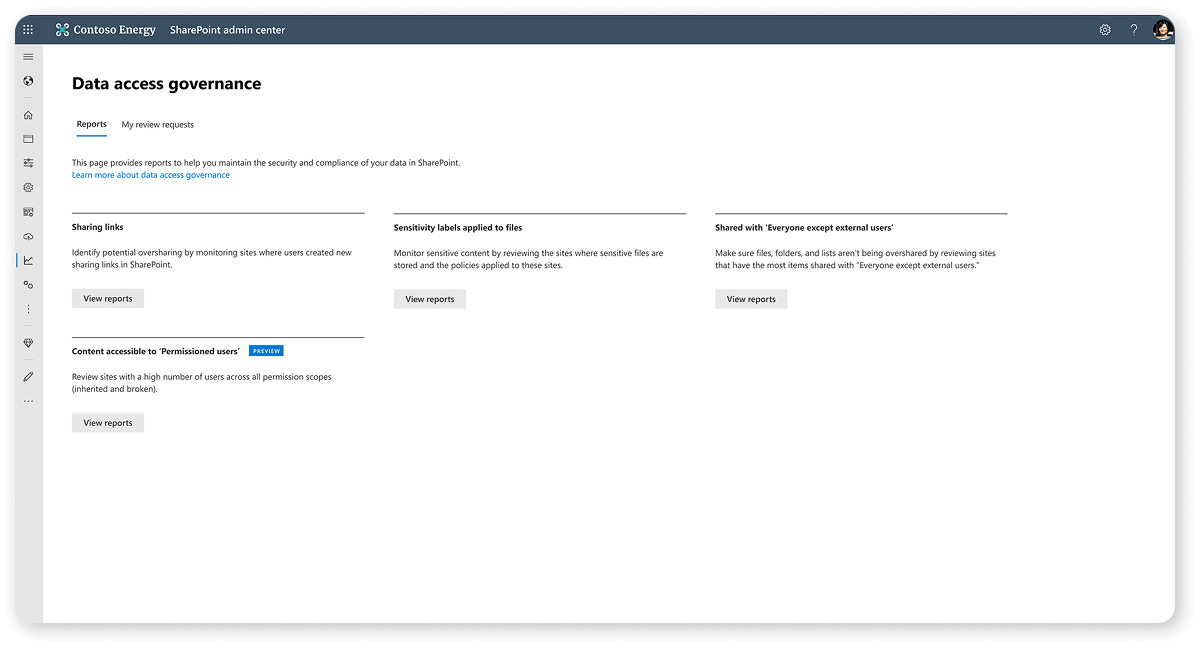
You will find Data Access Governance in the SharePoint Online Admin Center under reports. To run the snapshot report, you need to go to Content Accessible to Permissioned users.
From there, you can create a new report and choose your filters. You can either create a report with all your site templates or focus on one type of template at a time. One significant limitation of this report is at the bottom, you need to select the Count of permissioned users over which sites will show on the report. The minimum, at the time of writing this, is 100.
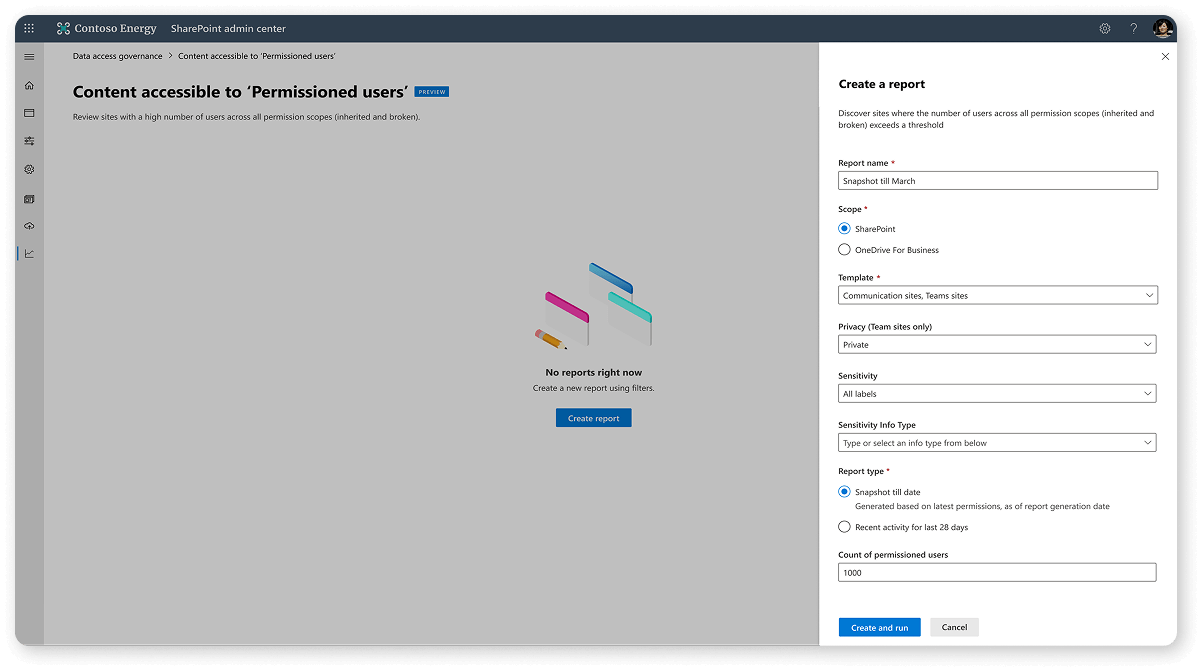
This is a significant limitation because a very important board site might be overshared if 20 people have access to it, while if 10,000 people have access to your intranet, it’s not overshared. But this is a current limitation of the tool, and we have to make the most of it for now.
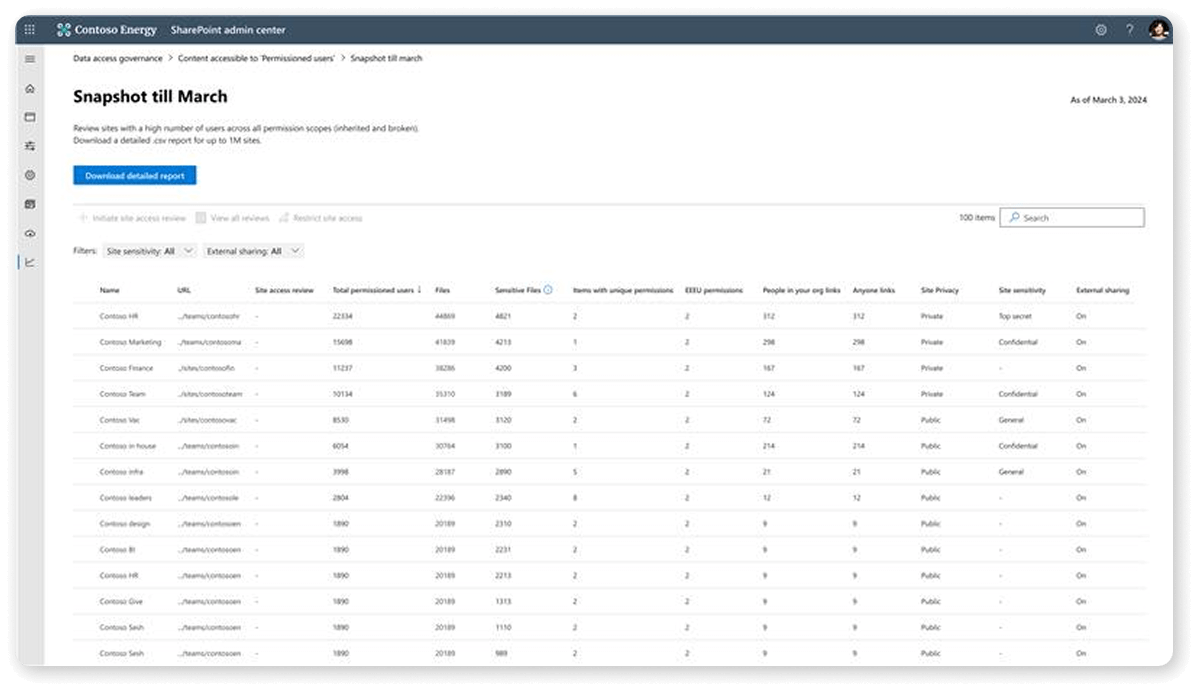
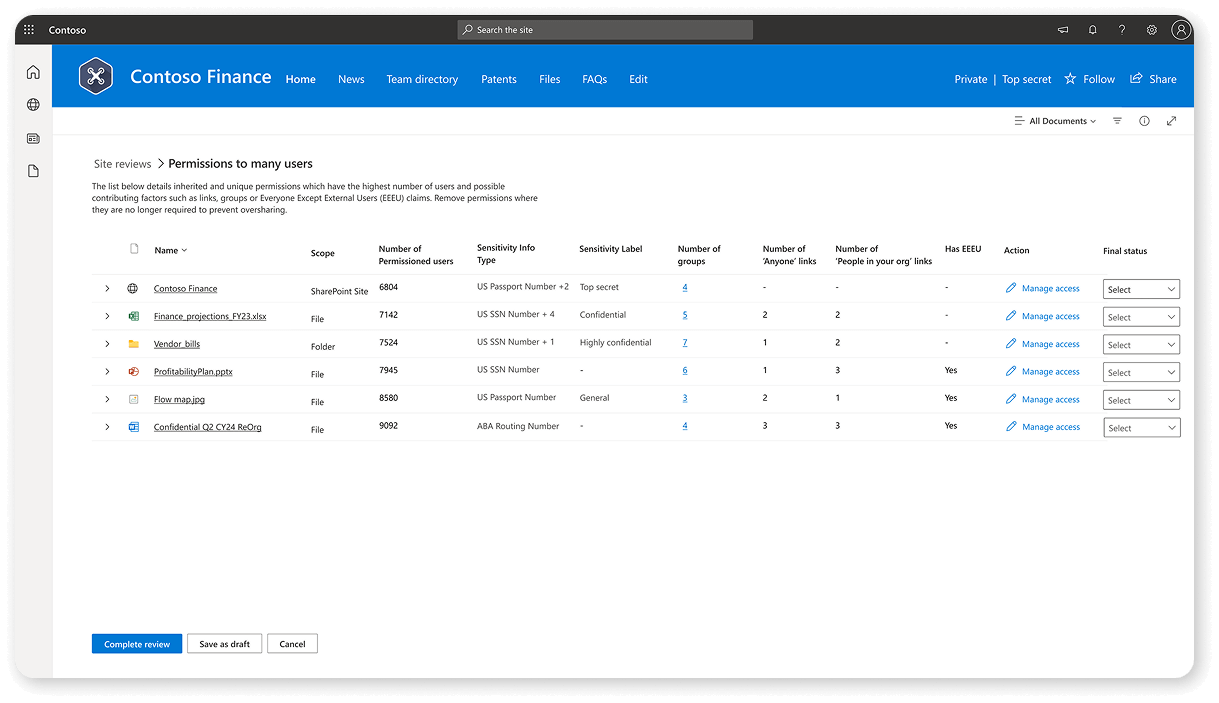
After the report finishes running, it will show you all your sites and the total permissioned users in each one, the number of files, and, more importantly, the number of sensitive files. This is connected to the Microsoft Purview Sensitive Information Types and allows you to prioritize the sites with the biggest number of potential files with sensitive information.
This report also tells you how many items have unique permissions, how many pieces of content are shared with Everyone Except External Users (EEEU), and how many links of the type “People in your org” and “Anyone” are created on that site.
After you look at the report, you can either tackle each site one by one as an IT admin and deal with the overshared content or initiate an access review. Site access reviews allow you to reach out directly to the site owner and then let them decide what permissions people should have on their site.
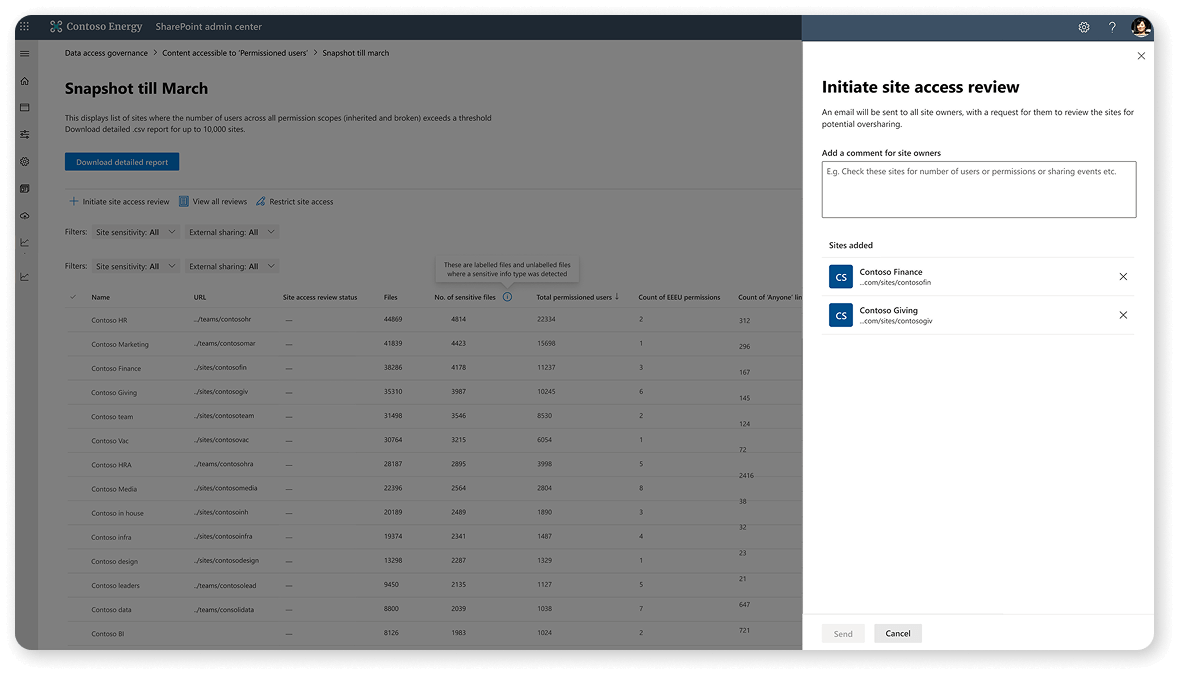
By using Site Access Reviews, you can free up the IT team’s time and let the site owners, who know the site best, decide the permissions. You can always do a second pass afterward to ensure that everything is only accessible to people who should have access to it.
Microsoft 365 Groups access reviews
In addition to the data access governance reports and SharePoint Premium access reviews, Microsoft 365 Groups also allow you to create periodic access reviews so group owners can review the membership of Microsoft 365 Groups. You can create them from the Entra ID portal. You can choose if you want to review either Select Teams + groups (for internal users) or All Microsoft 365 groups with guest users.
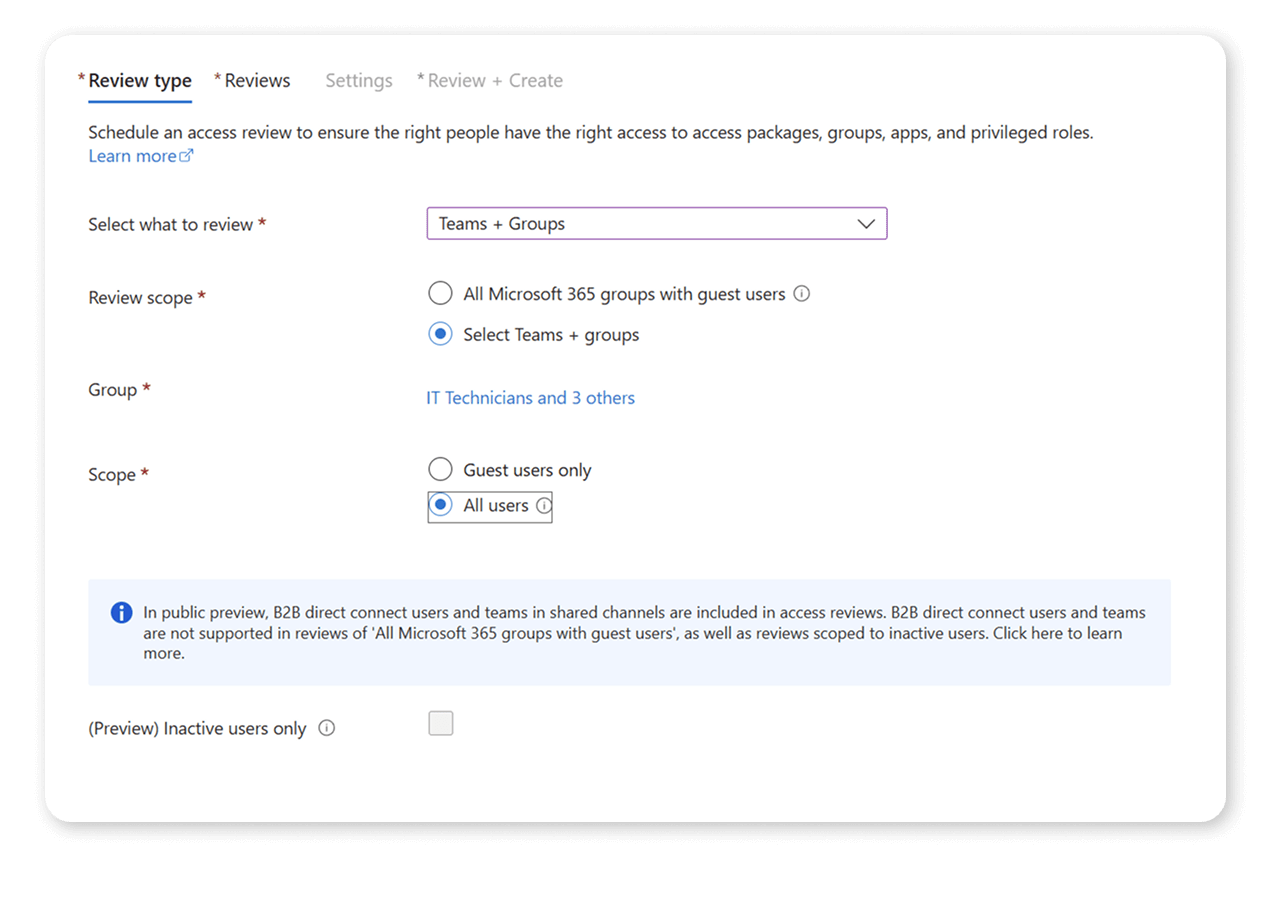
You can then select who the reviewers are, as well as the review recurrence. This way, you can have it on Autopilot and know that every 3 months, owners will need to review permissions to their Microsoft 365 groups.

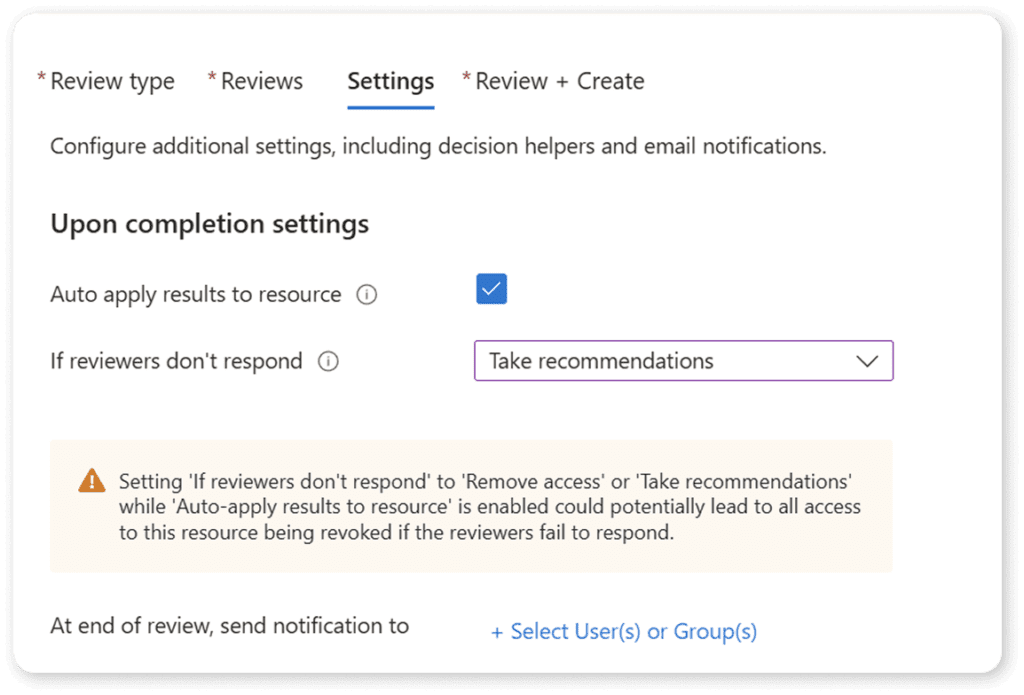
Finally, you can decide what happens if reviewers do not respond. Do you want to follow Microsoft’s recommendations or not change anything? The choice is yours.
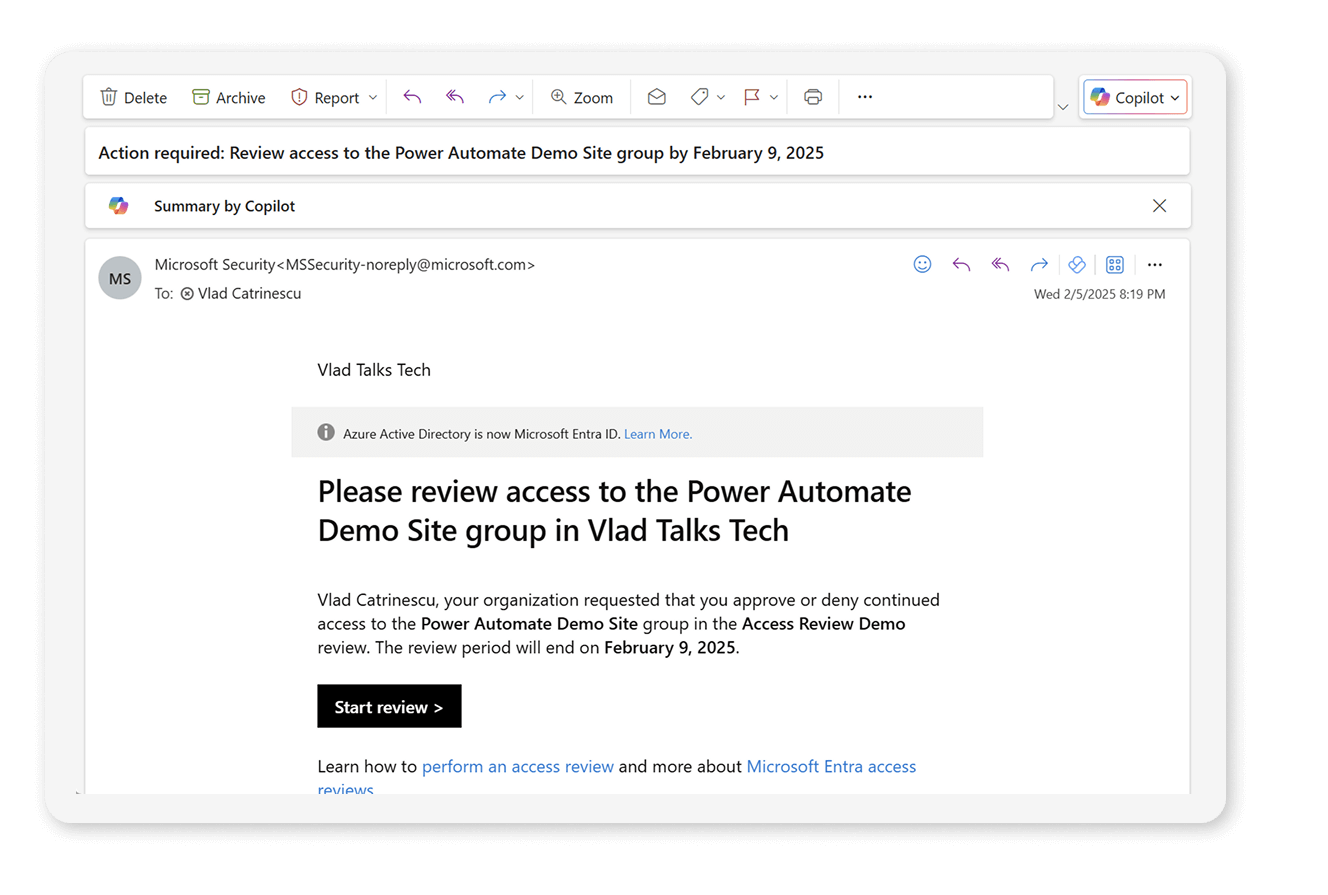
The group owners will receive an email asking them to review the membership of their groups and choose who should still have access to their group and who should be removed.
SharePoint Restricted Access Control (RAC)
Now that we talked about access reviews, what happens if a site is so sensitive that you want to make sure only people from a certain group have access to it? Or what if a site is so overshared that you want to put in some temporary restrictions on who can access it until the site owner and IT work together to fix the permissions in the site? Restricted Access Control (RAC), part of SharePoint Premium Advanced Management, is there to help.
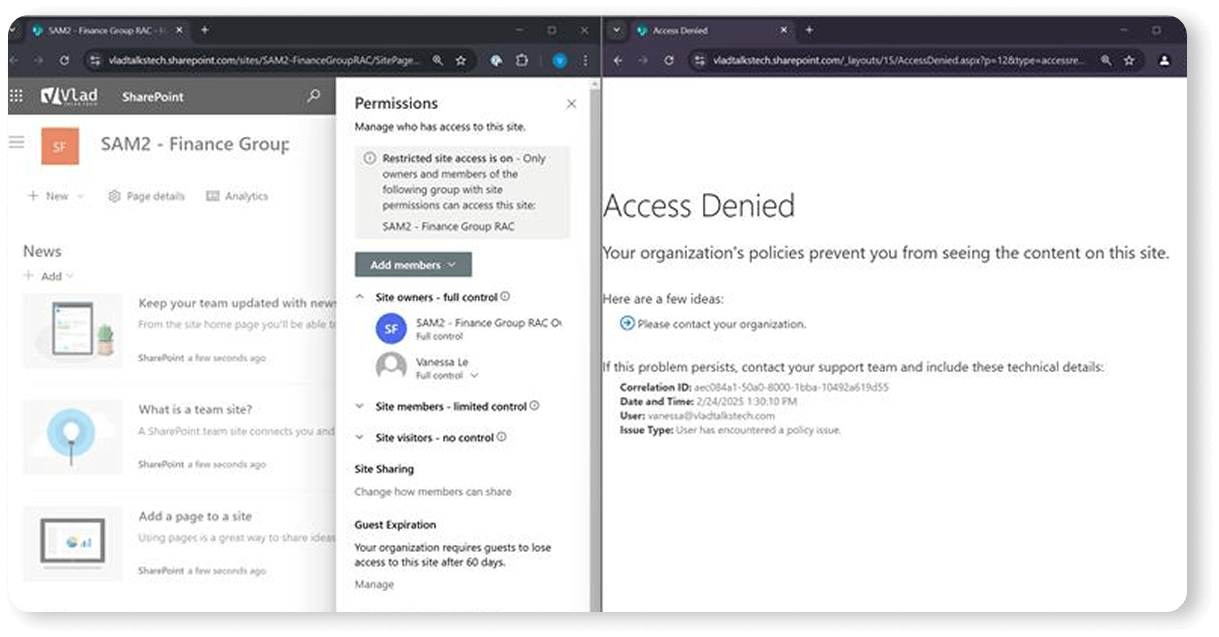
SharePoint Premium Advanced Management has two different configuration options depending on whether your site is Microsoft 365 group-connected. If the site is Microsoft 365 group-connected, turning on RAC will only allow members of the Microsoft 365 Group to access any content on the site, even if it was previously shared with other members.
In the example below, you can see Vanessa has access to the SharePoint site. Still, since we turned on RAC and Vanessa is not part of the Microsoft 365 group, Vanessa will get a policy error when trying to access the site.
Now let’s move on to the scenario where we have a standalone SharePoint site, such as a communication site or a standalone team site (#STS3). This allows you to restrict access to, let’s say, the HR site only to the HR security group while not breaking or touching any of the permissions underneath. Again, even if a user has access to an item, if they are not in the security group, they will get a policy error. You can add up to 10 security groups, and you can also use dynamic groups.
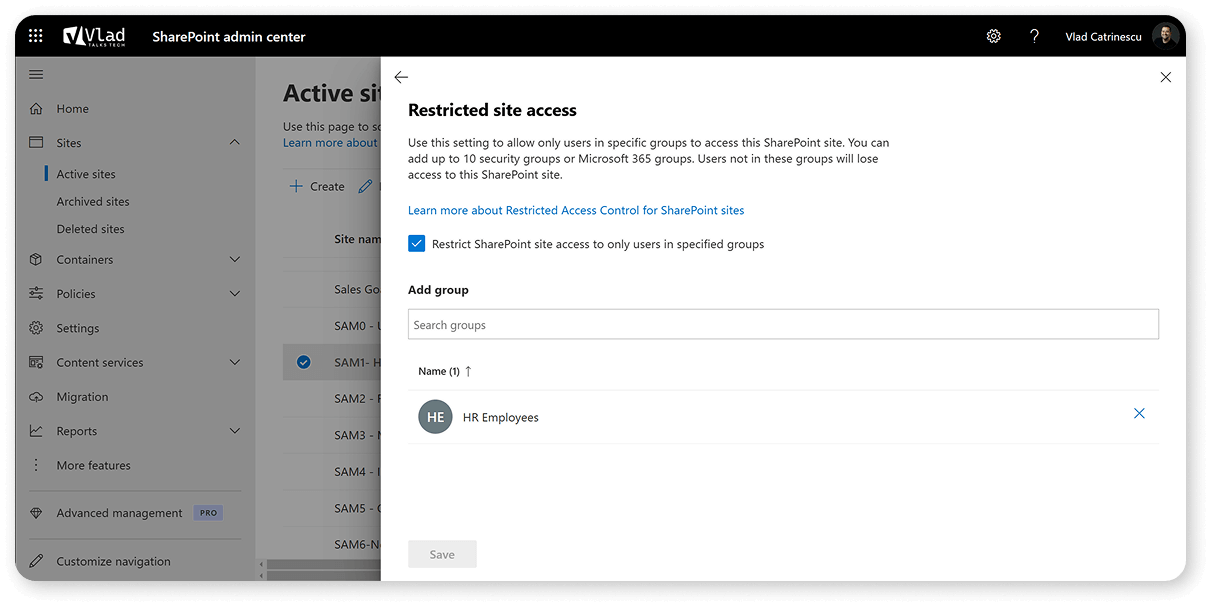
RAC allows you to have a temporary solution while you fix items on each file and library or a permanent solution on your most sensitive sites.
External sharing alerts
Suppose you configured all the external sharing settings in the previous section. In that case, you should feel pretty comfortable with external sharing. Still, if you want more visibility faster, Microsoft allows us to BCC an email distribution list on every external sharing invitation.
You can do this by using the Set-SPOTenant PowerShell cmdlet, for example:
Set-SPOTenant -BccExternalSharingInvitations $true -BccExternalSharingInvitationsList emailaddress@syskit.comThis lets you immediately see if external sharing is done inside your tenant. But, from our experience, while this sounds interesting, if you have configured your external sharing guardrails properly, most organizations disable this as it generates a lot of emails that someone needs to keep up with after.
Using the Microsoft 365 Audit Log to detect sharing
Before we go into the details, the Microsoft 365 Unified Audit Log is the audit log for all your Microsoft 365 activities. Every click you make, every file you see, the audit log is watching you. Each sharing activity is logged in there, and you can create different types and filters to find sharing activity, as well as alerts to be notified when content is shared. Please note, however, that there can be a few hours delay between when an activity happens and when it will show up in the unified audit log.
You cannot access the audit log only with the SharePoint Online administrator permissions; you must have extra permissions in the Purview admin portal.
To get to the Unified audit log, you can navigate to: https://purview.microsoft.com/audit
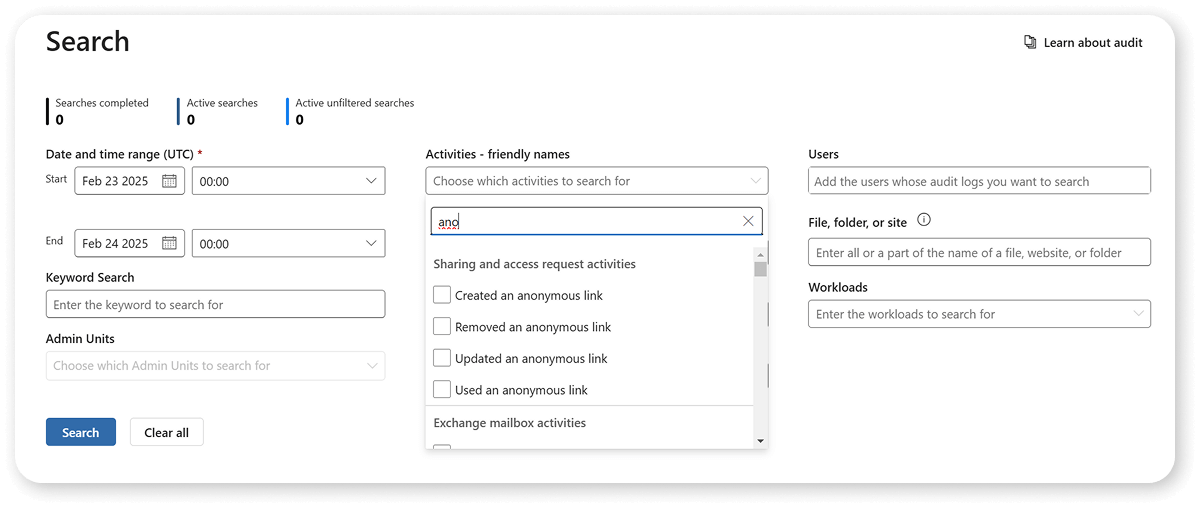
When you want to filter for sharing activities, here are the different activities logged for you in the audit log:
- SharingInvitationCreated: A user in your organization tried to share a resource (likely a site) with an external user. This results in an external sharing invitation sent to the target user. No access to the resource is granted at this point.
- SharingInvitationAccepted: The external user has accepted the sharing invitation sent by the acting user and now has access to the resource.
- AnonymousLinkCreated: An anonymous link (also called an “Anyone” link) is created for a resource. Because an anonymous link can be created and then copied, it’s reasonable to assume that any document that has an anonymous link has been shared with a target user.
- AnonymousLinkUsed: As the name implies, this event is logged when an anonymous link is used to access a resource.
- SecureLinkCreated: A user has created a “specific people link” to share a resource with a specific person. This target user might be someone external to your organization. The person with whom the resource is shared is identified in the audit record for the AddedToSecureLink event. The time stamps for these two events are nearly identical.
- AddedToSecureLink: A user was added to a specific people link. Use the TargetUserOrGroupName field in this event to identify the user added to the corresponding specific people link. This target user might be external to your organization.
Or, if you prefer, you can also simply use the friendly names available in the Audit log.
You can also set up alerts in Microsoft Defender to be notified proactively as soon as a sharing activity happens.

You can even configure the volume required or audience before an alert is triggered to prevent alert overload.
Implement Data Loss Prevention policies
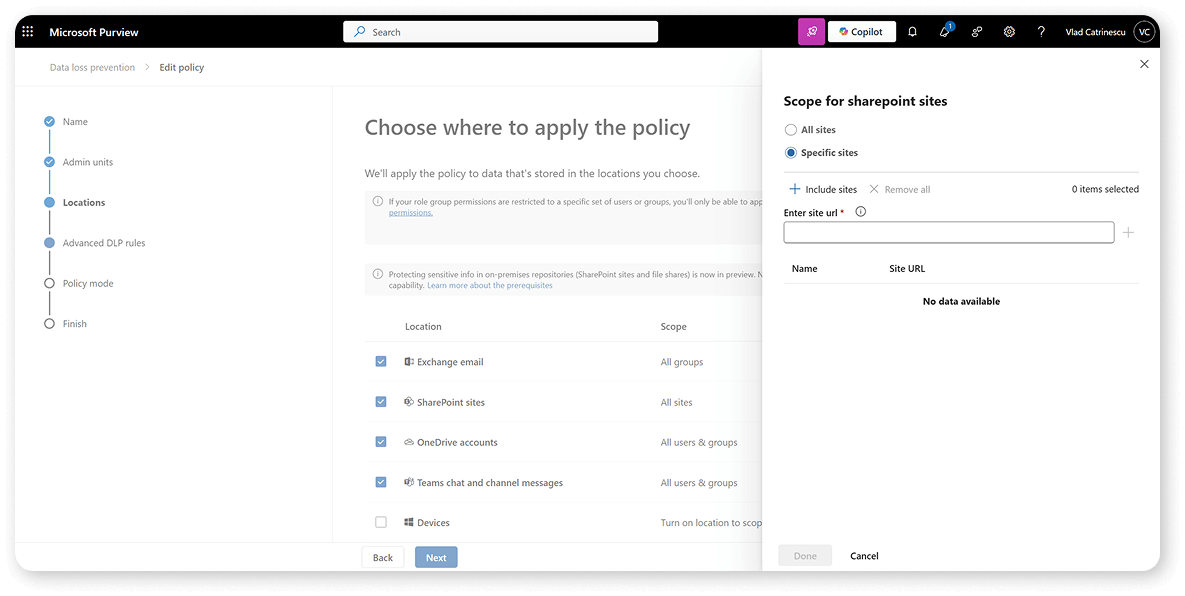
For the final part of this section, let’s talk about Data Loss Prevention, or DLP for short. DLP policies allow you to stop sensitive content from being shared in certain locations (or at all). In most organizations, information such as credit card numbers, passport numbers, or driver’s licenses should not be on the intranet, to which anyone can have access. You can create a new policy in the Purview Compliance Portal.
You can decide if the policy applies to all, or select SharePoint sites, OneDrive accounts, or if it applies to Microsoft Teams as well.
Next, you can decide what happens when certain sensitive information is found in those locations. For example, in this rule, if the content is only shared with people inside my organization and includes a credit card number, US bank account number, or ABA Routing number, we will restrict access to the content and notify users.
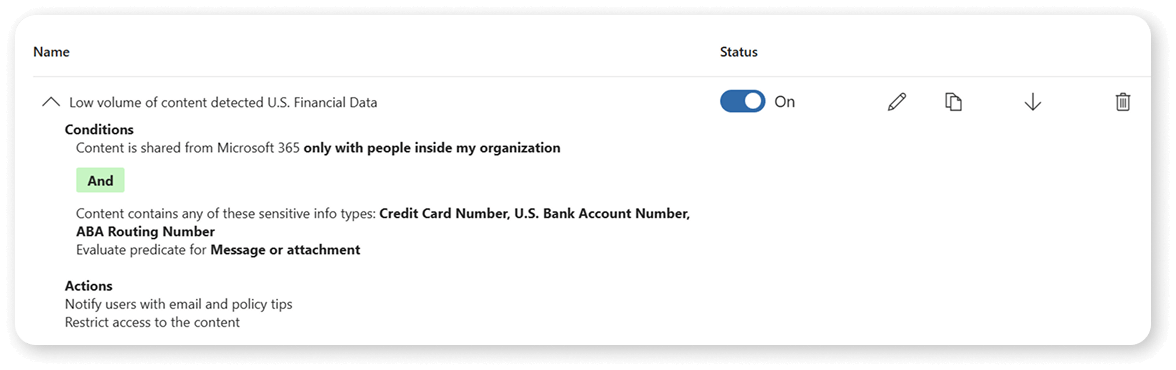
You can create different rules depending on how many instances of your sensitive information type are found, who the content is shared with (for example, you might just want a policy tip if shared internally but restrict access if shared externally), and even the confidence of the system about the content of the file.
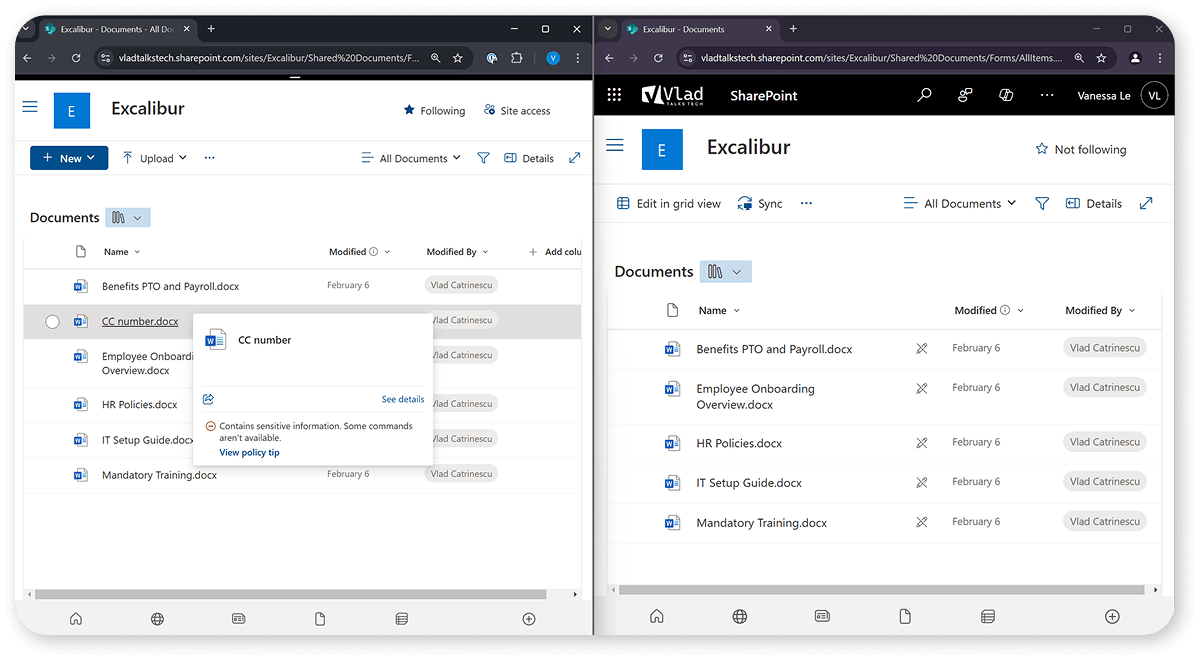
In the screenshot below, you can see a file with credit card numbers has been uploaded to the Excalibur intranet; however, the DLP policy caught it (left), so it’s restricted from site members of that site (right).
Advanced oversharing prevention checklist
Here’s a quick checklist that goes over all the items we’ve mentioned here in this section:
- Discover current oversharing with Data Access Governance.
- Secure sensitive sites with Restricted Access Control.
- Implement SharePoint and Microsoft 365 Groups Access Reviews to empower workspace owners to remove users who do not need access anymore.
- Implement DLP Policies to ensure sensitive content is only accessible in specific sites.
- Set up alerts when unusual sharing happens with Defender Alert Policies or SharePoint tenant policies.
Final thoughts and recommendations on oversharing
In this section of our oversharing guide, we discussed more advanced options on how to discover existing oversharing using Data Access Governance reports, as well as implement advanced features such as access reviews, restricted access control, and data loss prevention policies to ensure that if any oversharing happens, it gets removed as soon as possible.
While we always recommend and encourage you to offload a lot of this work to workspace owners with access reviews, admins need to keep an eye out for unusual activities by using the alert mechanisms we discussed.