Office 365 retention policies and labels
Table of contents
It has been a long way from Office 365 labels, originally developed as retention labels, to Azure Information Protection labels, now commonly used for content access control. You can learn more about protection history and sensitivity labels in one of our previous posts or explore Office 365 data governance in a comprehensive eBook.
Why do we need Office 365 data retention?
Each organization can have several reasons that will require them to retain certain data for a specific time. Whether it be emails, documents, contracts, etc., data retention is often a tricky subject. There can be many discrepancies in retaining different data, for how long, and what to do with it after the retention period has passed.
Let’s take a look at financial records, for example. You can be obliged by the government to keep all financial records for five years. So, you need to keep all your client contracts, data, and other financial records, as well as all the receipts for office supplies, papers, coffee, etc. We can all agree that you won’t treat all those files the same way, nor give access to them to anyone. You’d want to define a rule to delete all those office supply receipts automatically after the retention period has passed. Also, you’d want to archive all the contracts with critical financial data and define who has access to those documents.
What are Office 365 retention policies?
Data retention policies are a Microsoft 365 compliance feature that can be used to govern information vital for your organization. Retention policies can help you to:
- Comply proactively with industry regulations and internal policies that require you to keep content for a minimum period.
- Reduce your risk of litigation or a security breach by permanently deleting old content.
- Share knowledge effectively inside the organization and be more agile by ensuring that your users work only with current and relevant content.
As you have already noticed, data retention sums up to only two actions:
- Retain content
- Delete content
Using these two actions, we can configure retention settings for the following scenarios:
- Retain-only: Retain content forever or for a specified period.
- Delete-only: Permanently delete content after a specified period.
- Retain and then delete: Retain the content for a specified period and then permanently delete it.
For more detailed information about retention policies and retention labels, please look at this Microsoft document.
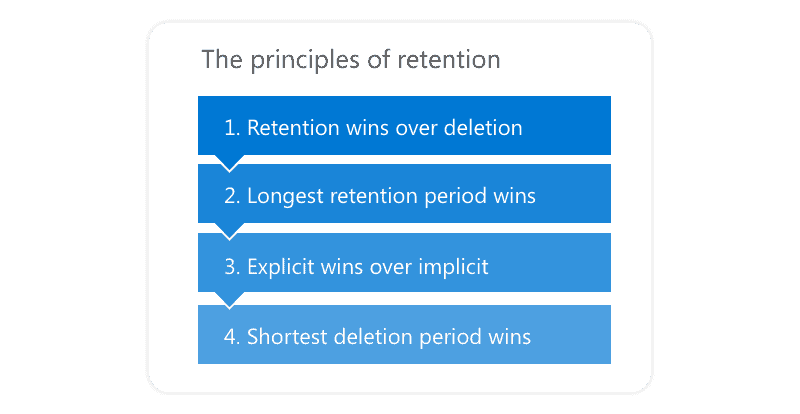
The principles of retention
In everyday use in your organization, you are most likely to have multiple retention policies in place. In most cases, the same content will have several policies applied simultaneously. Each of those policies can have different retention actions and different retention periods. Don’t worry; things are straightforward with Microsoft’s retention principles. They allow us to determine which policies take precedence over others without worrying about one policy setting overwriting the others.
The following image provided by Microsoft represents the principles of retention.
Office 365 retention policies and retention labels
Using retention policies and retention labels with retention policies, you can assign your retention settings to your content. You can use just one of these methods or combine them.
We can use a retention policy to assign the same retention settings at a site or mailbox level. To assign retention settings at an item level (folder, email, document), we should use a retention label.
For example, if all emails in the mailbox should be retained for seven years, it is easier to use a retention policy on the entire mailbox than to apply the same retention label on all the emails. But in case we want to keep some of the emails for three years and some for five, then we need to apply retention labels at the item level.
Suppose you move your content to a different location within your M365 tenant. In that case, retention labels will migrate with the content, unlike retention policies that are bounded to content containers and apply only to the content within.
Retention labels have the following capabilities that retention policies do not:
- Start the retention period based on the content labelling date, an event date, age of the content, or modification date.
- Use trainable classifiers to identify content to label.
- Apply a default label for SharePoint documents.
- Support disposition review for the content before it is permanently deleted.
- Mark the content as a record in the label settings to prove disposition when content is deleted.
Retention policies
Retention policies can be used at the container level, such as:
- Exchange email
- SharePoint site
- OneDrive account
- Microsoft 365 Groups
- Skype for Business
- Exchange public folder
- Teams channel messages
- Teams chat
- Yammer community
- Yammer private messages
The same policy can be applied to multiple locations or a specific set of locations or users. Items located in one of those containers inherit retention settings from their containers specified in the retention policy. If we move an item outside of the container with a retention policy, a copy of that item is retained in the workload’s secured location. It is important to remember that when an item is moved to a new location, retention settings do not travel with it. If you need that, you should use retention labels.
Microsoft created a nice table where you can see the differences between retention labels and policies.
Retention labels
As already stated, when we need to apply different retention settings for several types of content, we should use retention labels. For example:
- Financial forms that should be kept for a minimum period.
- Project data that needs to be retained for a specific period and permanently deleted afterward.
- Public materials that should be deleted after a certain amount of time.
In the mentioned examples, retention labels allow us to apply retention settings at the item level (email, folder, document).
With retention labels, we can do the following:
- Apply retention labels to content automatically if it triggers specific conditions like containing specific types of sensitive information, keywords, or patterns (trainable classifier).
- Start retention period on an event like project closure or employee offboarding.
- Start retention period from the time when the content was labeled.
- Apply a default retention label to a document library, folder, or document set, so that all documents in that location inherit the default retention label.
Suppose you need to use a records-management solution to manage regulatory, legal, and business-critical records across your corporate data. In that case, you can mark items as a record with retention labels. When this happens and the content remains in Microsoft 365, the label places further restrictions on the content for regulatory reasons. Find more information about records management.
Create Office 365 retention labels and apply them
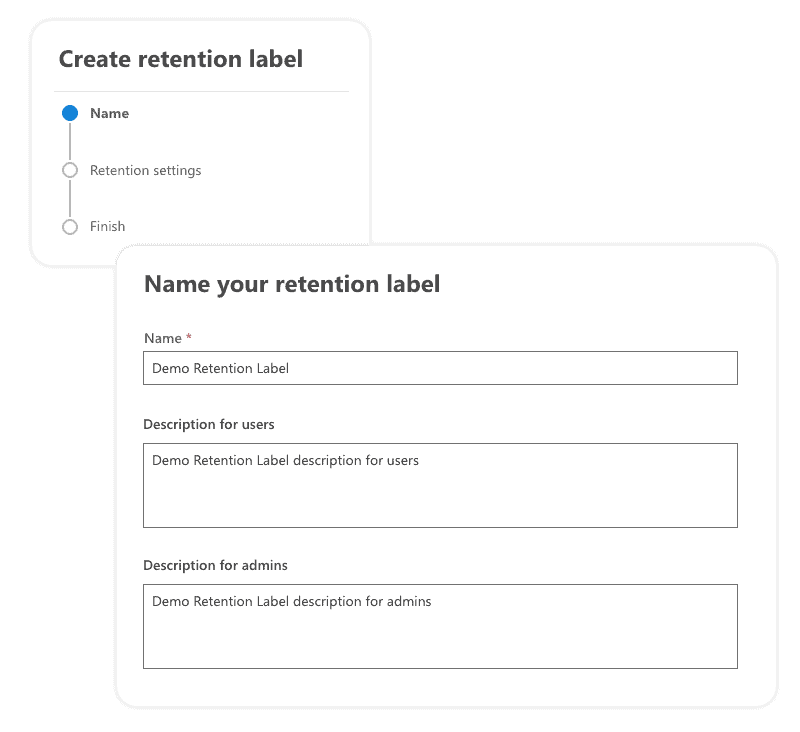
Create a retention label
- Navigate to the Microsoft 365 compliance center.
- Under Solutions, select Information Governance, go to the Labels tab, and click on Create a label as shown on the image below:

- The Create retention label wizard is open where we need to specify the retention label name and description.
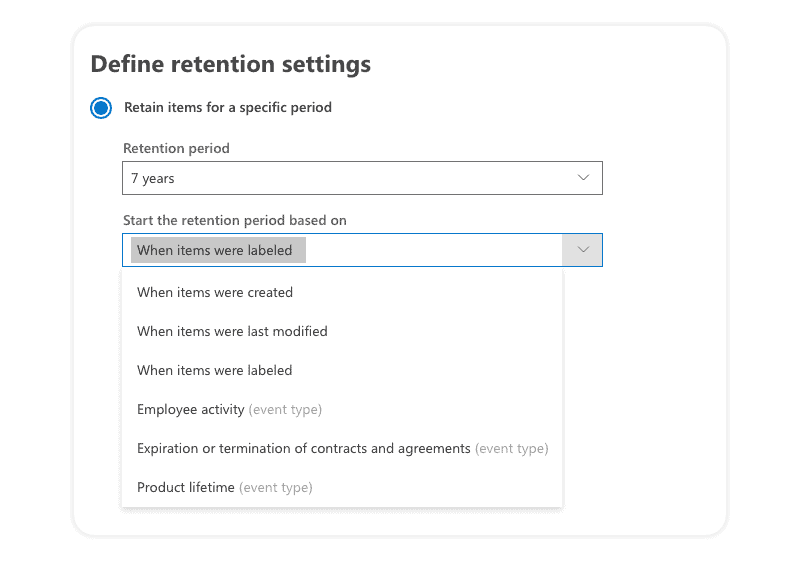
- The next step is essential because this is where we define our retention label settings.

As you can see, it is possible to:
- Retain items for a specific period -> choose between predefined ranges or set a custom retention period.
- Define what will trigger the retention period:
- Also, we can define whether we would like to delete an item automatically, trigger a disposition review, or do nothing with it after the retention period has passed.
- Define what will trigger the retention period:
- We can choose to retain items forever, delete them after reaching a certain age, or do nothing with them (in case we want to classify items).
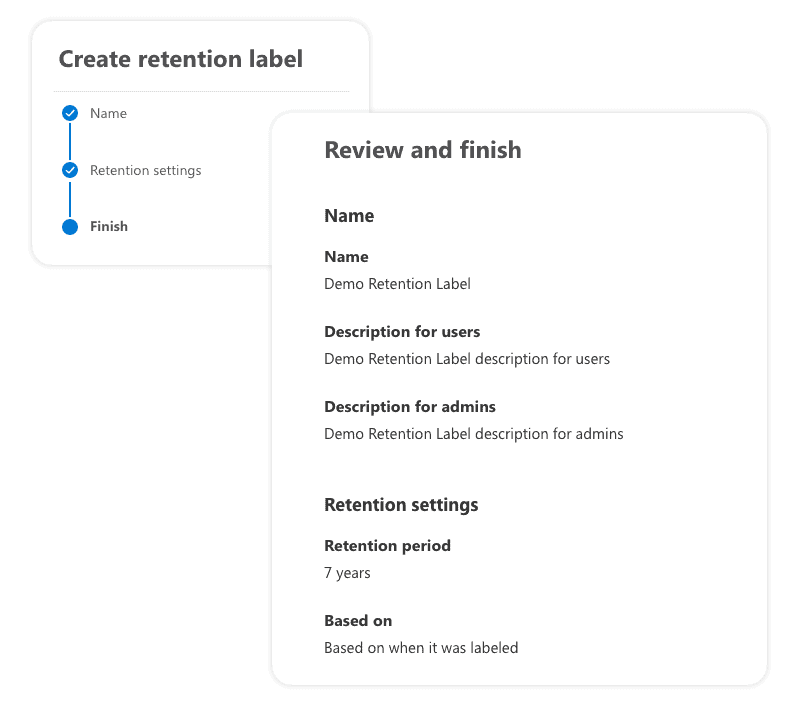
- In the end, we need to review and confirm the retention label creation.
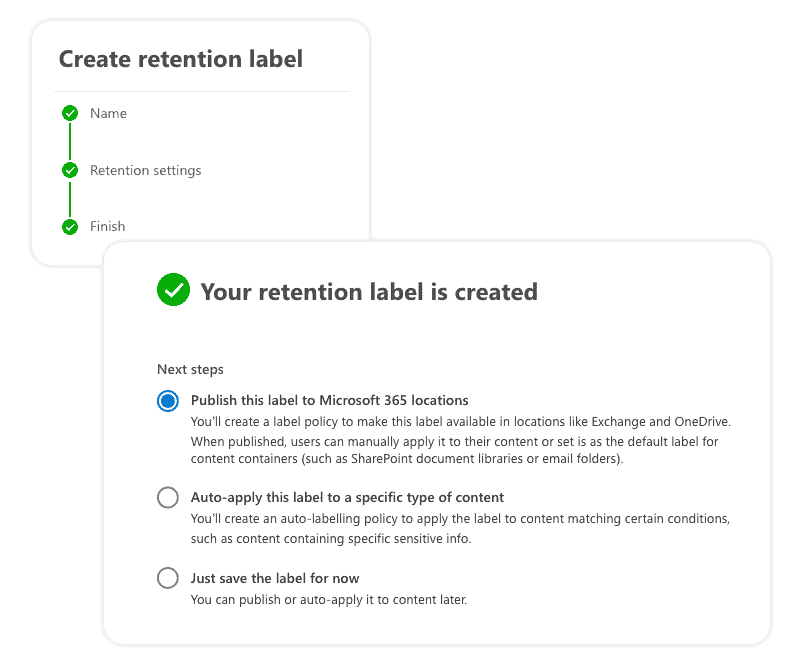
- After the label is created, we have the option to define our next steps. We can publish this label, set an auto-apply rule to a specific type of content, or save it and publish it later when you are ready.
Apply labels using label policies
After creating our retention labels, just like with sensitivity labels, we need to publish them. When you publish labels to locations such as Outlook and SharePoint, users can manually apply the labels to retain their content. Users can also auto-apply labels to content that matches their conditions (such as content containing specific sensitive info).
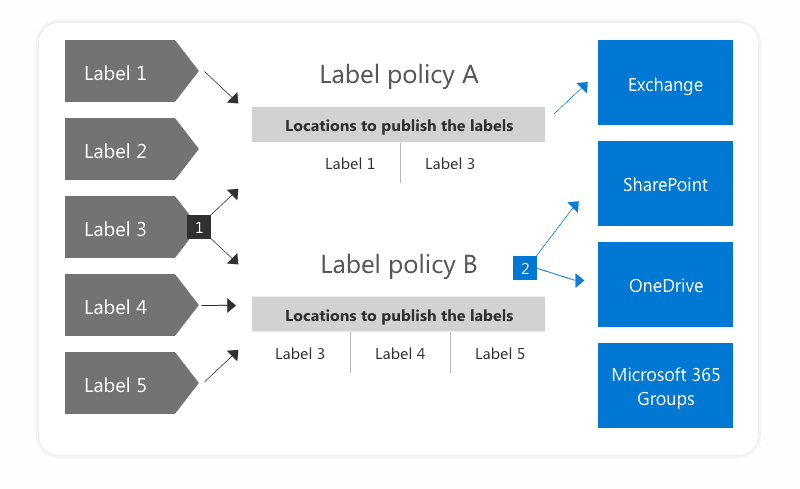
A single retention label can be included in multiple retention label policies. Retention label policies specify the publish locations of selected retention labels.
The following diagram on Microsoft docs visualizes the relations between retention labels, retention policies, and publish locations.
The following steps will show how to create a retention label policy and publish retention labels.
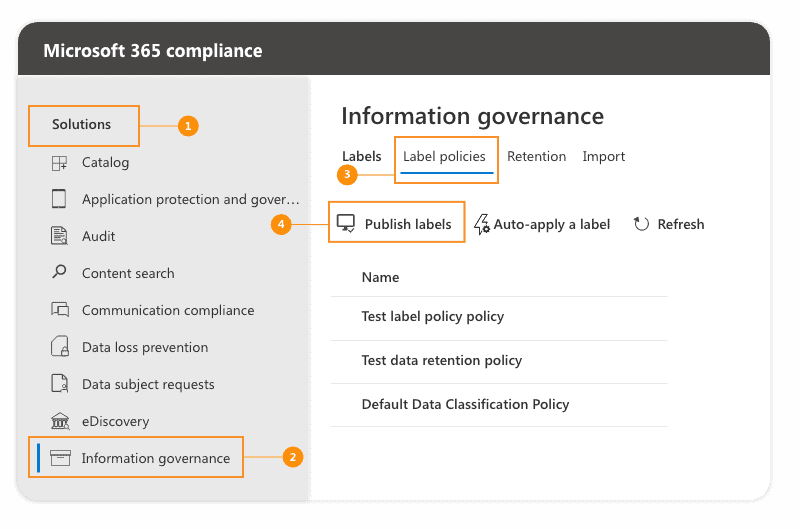
- Navigate to the Microsoft 365 compliance center.
- Under Solutions, select Information Governance and go to the Label policies tab and click on Publish labels as shown on the image below:
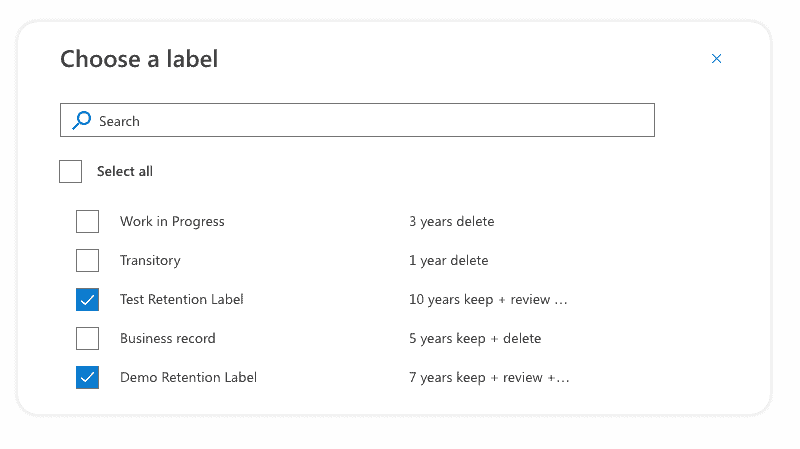
- The Create retention policy wizard is open where the first thing to do is selecting retention labels we want to publish.
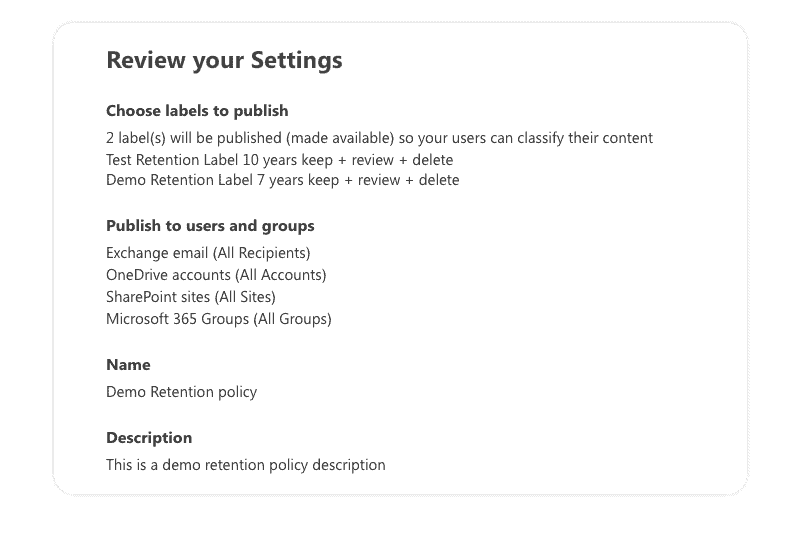
- The next step is to choose locations (Exchange, SharePoint, OneDrive) where we want to apply the selected retention labels.

- In the end, we need to name our policy, write some descriptions if we want, and review the settings.
Keep in mind that it can take up to 24 hours for labels to become available to your users.
Subscription, licensing, and permissions requirements
Many different retention features are available in different subscription packages. To see what you can use in your licenses, check out Microsoft 365 licensing guidance for information governance.
Members of your organization that will be in charge of creating and managing retention policies need permissions to access the Microsoft 365 Compliance center. Usually, your global admin can give them access by assigning them to the Compliance Administrator role group or adding the Retention Management role to a new group. You can even use a read-only role (View-Only Retention Management) if you want certain users to only have viewing permissions.
Keep in mind that these roles are only needed to create, configure, and apply retention policies and labels. The person in charge of configuring these policies and labels doesn’t require access to the content protected by them.
Limits
If you plan to use retention labels and policies in your organization, here are some limitations you should be aware of.
- A single tenant can have a maximum of 10,000 policies (any configuration). This maximum number includes the different policies for retention and other policies for compliance, such as DLP policies.
- The maximum number of policies for retention per workload:
- Exchange Online (any configuration): 1,800
- SharePoint or OneDrive: (all sites automatically included): 13
- SharePoint or OneDrive (specific locations included or excluded): 2,600
- Suppose you use the optional configuration to scope your retention settings to specific users, specific Microsoft 365 Groups, or specific sites. In that case, you need to be aware of a maximum number of items per retention policy:
- 1,000 mailboxes (user mailboxes or group mailboxes)
- 1,000 Microsoft 365 Groups
- 1,000 users for Teams private chats
- 100 sites (OneDrive or SharePoint)
Final thoughts
Microsoft retention labels and policies can be a handy tool if you know how to set it up correctly for your organization. It can help you a lot with governance and archiving important content, primarily if you use them combined with Sensitivity labels and Data loss protection.
If you haven’t already, try it out and see if you can get some benefits from it. If you need some help with governing your Microsoft 365 tenant, check out Syskit Point and its helpful features.


