Office 365 Sensitivity Labels
Table of contents
To be able to work and understand what sensitivity labels are, we need to know how we got to where we are now.
Information Protection Legacy
Until now, label configuration was done in the Azure portal. Protection templates were created in the Azure Information Protection section of the Azure portal. AIP was also used to label client computers with the right-click option Classify and Protect, or by labeling documents and information in Office apps.
We were also allowed to create labels in the Office 365 portal, and that was a recipe for disaster because those two were not aware of each other. AIP labels and the Office portal labels could do the same in many areas, but the client version you downloaded would decide from which portal the settings would retrieve.
Today we could say that we have feature parity, and now, sensitivity label configuration is done in the Security portal. The Security portal offers new sensitivity labels and a new way to apply them to on-premises file servers or SharePoint.
Azure Information Protection labels can be used by the classic Azure Information Protection client on Windows computers but can’t be used by devices running macOS, iOS, or Android. Microsoft recommends avoiding creating sensitivity labels until you activate unified labeling in the Security portal. If you are still using Azure Information Protection labels, migrate them to sensitivity labels.
The metadata applied by both sets of labels are compatible, so you don’t need to relabel documents and emails when the migration is complete. Learn more about how to migrate your Azure Information Protection labels to unified sensitivity labels. Keep in mind that label management for Azure Information Protection labels in the Azure portal is being deprecated March 31, 2021. More information about that can be found in the Microsoft deprecation notice.

Office 365 Sensitivity Labels
Sensitivity labels enable us to classify and protect sensitive data within the file and the file itself. It will stay persistent with that file regardless of the file location. This way, users can continue to collaborate and let the sensitivity label worry about the protection.
Applying sensitivity labels enables you to state how certain sensitive data is in your organization. For example, a specific project name might be highly confidential within your organization, while that same term is not confidential to other organizations.
A sensitivity label in the Office apps appears to users like a tag on an email or document. Each item of content can have a single sensitivity label applied to it. An item can have both a single sensitivity label and a single retention label applied to it.
When you assign a sensitivity label to a document or email, it’s like a stamp that’s applied to content that is:
- Customizable – you can create categories for various sensitive content levels in your organization, such as Personal, Public, General, Confidential, and Highly Confidential.
- Clear text – the label is stored in clear text in the content’s metadata; third-party apps and services can read it and then apply their protective actions if required.
- Persistent – after you apply a sensitivity label to content, the label is stored in that email or document’s metadata. This means the label roams with the content, including the protection settings, and this data becomes the basis for applying and enforcing policies.
What we can use Office 365 Sensitivity Labels for
- Enforce protection settings such as encryption or watermarks on labeled content. For example, your users can apply a Confidential label to a document or email, and that label can encrypt the content and apply a Confidential watermark.
- Protect content in Office apps across different platforms and devices. For a list of supported apps, see Use sensitivity labels in Office apps.
- Protect content in third-party apps and services by using Microsoft Cloud App Security. With Cloud App Security, you can detect, classify, label, and protect content in third-party apps and services. Some of the supported services are Salesforce, Box, Dropbox, and even the third-party apps or services that do not read or support sensitivity labels.
- Extend sensitivity labels to third-party apps and services. Using the Microsoft Information Protection SDK, third-party apps can read sensitivity labels and apply protection settings.
- Extend sensitivity labels to Power BI. When you turn on this capability, you can apply and view Power BI labels and protect data saved outside the service.
- Classify content without using any protection settings. You can also assign a classification to content (like a sticker) that persists and roams with the content as it’s used and shared. You can use this classification to generate usage reports and see activity data for your sensitive content. Based on this information, you can always choose to apply protection settings later.
Permissions required to create and manage sensitivity labels in Office 365
To create and manage sensitivity labels, you need to have access to one of the admin centers (Microsoft 365 Compliance center, Microsoft 365 security center, Security & Compliance Center). Global administrators have access to admin centers and can give compliance officers and other users non-admin access.
For this delegated limited admin access, it is necessary to go to one of these admin centers’ Permissions page and then add new members to a Compliance Data Administrator, Compliance Administrator, or Security Administrator group.
If you prefer giving permissions to groups, you can create a new role group and add either the Sensitivity Label Administrator or Organization Configuration role to this group. For read-only access, use Sensitivity Label Reader, a new role that initially supported just the Office 365 PowerShell labeling cmdlets.
Set up your Office 365 Sensitivity Labels
After we have enabled unified sensitivity labels and configured the necessary roles and permissions, we are ready to create and publish some sensitivity labels and see them in action.
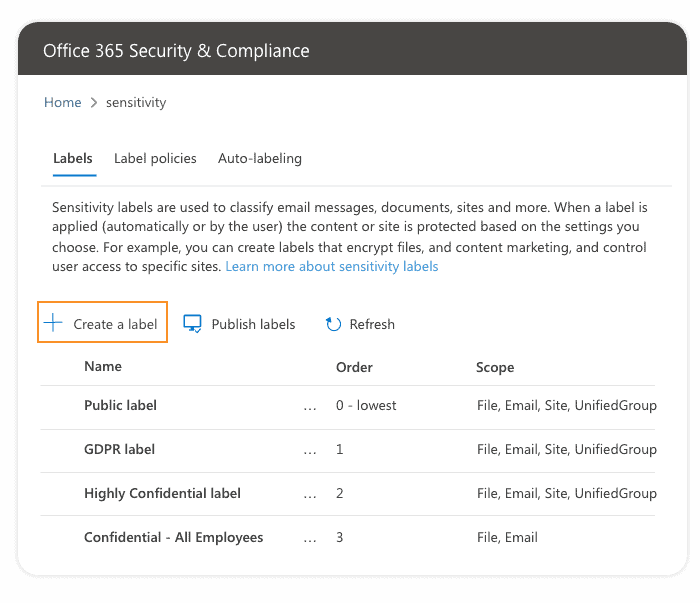
- Let’s begin by opening the Microsoft 365 Security & Compliance center and selecting Sensitivity labels in the Classification menu.
2. The next step is to fill out some necessary information about the label you are creating such as shown in the following image:

3. Now we need to define the label scope, which determines two things:
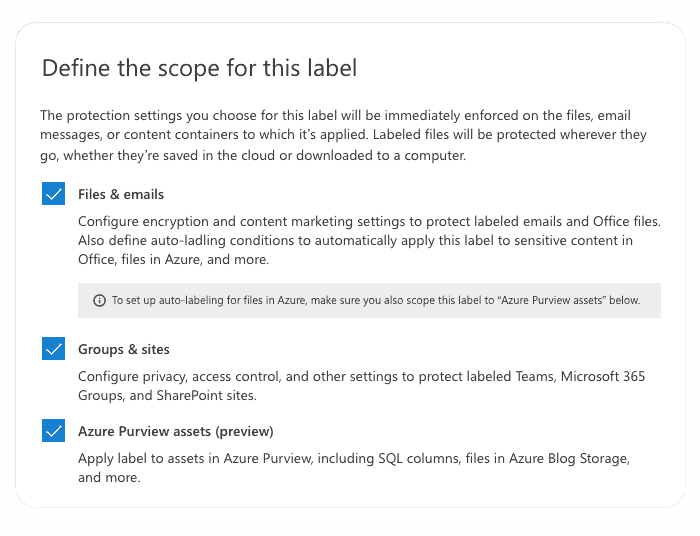
Scope configuration lets you define sensitivity labels used just for documents and emails and can’t be selected for containers and vice versa.
4. After the label scope is defined, we can do additional configuration and define what will be done for each of the selected scopes.
Encryption
Using encryption, we can control who can access files and email messages that have this label applied. It is possible to assign permissions only to specific users, groups, and domains, or we can let users apply the policy to choose who can have access to labeled content. There is also the possibility to control offline access and even set content expiration date.
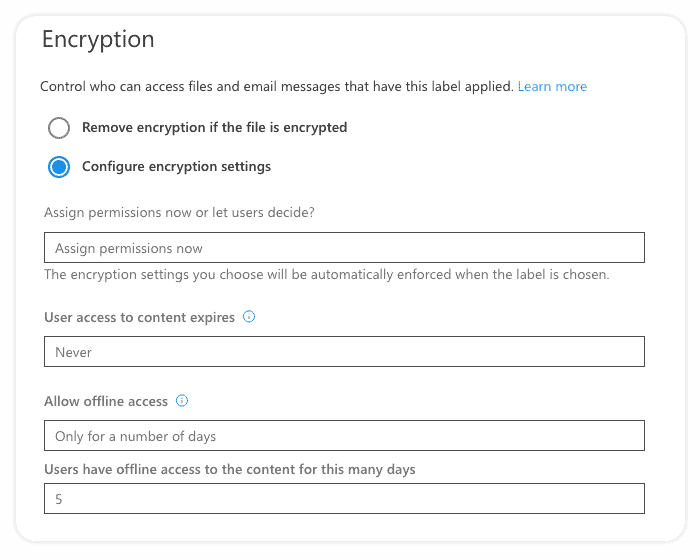
You can even configure a Double Key Encryption service for your most sensitive data.
Content Marking
Content marking is mostly self-explanatory, you can configure whether you want to apply a watermark, footer, header, or all of them, and you can configure text, font color, and size.
Auto-Labeling
Auto-labeling rules and configuration is another topic in itself. You can use sensitive-info types and trainable classifiers to create rules to suggest or apply the label automatically when sensitive content is detected in documents and emails. This will help you protect your most sensitive data from leaving the company’s digital environment.
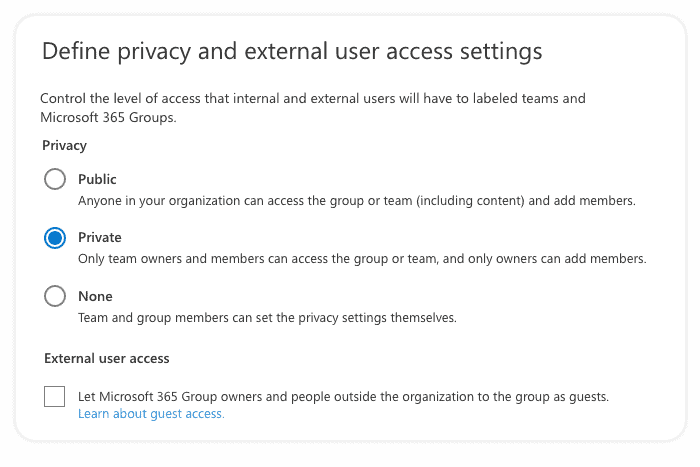
5. The next step is to define privacy and external user access settings. Here we can choose whether to allow group owners to add people outside of your organization as guests and who will have access from your organization.
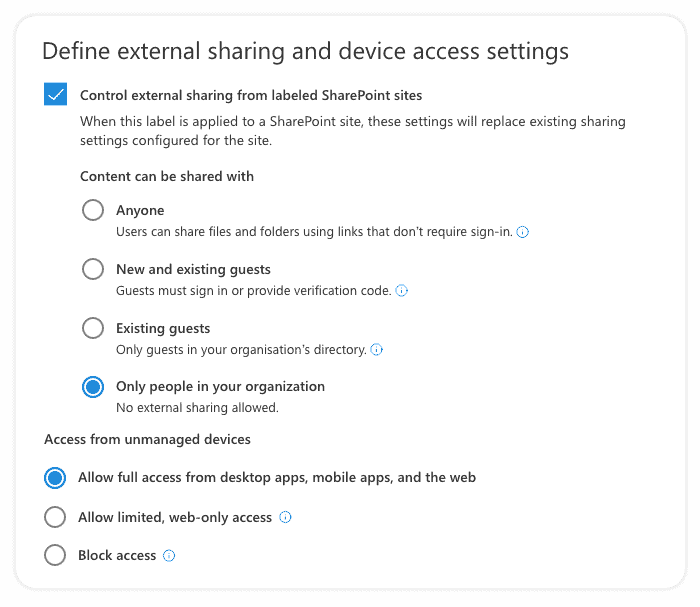
6. After that, we need to define external sharing and device access settings. We can control external sharing from labeled SharePoint sites at this screen, which will replace existing external sharing settings configured for the site, as shown in the image below. We can also manage access from certain device types.
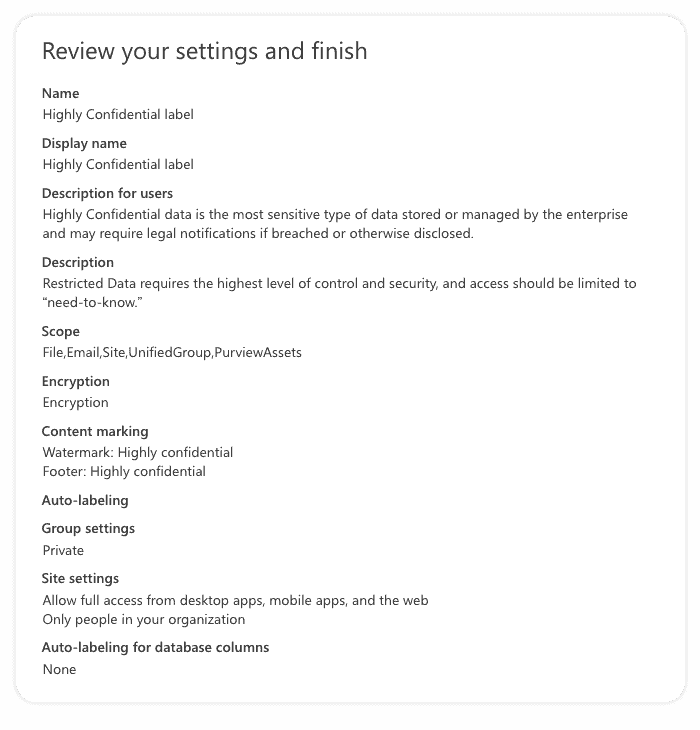
7. In the last step, we need to review our sensitivity label settings and click on the create label button if everything looks ok. If something is wrong, you can always click on the step you want to reconfigure and update settings.
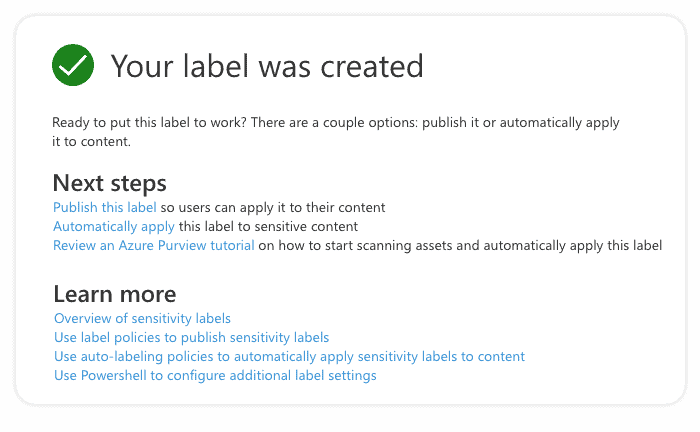
If everything went ok, now you should see a confirmation screen like this:
You can do all of this using PowerShell, too. Here, you can find detailed instructions and code snippets: Create and publish sensitivity labels – Microsoft 365 Compliance | Microsoft Docs.
- After sensitivity labels have been created, you need to make your sensitivity labels available to users by posting them using the sensitivity label policy.
Grouping sensitivity labels and label priority
Created labels appear in a list on the Sensitivity tab on the Labels page. In this list, the order of the labels is important because it reflects their priority. You want your most restrictive sensitivity label, such as Highly Confidential, to appear at the bottom of the list, and your least restrictive sensitivity label, such as Personal or Public, to appear at the top.
It is possible to group one or more labels using sub-labels below a parent label that a user sees in an Office app. For example, under Confidential, your organization might use several different labels for specific types of that classification.
Sublabels don’t inherit any settings from their parent label. When you publish a sublabel, a user can apply the sublabel but can’t apply just the parent label to content. If you choose a parent label as the default label or configure a parent label to automatically apply (or recommend), it won’t apply to the content.
What Office 365 label policies are good for
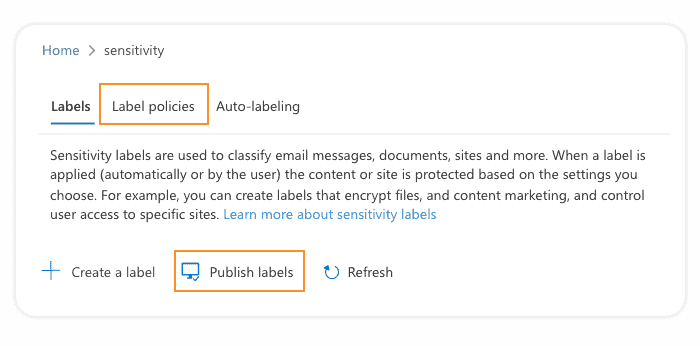
You can create a new label policy by selecting Publish labels or selecting the label policies tab on the sensitivity labels page.
You can use Label policies to:
- Publish sensitivity labels to any specific user or email-enabled security group, distribution group, or Microsoft 365 group (which can have dynamic membership) in Azure AD.
- Apply a default sensitivity label to all new documents and emails created by the users and groups included in the label policy.
- Require a justification from a user for changing or removing a sensitivity label.
- Implement mandatory labeling – you can require that a sensitivity label must be applied before users can save documents and send emails.
- Provide instructions for your users by implementing a help link to a custom help page.
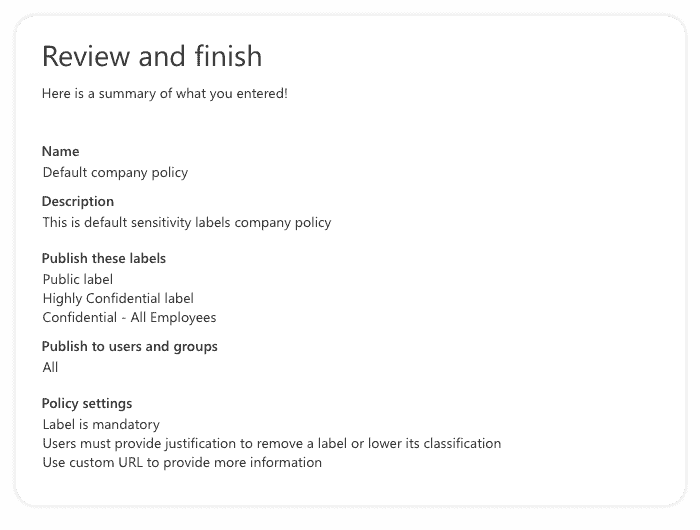
After configuring policy settings, we will see another review screen to check everything we configured for sensitivity labels we wish to publish using this label policy:
You can include a user in multiple label policies, and a user will see all the sensitivity labels from those policies. However, a user gets the policy settings from only the label policy with the highest priority, so you need to prioritize your policies; the same goes for sensitivity labels priority.
Good to have in mind
Few limitations are good to know about before you start creating your sensitivity labels
- Watermarks are limited to 255 characters.
- Headers and footers are limited to 1024 characters, except in Excel.
- Excel has a total limit of 255 characters for headers and footers, but this limit doesn’t include visible characters, such as formatting codes. If that limit is reached, the string you enter is not displayed in Excel.
- There is no limit to the number of sensitivity labels that you can create and publish, with one exception: If the title applies encryption, there is a maximum of 500 labels.
- The order of the sensitivity label policies is essential because it reflects their priority.
- You can include a user in multiple label policies, and the user will see all the sensitivity labels from those policies. However, a user gets the policy settings only from the label policy with the highest priority.
- If you use retention labels in addition to sensitivity labels, it’s important to remember that priority matters for sensitivity label policies but not for retention label policies.
- Understand the licensing for AIP P1, P2 and AIP for Microsoft Office 365.
- You can find more information on choosing which AIP client to use.
- After you have migrated your labels, you will use both AIP and Microsoft 365 admin areas to manage labels and their policies.
- You can use both solutions at the same time but with only one client.
- iOS, Android, and Mac for Office all require unified labeling as it is built-in vs. AIP.
- If you delete a sensitivity label, the label is not removed from existing content, and any protection settings continue to be enforced on content that had that label applied.
- If you edit a sensitivity label, the version of the label that was applied is enforced.
- More details on understanding Unified Labelling migration
Final thoughts
Sensitivity labels are a powerful tool that can help increase your Office 365 data security and force your employees to be more careful with data sharing. Using tags, you can easily track your content’s activity, protect content in other applications, automatically label content, encrypt emails, and much more.
Using a new feature called “Labeling for Azure Purview” which is currently in preview, it is possible to apply labels to SQL Database columns and files in Azure Blob Storage. If you still haven’t, you should check what sensitivity labels can do for your company data.
If you already use Sensitivity Labels in your organization, check out how you can improve your Sensitivity Labels usage experience with Syskit Point. With Point you can check which label is applied to a specific site, group or team in one place, provision new resource with Sensitivity label applied with Point provisioning templates feature, and much more to improve your Microsoft 365 security.