Microsoft Office 365 provisioning guide
Table of contents

The role of Azure AD in provisioning
Learn more about Azure AD automation role and features in Microsoft Office 365 provisioning processes.

How to get started with Microsoft 365 provisioning
Learn more about provisioning policies and cloud PC provisioning.

Applying the PnP provisioning engine within Microsoft 365
Learn more about PnP provisioning engine capabilities.
Microsoft Office 365 provisioning is a process that deals with providing and making Microsoft 365 services available to users.
Typical scenarios include provisioning users and devices for Teams, SharePoint workspaces, and third-party solutions such as Dropbox or Salesforce.
Admins create specific details for the configuration and automatic creation of Cloud PCs and then activate them for users with the relevant Windows 365 license and login credentials.
With Microsoft 365 usage reaching critical mass (around 345 million paid seats in April 2022), provisioning plays a crucial role in tenant management. Admins are tasked with identifying and predicting seat numbers and requirements and planning and executing configurations. Remote and flexible working are now sources of differentiation and competitive advantage, putting further pressure on workspace provisioning.
Office 365 provisioning used to involve manual, resource-hungry operations. Think uploading CSV files or deploying PowerShell scripts. Where high volume combined with high repetition meant errors could easily creep in. Azure Active Directory (Azure AD) changes all that.
The role of Azure AD in provisioning
You can automate provisioning based on business rules in SaaS applications. Everything from creation to maintenance to removal. The automation is scalable across the cloud and environments, making it ideal for modern business demands.
With Azure AD, you can:
- Automate provisioning and de-provisioning
Create, activate, and deactivate accounts for people joining and leaving your teams, groups, and organization. - Synchronize system data
Changes to directories or HR systems can automatically update user identities in your apps and systems. - Govern access and alert activity
Monitor users and audit usage when provisioned into applications, with customizable alerts for business-critical events. - Deploy in brownfield scenarios
Match user identities between systems for easier and seamless integrations. - Customize and map data
Choose the data attributes that are mapped during flows from source to target systems. - Save costs and boost productivity
Automating provisioning means reducing reliance and manual effort required for custom-built scripts and user identity management.
What does an Office 365 provisioning policy include?
You can apply provisioning for use cases involving users, apps, and devices:
User provisioning
Collaboration is at the heart of Microsoft 365. That’s why Azure AD provisioning means applications are made available to support employees so they can work together. User identities can be governed on an ongoing basis, with API endpoints for automatically managing user provisioning.
Users can be provisioned into apps hosted on-premises or in VMs – without the need to open firewalls. Further efficiency gains come from users logging in using Single Sign-On for third-party software.
App provisioning
Azure AD offers self-service options for app provisioning, which you can utilize using the templates in the application gallery menu. You just need to check whether the associated licenses are available and whether users are assigned.
Legacy apps can also be supported, including those relying on SQL databases. The service uses the SCIM 2.0 protocol for automatic provisioning. If the app doesn’t have an automatic Azure AD provisioning connector, simply make an Azure AD Application Request.
Device provisioning
You can also use Azure AD to provision devices at scale with bulk enrollment. Using the Windows Configuration Designer app, you can create a configuration package – which joins your devices to the Azure AD tenant and Intune.
Provisioning packages can be applied to devices via USB or by accessing a network folder.
Why do I need Microsoft 365 provisioning?
Consider how Microsoft 365 services are interconnected. For example, when you create a team, a group is also created, along with related services such as SharePoint sites and mailboxes.
Office 365 provisioning reduces the complexity that comes with these challenges. Some of the ways include:
Maximizing efficiency
Provisioning helps you get projects – and end users – up and running quickly. Provisioning is done once per user and once per license, helping to simplify tenant admin and management.
Ensuring consistency and accuracy
When you create a pre-defined process, there’s less potential for inconsistencies or mistakes – for example, avoiding the risk of duplication through incorrect naming or labeling.
Supporting scalability
Larger organizations are likely to require multiple workspaces provisioned regularly. Some may require customization rather than simple “out of the box” importing. These challenges are magnified when you factor in the likelihood of users regularly joining or leaving during projects.
Saving costs
Pre-defined provisioning saves costs. There’s less need to develop, host, and maintain custom-built scripts and other one-off solutions requiring disproportionate resources. Admins can focus on adding strategic value instead of routine tasks.
Securing the business
Workflows can be provisioned to automatically remove user identities from SaaS apps when they exit the business.
Aligning governance and compliance
A single set of policies mean a single source of truth for defining who can be provisioned. This also generates a trackable record for regulation-ready visibility and transparency.
How to get started with Microsoft 365 provisioning
Self-service is another central element of Microsoft 365. While this helps your organization stay productive, it can also mean your tenant can soon start to sprawl. Content and collaboration spaces can become duplicated and cluttered.
To prevent sprawl, you need to define a governance framework. The goal: To keep content streamlined, more easily audited, and surfaced to the right people at the right time. This should include establishing timescales and factoring in any industry requirements for expiry and renewal periods.
Here’s where an Office 365 provisioning policy acts as a crucial “middle path.” Helping your organization collaborate and be productive while securing your content and protecting your data.
How to create a provisioning policy
Provisioning policies mean Cloud PCs can be automatically created and assigned with the appropriate rules and settings. If you try to assign a user who doesn’t have a Cloud PC license, provisioning won’t be possible.
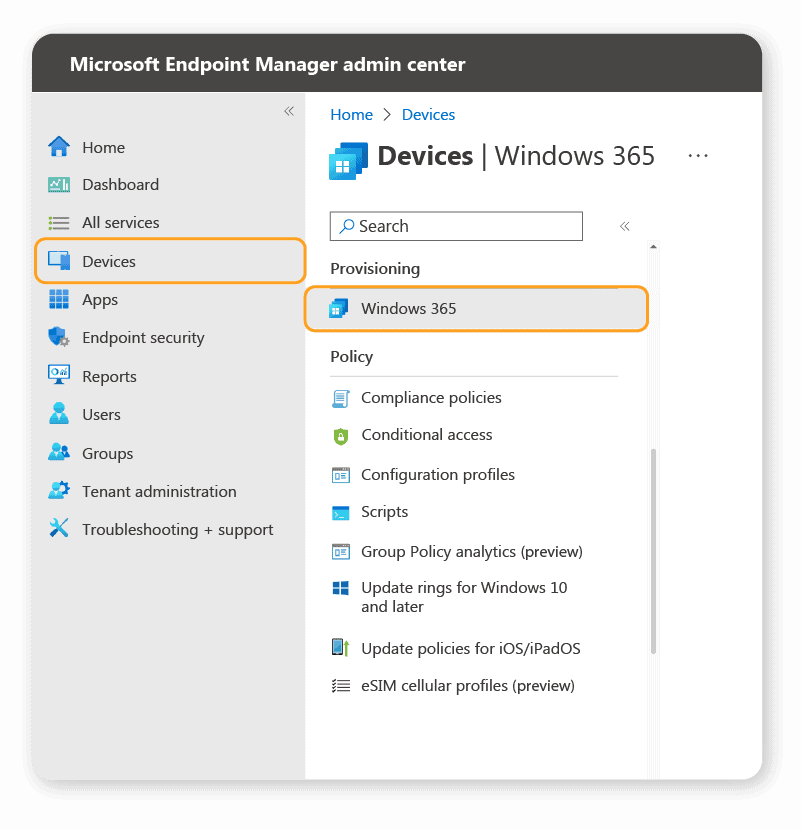
- Sign in to the Microsoft Endpoint Manager admin center.
- Click Devices > Windows 365 (under the Provisioning header):
- Click Provisioning policies and then click +Create policy.
- This takes you to the General page, where you can add a Name and Description.
- While you’re on the General page, choose the Join type.
- You have two join-type options. The first is Hybrid Azure AD Join (you need to select an ANC for this policy). The second is Azure AD Join. This gives you two further network options: Azure network connection (requires you to select an ANC), or Microsoft hosted network (choose the Geography and Region – Automatic is recommended because it reduces the risk of provisioning failure). If you choose Azure AD Join, tick the Use single sign-on box.
- Click Next.
- You’ll arrive on the Image page. This is the reference image that will show all Cloud PCs provisioned with the chosen policy. Choose between Gallery and Custom images.
- Click Next.
- You’ll arrive on the Configuration page. Click Language & Region (under Windows settings) to define the language to be installed on Cloud PCs with this provisioned policy.
- Under Additional services, you can also choose to automatically install services as part of the provisioned policy. Windows Autopatch is for automating updates on devices for Windows, Microsoft 365 Apps for Enterprise, Edge, and Teams. Microsoft Managed Desktop is a cloud-based service for device deployment, service management, security and operations.
- Click Next.
- You’ll arrive on the Assignment page. Here’s where the Azure AD user groups are identified.
- Click Select groups. Choose the groups where the policy will be assigned (it currently doesn’t support nested groups).
- You’ll arrive on the Review + create page.
- Click Create. It can take up to 60 minutes to complete the policy creation process (if you chose Hybrid Azure AD as the join type).
3 steps Windows takes you toward Cloud PC provisioning
Windows completes three crucial steps for Cloud PC provision. These are based on the provisioning policies you create, plus the Azure network connections involved:
Step 1: Core provisioning
- Azure allocation
Windows 365 automatically allocates its capacity to the customer’s supported region. You won’t need to manage this manually. - Virtual machine (VM) creation
Virtual machines are created according to users’ licenses and the specified hardware capacity. - VM network attachment
A virtual NIC is created at the same time as the VM. This is attached to the specified network. For Microsoft-hosted networks, the NIC is attached to networks for the specified region. For Azure networks, the NIC is injected into the customer’s vNet, allowing the Cloud PC to connect to their on-premises network. - Join to Azure AD
The device is joined to Azure AD using one of two options. The first is through Azure AD Join, where the device completes the join operation with no Windows Server Directory dependency. The second is through Hybrid Azure AD Join, where the device performs the join on the customer’s domain with registration to Azure AD through federation or synchronization. - Intune MDM enrollment
This action is where the Cloud PC gets enrolled in Microsoft Intune –it doesn’t require user credentials. - Primary user assignment
The user of the Cloud PC is assigned to the Intune primary user.
Step 2: Post-provisioning configuration
Windows 365 now optimizes the Cloud PC user experience. If any of the below steps fail, provisioning will still succeed:
- Hiding power icons from the start menu and sign-in screen.
- Deactivating option to reset Windows.
- Assigning a user as an administrator (when applicable, to complete specific actions).
- Setting Virtualized Desktop Infrastructure mode in Microsoft Teams to optimize user experience.
- Activating time zone redirection to save manual effort.
- Resize OS disk partition to match the size of the licensed Azure Managed Disk.
Step 3: Assignment
That’s it! Provisioning workflows are complete, and the user is assigned to their Cloud PC. It’s now a simple case of signing in and getting started.
Applying the PnP provisioning engine within Microsoft 365
The PnP provisioning engine means developers can remotely provision artifacts. Instead of a CAML/XML-based Feature Framework, it’s also possible to model and automate provisioning in test and production environments.
This opens the potential to sell customizations to different customers or to reuse templates across customer and project sites.
The introduction of tenant templates meant the engine’s capabilities were expanded to the tenant level. In other words, it became possible to configure the provisioning of teams, provision of Azure AD entries, and provision of taxonomy. Below you can find explanations and links to more provisioning-related information.
PnP provisioning with SharePoint
Site modeling can be done in the browser – columns, content types, list definitions, instances, and much more.
When you finish the design, export it into a provisioning template format. This can be in XML, JSON, or PnP file container format. You then have two methods to extract the template. One option is with Windows PowerShell, where you download and install PnP PowerShell cmdlets.
You can also use the CSOM/REST code. Simply create a development project using an environment such as Visual Studio. Then install the Core library.
PnP provisioning with Teams
You can use Power Automate to create Teams provisioning. Approval workflows can cover the process end-to-end, from requests to team creation:
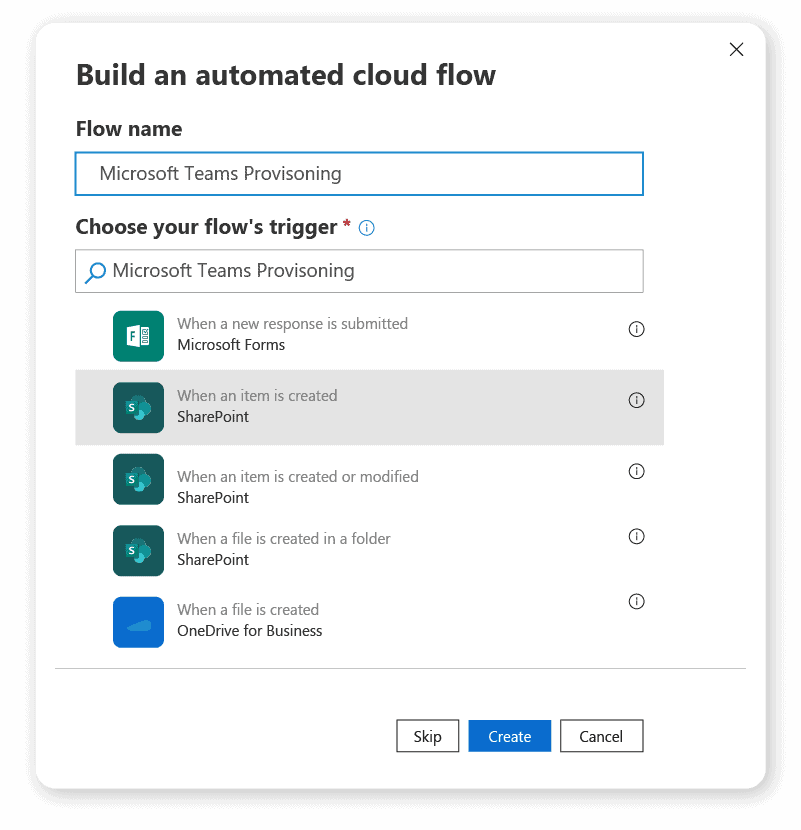
Of course, building more provisioning workflows helps you understand what’s happening in your environment too.
The importance of metadata in site provisioning
When provisioning SharePoint sites, you can also assign metadata to created sites. This has immediate benefits around your information architecture. In the long run, you can connect insights and information Longer-term, bridging silos and supporting decision-making.
Naturally, your method for managing metadata implementation will depend on your use case.
You may want formal taxonomies, where you control and limit the terms used. This can also include tagging options for users to tag content with their chosen terms or phrases. You can also decide whether to apply rules globally across all sites or localized to specific sites.
Getting started with Office 365 provisioning
The above should give you some insight into the many possibilities and advantages of provisioning. Set things up correctly, and you have a series of templates for success – however adaptable, scalable, and flexible your business needs to be.