How to Share your Screen on Microsoft Teams – Updated for 2025
Table of contents
The combination of video calling and screen sharing comes as close to replicating in-person collaboration as you’re likely to get today. By learning how to share your screen on Microsoft Teams, for example, you can visually communicate anything on your screen to someone. In this guide, we’ll cover how to share a screen in Teams.
Whether it’s showing how to use some software or application, giving a presentation, replicating a bug, demonstrating a new feature or product, illustrating a solution, or even delivering training – screen sharing can drastically enhance and augment your collaboration over Microsoft Teams. Check our our how-to video and extended blog below.
How to share your screen on Microsoft Teams
Step #1: Launch Microsoft Teams and join a meeting
The first step is always the most important one. To be able to share your screen on Microsoft Teams you first have to open the Teams app and join the meeting.
Step #2: Click on the Share icon in the call menu to launch your screen-sharing options
Once you’ve joined a meeting you can find the share icon in the Microsoft Teams meeting toolbar.

It will give you multiple sharing options, such as sharing a specific application or the entire desktop, depending on your preferences.
Step #3: Pick a workspace you want to share
Now, a quick explainer before we proceed.
Microsoft Teams share-screen feature has the handy capability to allow you to select only specific interfaces to be shared. It will allow you to choose specific applications, desktop views, browser tabs, or even Microsoft Teams extensions to share.
Let’s see it in action.
So, when you click the share screen icon, it will open a section at the bottom of the screen where you can select one of the following options:
- Desktop – to show your computer’s desktop (everything that’s on your desktop, Screen#1 for the first monitor, Screen#2 if you have a second monitor).
- Window – to show a specific app that you currently have on the desktop (for example opened pages in Chrome, opened Teams application, Excel…).
- PowerPoint – to show your presentation.
- Browse – to find the file you want to show that is saved on your computer (as a PDF, images, documents).
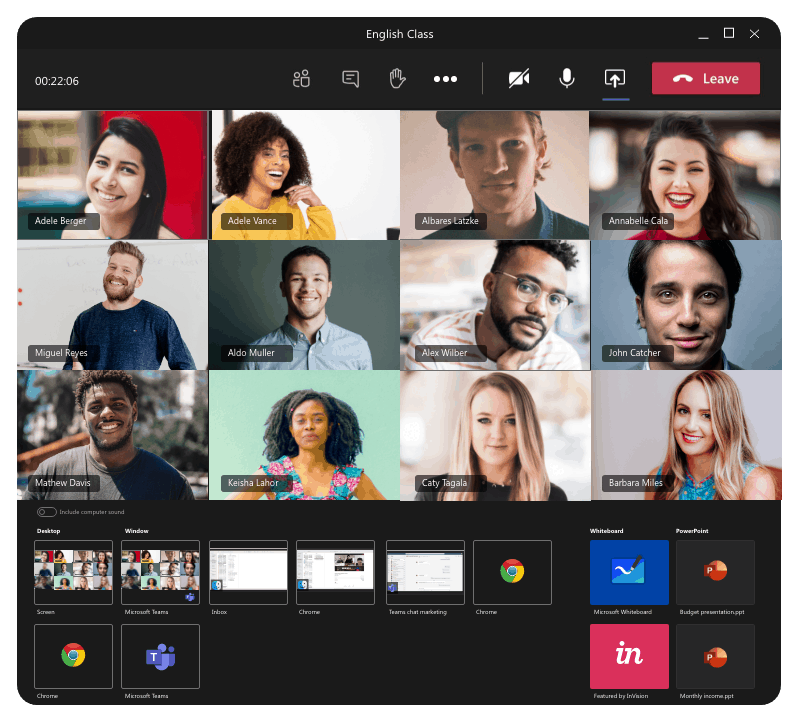
For some types of meetings, other options are available, such as Microsoft Whiteboard and Freehand by Invision. They are useful in collaboration because they allow participants to write, sketch, and draw on a shared digital canvas. Almost like you’re having a meeting in the office!
To improve your presentations, check out these specific Microsoft Team app integrations that can provide special interactions with screen sharing.
Step #4: Select a workspace to start sharing your screen
When you start sharing your screen on Microsoft teams, you will see a red border around the shared media on some sharing options. That’s how you know which part of your screen you’re sharing and which one you’re not.
The most common problem with screen sharing is when you choose Window as a sharing option and get confused why your teammates don’t see folders that you’re opening in another window. Well, that’s the perfect example of when to use Desktop as a sharing option. Just remember to close the windows you don’t want others to see.
Depending on the device or type of meeting, you will see a ribbon telling you your screen is being shared and offering different options. If the ribbon disappears, just move your mouse to see it.

You can allow another person in the meeting to take control of the screen so they can move their cursor and click on the screen you are originally sharing.
Step #5: Stop sharing ends your screen sharing
To stop sharing, simply click the Stop sharing icon and that’s it.

That’s all you need to know about How to share your screen on Microsoft Teams.
Tips and tricks for sharing your screen on Microsoft Teams
We’ve collected a couple of really good tips and tricks you can start using when you share your screen on Microsoft Teams. They will help you be more professional and also enable you to raise the quality of your Microsoft Teams presentations.
1. Prepare your content
Close unnecessary applications and windows to avoid distractions.
Organize your desktop and have the relevant files or applications ready for sharing.
2. Use the right window
When sharing, choose the specific window or application you want to share rather than your entire desktop if possible. This helps keep the focus on the content you’re presenting. And will help you avoid potential security issues or embarrassment if you show sensitive or personal information.
If you have multiple monitors, Teams allows you to choose which screen to share. Be sure to select the appropriate screen that contains the content you want to show.
3. Practice before the meeting
Familiarize yourself with the screen-sharing feature before the actual meeting to avoid technical issues during the presentation.
4. Check your bandwidth
Ensure you have a stable internet connection. A slow connection can affect the quality of your presentation significantly.
5. Share Specific Documents
If you’re presenting a document, consider sharing that specific file rather than your entire screen. This can enhance clarity and minimize distractions.
6. Use annotations and the whiteboard
Utilize the annotation tools available during screen sharing for emphasis. Teams allows you to draw, highlight, and add text on the shared screen.
7. Communicate while sharing and provide control to others
Explain your content as you go along to keep participants engaged and provide context to what they’re seeing.
If collaboration is needed, you can allow others to control your shared screen. Use this feature cautiously, especially in professional settings.
8. Use full-Screen mode
When sharing a presentation or application, use full-screen mode for better visibility.
9. Update Teams
Make sure your Teams application is up to date to benefit from the latest features and also avoid nasty bugs during an important presentation.
And finally…
10. End screen sharing when done
Remember to stop screen sharing once you’ve finished presenting to avoid inadvertently displaying unrelated or confidential information!
Govern, analyze, and audit your entire Microsoft 365 estate with Syskit Point
We often link in-house documents and files mentioned through chats and meetings with our colleagues.
“Oh, yes, here’s the document on that process I’ve mentioned!” – is common in meetings. It is so common that sometimes it can create security problems.
Take good care of governance and visibility across your Microsoft 365 suite, so it doesn’t become a challenge as your business and the complexity of interactions grows.
To help everyone from compliance managers to business users to Office 365 admins, Syskit Point provides a central point to manage your Microsoft 365 governance and security activities.
Syskit Point helps you achieve full control across your Microsoft 365 stack! Whether it’s cutting down on tenant clutter by uncovering inactive resources, proactively managing users and access levels, or achieving full visibility across your Microsoft 365 suite.