
As we deep-dive into provisioning, it’s important that we have a solid base and understand what is available out of the box with almost no effort at all. In this section of our provisioning handbook, we will learn how Microsoft 365 works by default, as well as what controls we can implement through the user interface or with PowerShell.
Out of the box provisioning basics
The first concept we need to understand regarding provisioning is Microsoft 365 Groups. Whether a user just wants a Teams team, a team site, or a Planner plan, by default, Microsoft will create a Microsoft 365 Group. A Microsoft 365 group combines multiple resources, such as:
- SharePoint site
- Shared Mailbox
- Teams team
- Planner plan
- Forms workspace
And those resources share the same identity, so once you add a member to the team for example, they will automatically get access to all the apps in the group.
However, something most people do not know is that not every Microsoft 365 Group gets all services automatically. For example, if you create a group from SharePoint, it won’t automatically get a Microsoft Teams team or a Planner plan. If you create a group from Planner, it won’t automatically get a Teams team. The graph below shows you at a high level what gets created by default, what gets created depending on where you create a group from, and, more importantly, what you can add after.
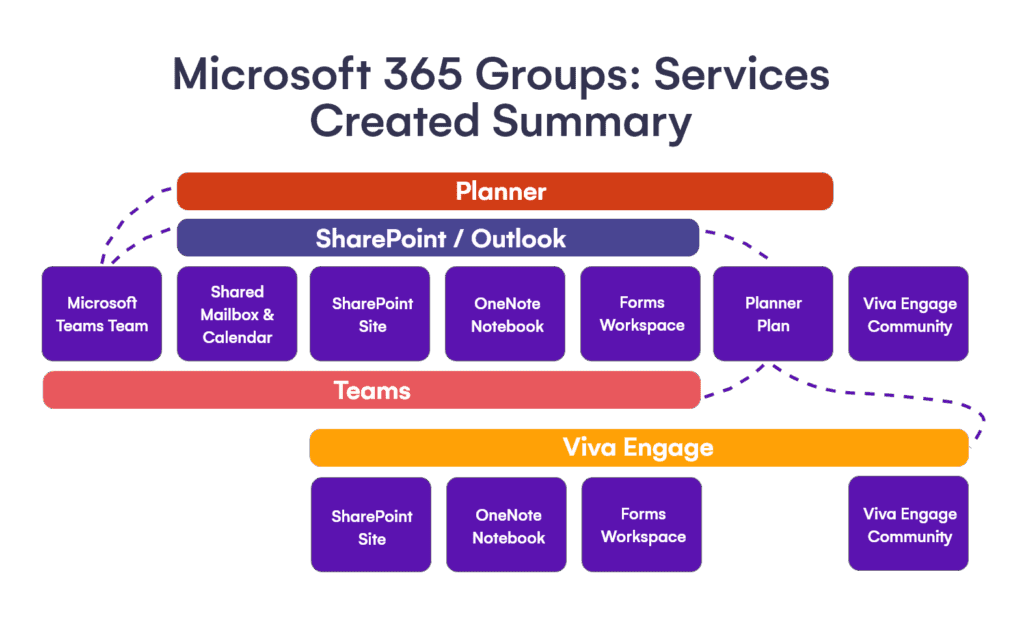
You will notice that the most different ones are Viva Engage Communities. Viva Engage communities still create Microsoft 365 Groups, but they are different, as they are the only ones that do not create a Shared Mailbox. Also, you cannot attach a Microsoft Teams team or Planner plan to them in the future.
Now that you know what gets created (and what can and cannot be added) depending on where you create it, what are some problems people are having with out-of-the-box provisioning?
Firstly, many users do not fully understand the concept of a group (and they shouldn’t have to). Someone who just wanted a plan in Planner now created a SharePoint site and a Shared Mailbox, and they had no idea they were doing that. This adds extra resources for IT to manage and govern.
Secondly, users do not get a consistent experience, and put a lot of work into converting each group to the collaboration workspace they wanted to build from the start. From recreating the same channels repeatedly to adding the same lists and customizations in SharePoint, this lost time adds up to your costs for each project and initiative you’re building.
Lastly, because one user might search in Teams, another in SharePoint, and someone else in Outlook, you might run into duplication issues where multiple people create different groups for the same purpose. Guess who is stuck migrating data to merge all of the content and delete duplicates in the future? You, as IT.
But now, can we solve all of those out of the box with only a few settings? Let’s take a look at what Microsoft offers us.
Teams templates
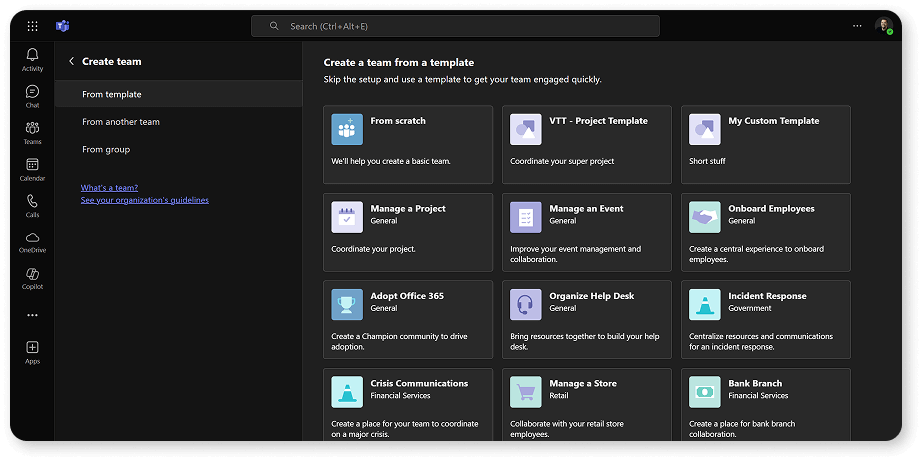
Let’s first of all focus on the problem that every Team you create, you start from zero. Microsoft introduced the concept of Teams templates. Microsoft offers every single company over a dozen prebuilt templates, such as Manage a project, Manage an Event, Onboard Employees, and even some that apply to very few organizations, such as Bank Branch.
Sometimes it’s funny to think that Microsoft shipped a Bank Branch template to every organization worldwide, even if most banks will probably create their own templates, and everyone else’s first reaction is “can we get rid of it?”, but that’s a discussion for another day. And don’t worry, we will show you how to hide unwanted templates in just a few minutes.
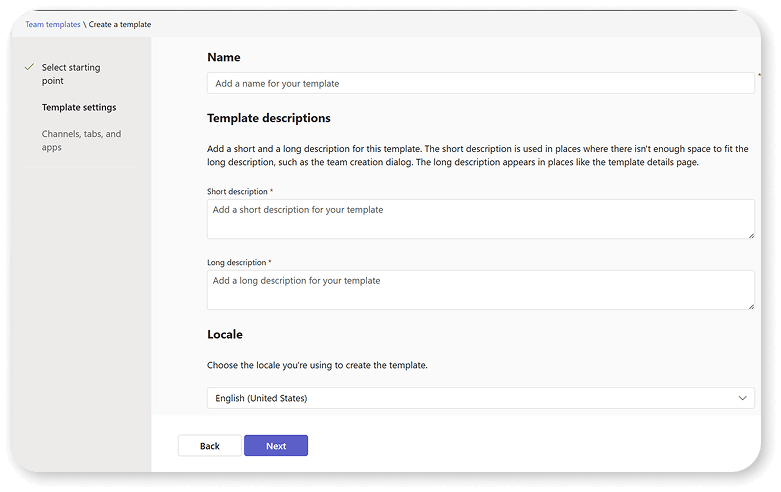
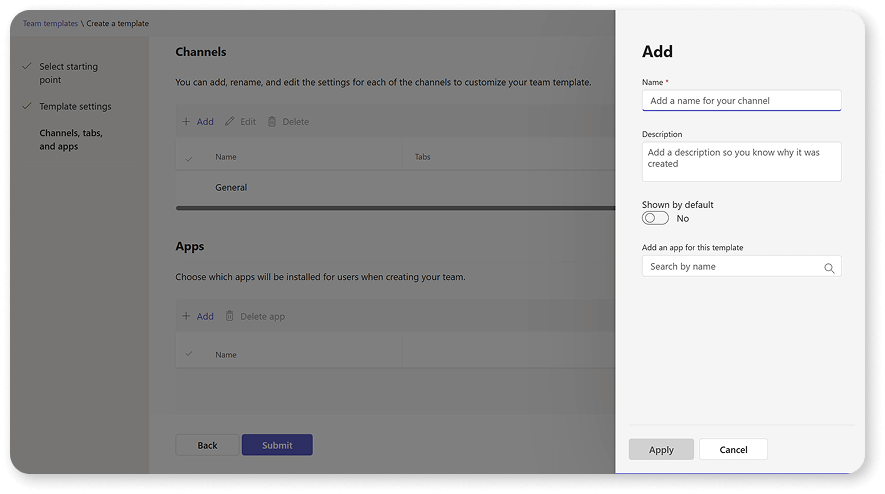
You will probably be most interested in custom templates. A Teams administrator can create a new template from the Teams admin center. You can give it a Name, a short description, or a long description and choose the Locale. You cannot modify the icon that users will see.
Teams templates allow you to configure both channels and apps that teams created with this template should have. As you can see, the options are pretty limitied:
- You can only add Standard channels (no private channels or shared channels).
- You cannot rename the General Channel.
If you use PowerShell as an administrator, you can export the template definition to JSON and then configure a few additional settings that are not available in the user interface. You can see all of them below, but some notable ones are member permissions, such as editing or deleting messages, if guests are allowed to create channels, and even fun settings, such as GIFs.

One of the big downsides of templating in Microsoft Teams is that it only does Microsoft Teams, and you cannot customize anything in SharePoint. Back in 2022, Microsoft promised us “Connected templates”; however, even 3 years later, it has not been delivered, and there doesn’t seem to be a plan to ever deliver them.
How to hide Microsoft-provided templates?
We promised you information on how to hide Microsoft-provided templates. There are two levels of customization when it comes to Teams templates, depending on whether you have Teams Premium or not.
For the basic level, Teams Templates policies allow you to hide templates that you do not want your users to see. This way, you can only make your custom templates available if you wish to.
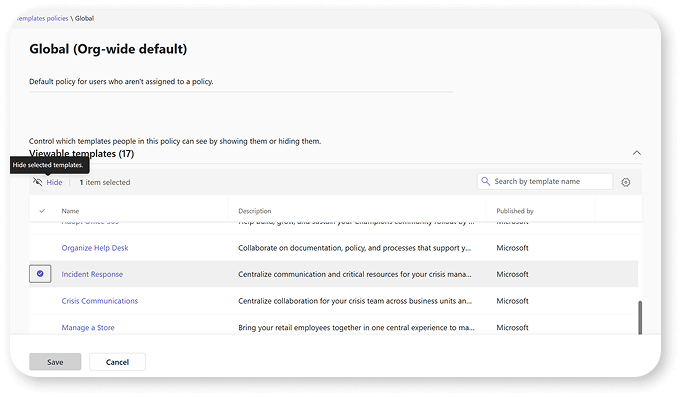
If your organization and users have Teams Premium, you can further customize it by creating multiple policies, this way you can configure only Project Managers to see the “Project” template and only HR personnel see the Onboarding template.

So while Teams templates are great in theory, many companies do not like the limitations of only automating half of the workspace. If that’s enough for you, it’s a great feature to start your onboarding journey.
SharePoint templates
SharePoint also has its own templating engine, which also offers both Microsoft-provided templates and allows you as an organization to create your own. SharePoint templates are referred by IT Professionals as many things from Site Scripts, Site Designs, or Site templates, all valid names depending on how technical you want to go.

Site templates allow you to configure lists, libraries, columns, themes and branding, navigation, permissions, and more. However, they are limited to SharePoint and, by default, have no customization options with Microsoft Teams.
You can disable Microsoft-provided site templates with the Set-SPOBuiltInSiteTemplateSettings PowerShell cmdlet. Some major limitations of SharePoint templates are that you cannot have any content as part of the template, and also that it’s disconnected from Teams templates, so again, you are only handling part of the workspace.
We have covered both Teams and SharePoint templates which, separately, attempt to solve one of the problems we had with workspace provisioning, but now let’s talk about governance and what Microsoft provides us to try and make sure people don’t create groups when they shouldn’t.
Basic Microsoft 365 governance controls
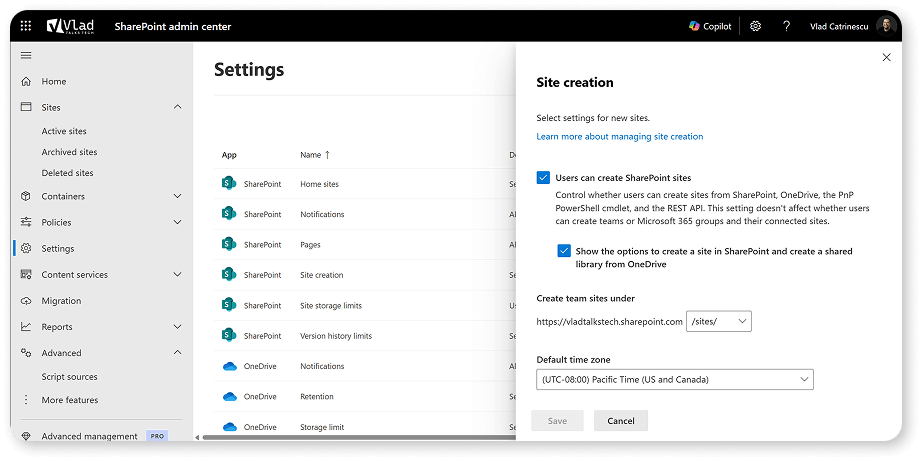
Let’s start by covering what is available without any premium Microsoft 365 / Entra ID licenses, so everything in this section will be available to any organization. First of all, for SharePoint sites, you can disable the Create site button for users.
You can do it from the SharePoint Online Admin Center > Settings > Site Creation, and then disable the User can create SharePoint site option.
Note this is only for SharePoint and does not cover SharePoint sites created from Microsoft 365 Groups. When it comes to groups, Microsoft allows you to fully disable the ability for users to create any Microsoft 365 Groups inside your tenant. This will include group-connected team sites, teams in Microsoft Teams, and, really, anything that depends on a Microsoft 365 Group won’t be available for users to create. This is a PowerShell only setting that you can configure by running the following script with the Microsoft Graph PowerShell module.
$params = @{


    Values = @(


        @{


            Name  = "EnableGroupCreation"


            Value = "false"


        }


    )


}


$Setting = Get-MgBetaDirectorySetting | where-object {$_.displayname -eq 'Group.Unified'}


Update-MgBetaDirectorySetting -DirectorySettingId $Setting.id -BodyParameter $params
This is useful when you want to ensure that users go through IT for any workspace creation, but on the downside, you need to ensure that you have a process in place and, hopefully, some automation to avoid overloading the IT department.
Premium Microsoft governance controls
In addition to the previously mentioned basic governance controls, Microsoft offers a few additional ones. Still, they require every member of a group using them to have at least an Entra ID Premium P1 license, or Microsoft 365 E3 or E5. The first setting we want to mention is an upgrade to the group restriction we just talked about before. If you have the right licenses, you can still allow a group of users to create Microsoft 365 Groups. This enables you to let’s say allow power users from each department to create groups for their departments, offloading responsibility from IT, while still maintaining some control.
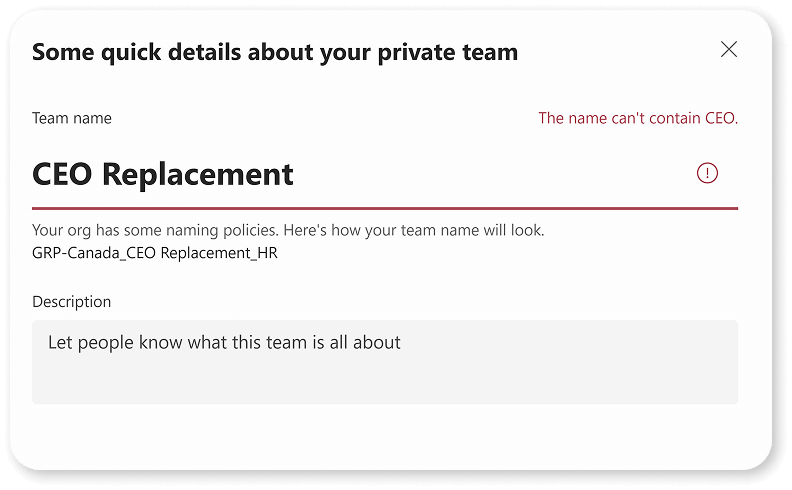
Another setting is naming conventions, which allows you to create a policy on how groups will be named. You can add both prefixes and suffixes to the group name entered by the user, and even make them dynamic for example adding the creator’s department as a dynamic token.

You can also configure a list of blocked words that users cannot use as part of their group names to avoid confusion from your most sensitive topics.
Finally, Microsoft allows you to configure organizational guidelines, which adds a link to every group creation endpoint to ensure that all your users are aware of your governance policies.

What’s next
In this section of our handbook, we have reviewed what Microsoft gives us out of the box to govern provisioning. We learned about templating in both SharePoint and Teams, how to stop group or site creation by our users, as well as advanced features such as blocked words and naming conventions.
While all of those can be useful depending on how you want to customize your provisioning process, there are still many weaknesses in just using those controls. From templates only covering either Teams or SharePoint but not both, to simply IT admins not having any visibility into why each group was created or knowing when it should be deleted. Those are all things that a provisioning system can help with, and that’s what we’ll cover in the next section.