What are sensitivity labels and retention policies in Microsoft 365
Table of contents
Sensitivity labels and retention policies stand out as powerful tools. They allow you to apply rules and actions to your data based on its content, location, and context. Understanding these tools empowers you to make informed decisions that best suit your specific needs, putting you in control of your data management and security.
In this blog post, I will unpack the flexibility of sensitivity labels and retention policies, how they adapt to your organization’s needs, and their advantages and disadvantages. I will also provide some tips and best practices for using them effectively in your organization, helping you stay ahead of the curve in data protection.
What are sensitivity labels?
Sensitivity labels are a way of classifying your data according to its level of confidentiality and sensitivity. You can create and apply sensitivity labels to your documents, emails, and files to indicate how they should be handled and protected. For example, you can label a document as “Highly Confidential” or “Restricted,” depending on who can access it and what actions are allowed.
When you apply a sensitivity label to your data, you’re not just classifying it but also proactively enforcing specific protection settings and actions. For example, you can encrypt your data, restrict access to authorized users, prevent copying or printing, add watermarks, or track and revoke access. You can also apply sensitivity labels automatically based on the content or metadata of your data or let users choose the appropriate label manually, giving you a proactive approach to data security.
Sensitivity labels can help you achieve the following goals:
- Protect your data from unauthorized access, copying, printing, or sharing.
- Ensure that your data is handled and stored in compliance with your organization’s policies and regulations.
- Communicate the level of confidentiality and sensitivity of your data to your users and collaborators.
- Reduce the risk of data breaches, leaks, or losses.
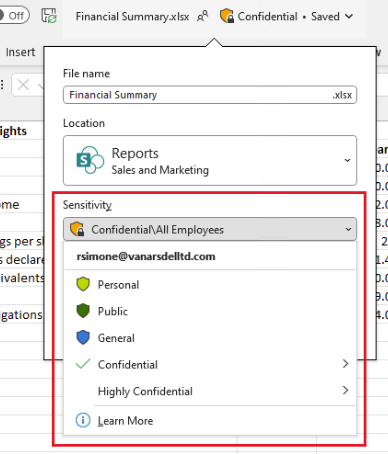
The definition would be that Sensitivity labels from Microsoft Purview Information Protection let you classify and protect your organization’s data while ensuring user productivity and their ability to collaborate isn’t hindered.
You can use sensitivity labels to:
- Provide protection settings that include encryption and content markings. For example, apply a “Confidential” label to a document or email, and that label encrypts the content and applies a “Confidential” watermark.
- Protect content in Office apps across different platforms and devices. Supported by Word, Excel, PowerPoint, and Outlook on the Office desktop apps and Office for the web. Supported on Windows, macOS, iOS, and Android.
- Protect content in third-party apps and services using Microsoft Defender for Cloud Apps. With Defender for Cloud Apps, you can detect, classify, label, and protect content in third-party apps and services, such as SalesForce, Box, or DropBox.
- Protect containers that include Teams, Microsoft 365 Groups, and SharePoint sites. For example, set privacy settings, external user access, and external sharing, access from unmanaged devices, and control how channels can be shared with other teams.
- Protect meetings and chat by labeling (and optionally encrypting) meeting invites and any responses and enforce Teams-specific options for the meeting and chat.
- Extend sensitivity labels to Power BI: When you turn on this capability, you can apply and view labels in Power BI and protect data when saved outside the service.
- Protect data when Microsoft Copilot for Microsoft 365 is assigned to users. Copilot recognizes and integrates sensitivity labels into user interactions to help protect labeled data. For more information, see the section Sensitivity labels and Microsoft Copilot for Microsoft 365.
In all these cases, sensitivity labels from Microsoft Purview can help you take the right actions on the right content. With sensitivity labels, you can identify the sensitivity of data across your organization, and the label can enforce protection settings that are appropriate for the sensitivity of that data. That protection then stays with the content.
What is a sublabel?
Sublabels allow you to organize multiple labels under a main label that users see in an Office app. For instance, under a main label like “Confidential,” your organization might have several specific labels for different levels of confidentiality. The main label, “Confidential,” is just a text label without protection settings, and it can’t be applied directly to content. Instead, users select “Confidential” to see the sublabels and then choose the appropriate sublabel to apply to their content.
Sublabels help present labels in a more organized and logical way. They don’t inherit any settings from their main label except for the label color. When you make a sublabel available to a user, they can apply that sublabel to their content and containers but not the main label itself.
Avoid setting a main label as the default label or configuring it to be automatically applied or recommended. If you do, the main label won’t be applicable.
Here’s how sublabels might look to users:
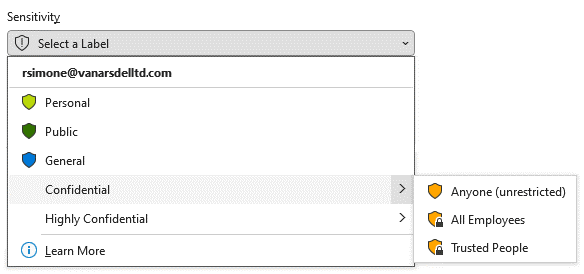
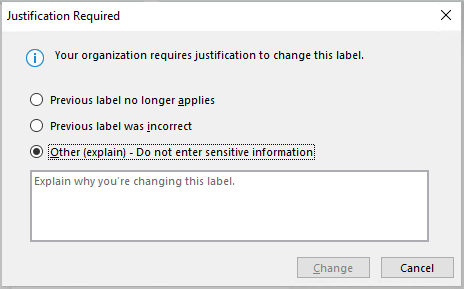
Please note that, if configured, those labels can also be overwritten. Here is what the experience looks like when asking for a justification.
Ranking, which somehow matters
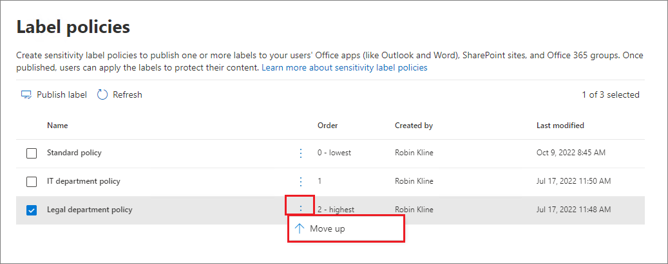
You publish sensitivity labels in a sensitivity label policy to make them available to users. This policy appears in a list on the Label Policies page. Like sensitivity labels, the order of these policies matters because it reflects their priority: the policy with the lowest priority is at the top with the lowest order number, and the policy with the highest priority is at the bottom with the highest order number.
A label policy includes:
- A set of labels
- The users and groups assigned to the policy
- The scope of the policy and its settings
You can assign a user to multiple label policies, and they will receive all the sensitivity labels and settings from those policies. If there are conflicting settings from multiple policies, the settings from the policy with the highest priority (highest order number) are applied. In other words, the highest priority policy wins for each setting.
For example, in a list of three label policies:
- All users might be assigned the standard label policy with the lowest priority (order number 0).
- Only IT department users are assigned the second policy (order number 1). If their policy conflicts with the standard policy, the IT policy wins because it has a higher order number.
- Legal department users are assigned the third policy with the highest priority (order number 2), as they likely have more stringent settings. This ensures that if a legal department user is also in a group assigned to the IT policy, the legal department settings take precedence.
If a user’s settings conflict with those of multiple policies, the setting from the policy with the highest order number is applied.
What are retention policies?
Retention policies are a way of managing (different from the Preservation Hold Library in SharePoint) the lifecycle of your data according to its value and compliance requirements. You can create and apply retention policies to your data to specify how long it should be kept and what should happen after a certain period.
For example, you can retain a document for 7 years and then delete it automatically or keep it indefinitely until you manually delete it. I had a customer whose default setting was 10 years (Financial Institution).
When you apply a retention policy to your data, you can also ensure that it is preserved and protected from accidental or malicious deletion, modification, or loss. You can also apply retention policies automatically based on your data’s content, location, or type, or let users choose the appropriate policy manually.
Retention policies can help you achieve the following goals:
- Manage the lifecycle of your data based on its value and compliance requirements.
- Preserve your data from accidental or malicious deletion, modification, or loss.
- Reduce the storage and maintenance costs of your data.
- Support your legal and audit obligations.
While a retention policy can cover multiple services, referred to as “locations” in the policy, you can’t create a single policy that includes all the supported locations at once:
- Exchange mailboxes
- SharePoint sites, including classic and communication sites
- OneDrive accounts
- Microsoft 365 Group mailboxes & sites
- Exchange public folders
- Teams channel messages
- Teams chats and Copilot interactions
- Teams private channel messages
- Viva Engage (previously called Yammer) community messages
- Viva Engage user messages
- I would maybe add (Previously called Yammer) in there for both SEO and user education.
If you select Teams or Viva Engage locations when creating a retention policy, the other locations will be automatically excluded. Therefore, your steps depend on whether you include Teams or Viva Engage locations in your retention policy.
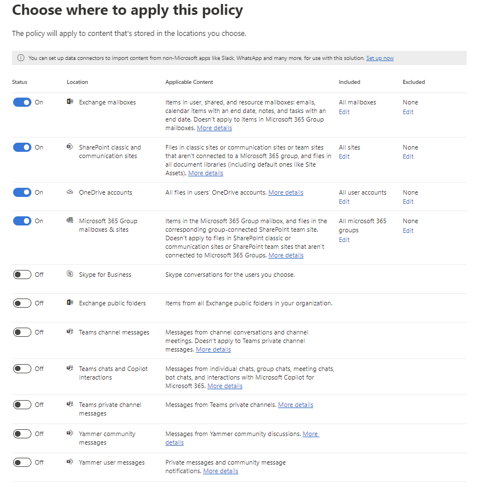
So, it’s a correct statement to say that we have 3 main pillars for Retention Policies:
- Retention Policy for Teams and Copilot for M365
- Retention Policy for Viva Engage
- Retention Policy for all other services
a) SharePoint
b) Exchange
c) OneDrive
d) Microsoft 365 Group
e) …
To create a new Policy, Sign in to the Microsoft Purview compliance portal > Solutions > Data lifecycle management > Microsoft 365 > Retention Policies.

What are the differences between sensitivity labels and retention policies?
While sensitivity labels and retention policies are useful for managing and securing your data, they also have some important differences that you must be aware of. Here are some of the main ones:
- Sensitivity labels focus on the confidentiality and sensitivity of your data, while retention policies focus on the value and compliance of your data.
- Sensitivity labels apply protection settings and actions to your data, while retention policies apply retention settings and actions to your data.
- Sensitivity labels are persistent and travel with your data, while retention policies are applied at the source and do not follow your data.
- Sensitivity labels can be applied to individual files and items, while retention policies can be applied to containers and locations.
- Sensitivity labels can be changed or removed by users, while retention policies cannot be overridden or deleted by users.
These differences affect how you use sensitivity labels and retention policies in your organization. For example, you may need to use sensitivity labels to protect your data when you share it with external parties. In contrast, you may need to use retention policies to manage your data when you store it in internal repositories. You may also need to use sensitivity labels and retention policies to apply different rules and actions to different types, locations, or data content.
How do you choose between sensitivity labels and retention policies?
Depending on your goals and scenarios, you may need to use either sensitivity labels, retention policies, or both. Here are some questions to help you decide which option is best for you:
- Do you need to classify your data based on its level of confidentiality and sensitivity? If yes, use sensitivity labels.
- Do you need to protect your data from unauthorized access, copying, printing, or sharing? If yes, use sensitivity labels.
- Do you need to encrypt your data or add watermarks to it? If yes, use sensitivity labels.
- Do you need to track and revoke access to your data? If yes, use sensitivity labels.
- Do you need to manage the lifecycle of your data based on its value and compliance requirements? If yes, use retention policies.
- Do you need to keep your data for a certain period and then delete it automatically? If yes, use retention policies.
- Do you need to preserve your data from accidental or malicious deletion, modification, or loss? If yes, use retention policies.
- Do you need to apply different rules and actions to different types, locations, or content of your data? If yes, use both sensitivity labels and retention policies.
There is no one-size-fits-all solution for choosing between sensitivity labels and retention policies. Depending on your specific needs and scenarios, you may need to use a combination of both. However, you should always consider the following best practices when using sensitivity labels and retention policies:
- Define clear and consistent criteria for applying sensitivity labels and retention policies to your data.
- Use automation and intelligence to apply sensitivity labels and retention policies to your data whenever possible.
- Train and educate your users on how to use sensitivity labels and retention policies correctly and responsibly.
- Monitor and review the effectiveness and compliance of your sensitivity labels and retention policies regularly.
Last thoughts on sensitivity labels and retention policies
Sensitivity labels and retention policies are powerful tools to help you manage and secure your data in Microsoft 365. However, there are also some differences that you need to consider before choosing the best option for your needs.
In this blog post, we explained sensitivity labels and retention policies, how they work, and their advantages and disadvantages. We also provided some tips and best practices for using them effectively in your organization.
We hope that this blog post has helped you understand the difference between sensitivity labels and retention policies and how to choose between them.

