Office 365 security alerts done the right way
Table of contents
Microsoft 365 keeps a very comprehensive audit log of activities performed by both users and administrators. Most organizations will have millions of entries in the audit logs each month. The questions arise about how to make sense of all this data and detect data breaches in time.
An IBM 2023 study showed the average time to detect and contain a data breach is 277 days.
This can lead to significant financial losses and generate a negative reputation for the organization. IBM also showed that security automation is one of the most important things a company can do to improve the response time for a data breach and reduce costs. Automation does many time-consuming tasks, eliminates the chance of human error, and increases your chances of detecting a data breach in time.
This is where Alert policies inside Microsoft Purview (previously known as the Security & Compliance Center) come into play. Several default alert policies can help you monitor activities such as assigning admin privileges in Exchange Online, malware attacks, phishing campaigns, and unusual levels of file deletions and external sharing. You can also create your alert policies to specify the conditions for which user activities the alert needs to be generated.
How do Office 365 alert policies work?
Below, you can find a quick overview of how alert policies work. It is essential to understand:
- how alerts are created,
- when alerts are triggered,
- how to view generated alerts.
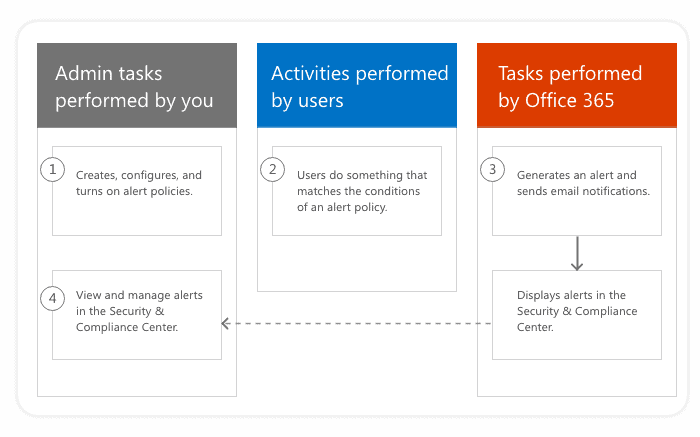
Image source: Microsoft
- An admin creates an alert policy in Microsoft Purview using the Alert policies. You also have the option to use the New-ProtectionAlert cmdlet in Security & Compliance Center PowerShell.
- A user performs an activity that matches the trigger conditions for an alert policy.
- Microsoft 365 automatically detects the activities and generates new alerts. If you configured email notifications for your alert policy, those are sent out.
- An admin views the alerts using the Alerts page in Microsoft Purview.
What can trigger a security alert in Office 365?
In general, Alert policies can detect suspicious and unusual activity in your tenant, such as:
- A single action, like sharing a file with an external user.
- An unusual volume of some activity. For instance, when a single user downloads 1000 files in 5 minutes.
Here are some of the critical areas covered by Alert policies:
- Exchange – detect malware attacks, phishing campaigns, and abuse of admin permissions.
- SharePoint & OneDrive – detect file and folder activities such as file sharing with internal and external users and sharing with anonymous links. It also covers synchronization activities for OneDrive clients and all kinds of site administration activities like changing site admins.
- Data Loss Prevention – detect data loss incidents.
- Information Governance – detect activity on sensitive data and check eDiscovery search usage.
Default Office 365 alert policies
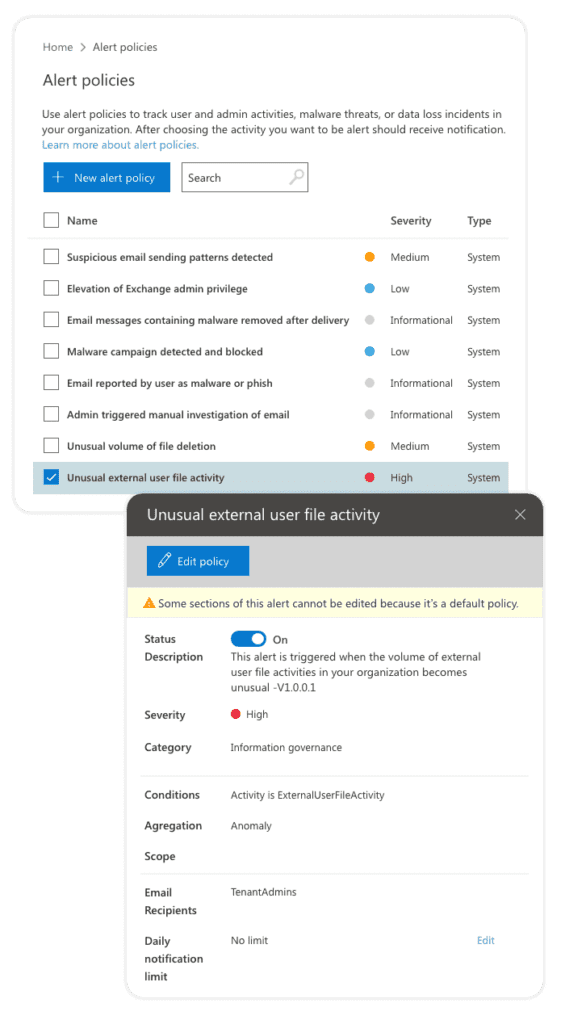
Microsoft provides a notable set of built-in alert policies. You can find the built-in policies on the Alert policies page. You can easily recognize them by the bolded name and a “System” policy type definition. Although these policies are turned on by default, you have the option to disable them or edit the list of recipients for email notifications. Unfortunately, you cannot edit other settings for built-in policies.
The list of these built-in alert policies depends on the available licenses in your organization. Some policies will only be available if you have the appropriate Office 365 Enterprise or Office 365 US Government plan. Moreover, some policies are only available if your organization has the appropriate add-on to a standard E1/F1/G1 or E3/F3/G3 subscription. Some add-on subscription examples are Microsoft Defender for Office 365 P1 or P2 or Microsoft 365 for E5.
You can find the complete list of built-in alert policies based on your subscription on the following link.
Figure 2 Built-in alert policies
Advanced Office 365 security alerts
Using the Manage advanced alerts page in Microsoft Purview, you can view incidents generated by the Microsoft Defender for Cloud Apps and it’s subsystem Microsoft Cloud App Security (MCAS). Please note that this requires your organization to have MCAS licenses (only available for organizations with an Office 365 Enterprise E5 or Office 365 US Government G5 subscription). Some of the advanced features offered by MCAS are:
- Behavioral analytics (UEBA) – Using best-in-class machine learning algorithms, you can detect, investigate, and remediate advanced threats such as:
- compromised users,
- insider threats,
- data exfiltration,
- ransomware.
- Productivity app discovery – You can identify Shadow IT and gain instant visibility into how Office 365 and other productivity cloud services are used in your organization.
- OAuth apps – You can detect malicious apps, identify overprivileged apps, investigate, and control suspicious apps in your Office 365 environment.
- Conditional Access App Control – You can get real-time session monitoring and control for your Office 365 apps.
How to create Office 365 alerts
To create alerts based on your company policies, you need to click Policies > Alert policies inside Microsoft Purview. From there, a New alert policy action starts the configuration wizard that sets up your new alert policy’s settings.
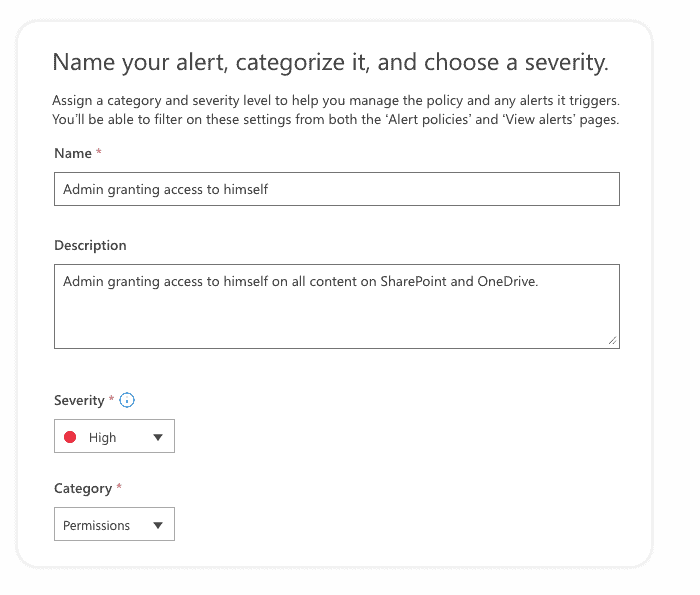
The wizard consists of a few steps. In the first step, you need to define some basic settings. This will help you identify, filter, and manage alerts generated by this policy on the Alerts page:
- Name – a descriptive name to view generated alerts on the Alerts page.
- Description – a short description of an alert.
- Severity – define severity to Low, Medium, or High. It is best to assign higher severity to activities that can result in severely negative consequences.
- Category – you can assign one of the following categories to a policy: Data loss prevention, Information governance, Mail flow, Permissions, Threat Management, and Others. You can use categories to filter and sort events on the Alerts page. Please note that your choice here also impacts the Role-Based Access Control (RBAC) on the Alerts page. Different roles have access to distinct categories of alerts. For a complete list of roles and access to specific alert categories, check out the following link.
On the second step, you need to choose an activity to trigger the alert and apply additional conditions if necessary:
- Activity – pick an activity you want to be alerted for. You can choose only one alert activity, but multiple actions in the audit logs might trigger it. For instance, the “External user file activity” alert will trigger if audit logs recorded that an external user has either accessed, modified, deleted, or checked a file.
- Conditions – based on the specified activity, you can set additional conditions when to trigger the alert. For most activities, you will see the following conditions:
- IP address (‘Like any of’/’ Equals none of’ with wildcard support),
- User (pick users to trigger or ignore for this alert),
- Site Collection URL (specify or ignore some sites by entering site URLs with wildcard support).
- Threshold – configure how often an activity can occur before an alert is triggered. This will allow you to start an alert every time an activity matches the policy, when a certain threshold is exceeded (X activities in Y minutes for All users/Single user), or when the occurrence of the activity becomes unusual for your organization. The last option is attractive when you specify the extraordinary event of the activities. In this case, Microsoft takes up to seven days to establish a baseline for your tenant, and during this period, alerts will not be generate. After you establish the baseline, an alert is triggered when the frequency of the activity tracked exceeds the baseline value.
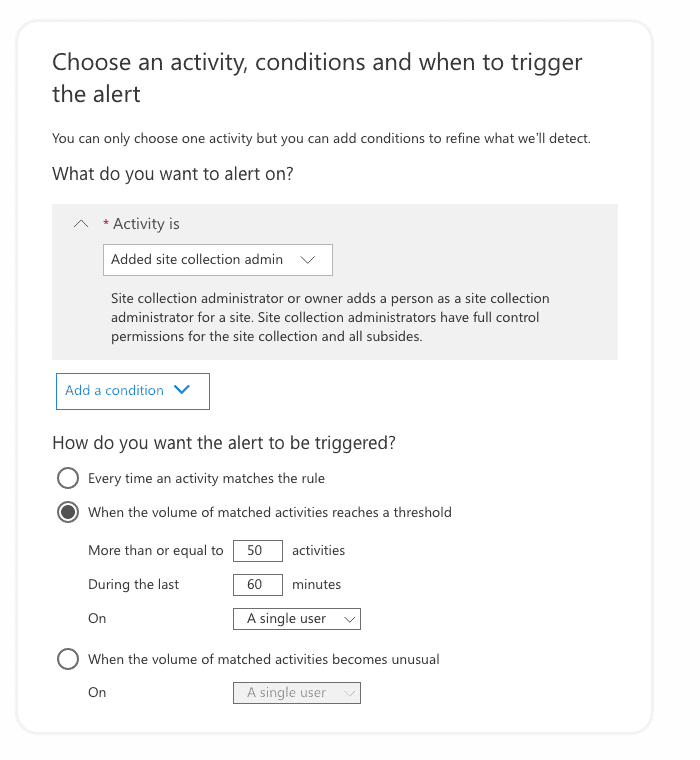
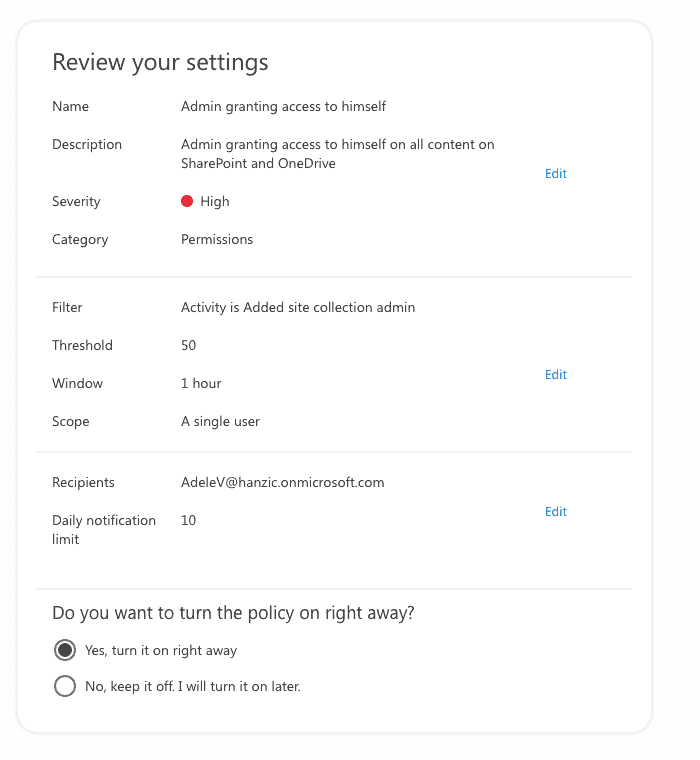
In the image above, you see that we are trying to detect potential abuse of admin rights. In our example, a SharePoint admin is adding himself as a site collection admin to multiple sites, which allows him to access their content. In our case, the alert will be triggered if the admin gets added to more than or equal to 50 sites within 60 minutes. Such behavior is abnormal and might require some investigation into what is happening and the reasons for such an action.
In the third step, you can specify the settings for email notifications:
- Send email notifications – define if email notifications are sent when an alert is triggered.
- Email recipients – list of users who will receive the email notification.
- Daily notification limit – set the maximum number of notifications that can be sent daily.
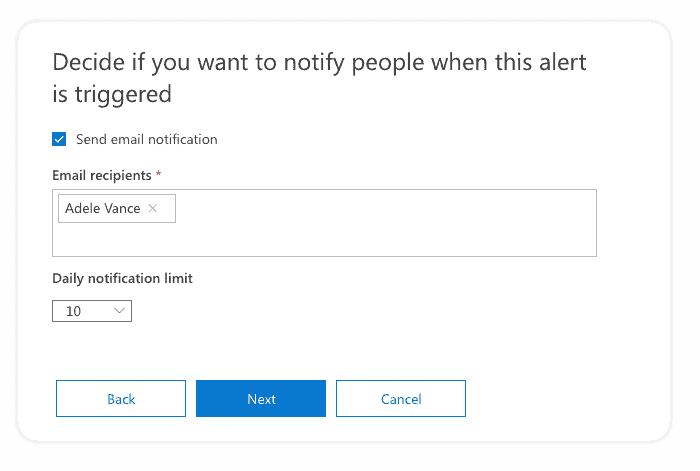
It is good practice to enable email notifications only for specific alert categories or high severity. If too many emails are sent, there is a higher chance that you’ll overlook the critical alert in the clutter of all other emails.
In the last step, you can review the alert policy settings before you turn on the policy. You can also save the new alert policy but keep it disabled until you enable it later at any point in time.
Once you finish the wizard, you will see your new alert policy on the Alert policies page. You will notice that it will have the Type value defined as Custom. From here, you can edit, disable, or delete it at any time.
How to view security alerts in Office 365
When a user activity matches an alert policy’s settings, an alert is generated and displayed inside Microsoft Purview. The first place to view your alerts is the Home page, and the second one is the Alerts page.
On the Dashboard page, you get to see current Active alerts with their severity so you can immediately see if you have any incidents in your environment. From there, you can quickly drill to see all the alerts.
On the Alerts page, you get a more detailed view of all the triggered alerts in your environment. The page displays a table with the following information:
- Severity – defined in the alert policy.
- Alert name – the name of the corresponding alert policy.
- Status – shows the status for each alert.
- Tags – tags are reflected based on tagged mailboxes or users that appear in the alerts. See User tags in Office 365 ATP to learn more.
- Category – defined in the alert policy.
- Activity count – number of times an activity has occurred that resulted in the alert being generated.
- Last occurrence – shows when the alert was last generated.
It is really helpful to have the filtering options on this page so you can filter based on any of the fields mentioned above. Additionally, you can also filter by alert source – either Microsoft Purview or Microsoft Defender for Cloud Apps.
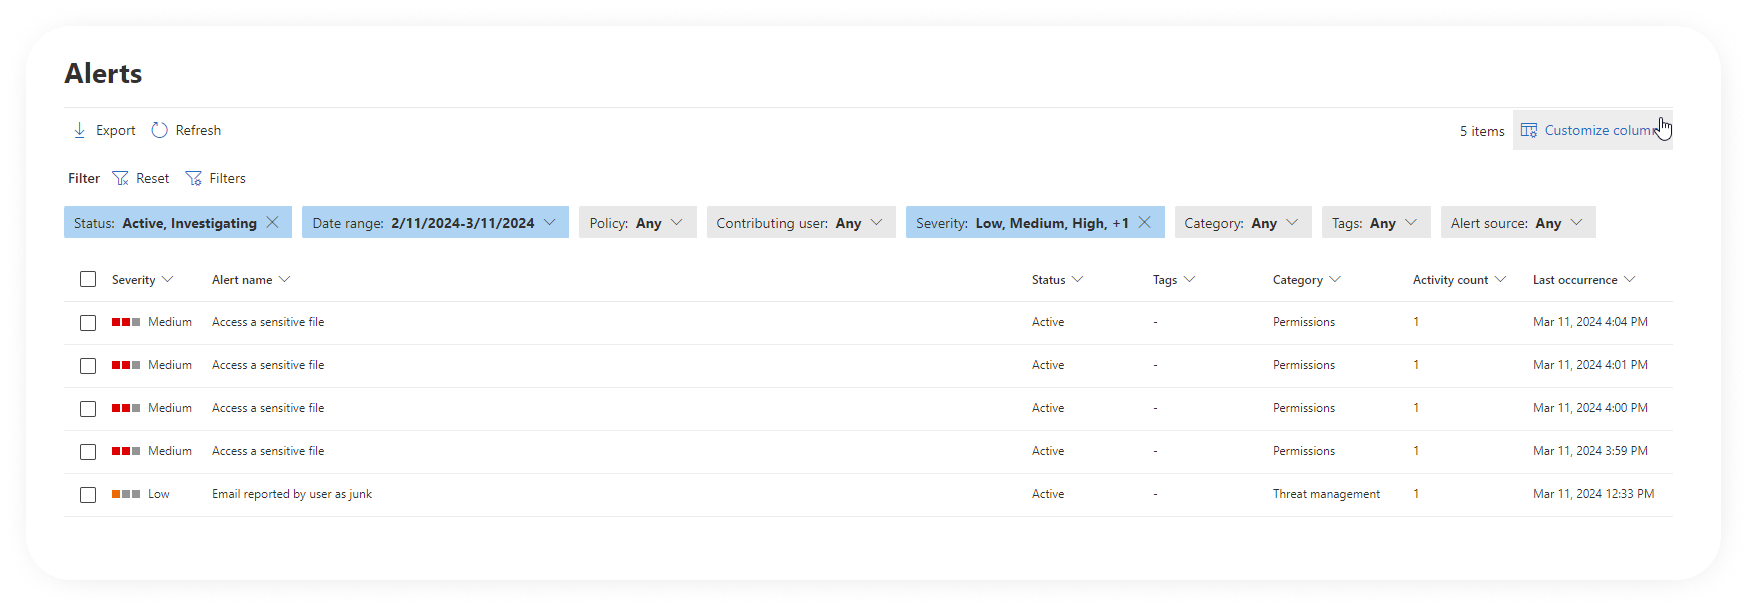
Another helpful thing is the Status column. You can assign one of the following statuses: Active (default value), Investigating, or Dismissed. This can help you track the process of resolving alerts. It is easy to distinguish new alerts vs the ones you already investigated.
Some downsides to alert policies
The Alert Policies solution is powerful and useful, but it still does have some downsides:
Licensing costs
A lot of the functionality and usefulness of this feature depends on your licenses. A lot of this functionality depends on you having an Office 365 Enterprise E5 or additional add-on subscriptions, such as:
- The list of activities you can track in custom alert policies
- A list of built-in alert policies
- The availability of advanced alerts through the MCAS integration
A static list of recipients for notifications
You need to specify a static list of User or shared mailbox emails. The typical use case is to notify group owners when some group content is shared with external users. If this sharing happens in Group A, notifications should only go out to Group A Owners. In contrast, if this happens in Group B Owners, notifications should only go out to Group B. With out-of-the-box alert policies, you would need to create a new alert for each group and manually specify the conditions and list of notification receivers to apply only for that group. Maintaining such alerts over time would be an impossible mission.
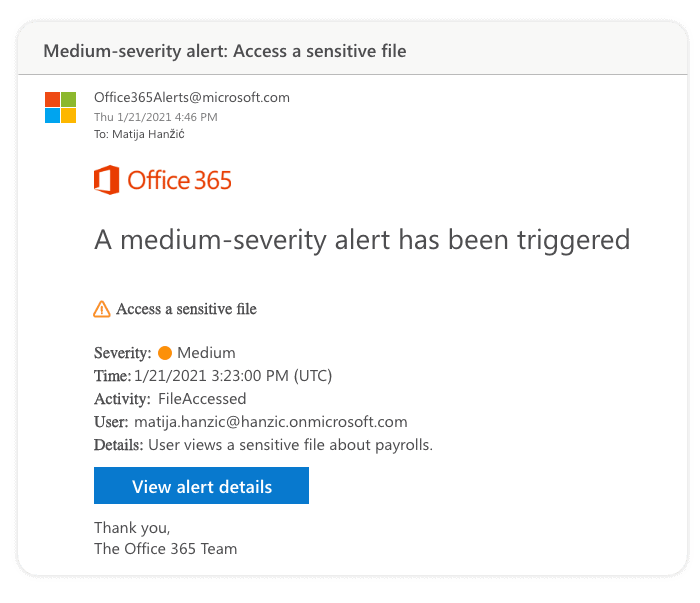
Missing crucial information in email notifications
Email notifications you receive often do not contain all the critical pieces to figure out what happened without looking at the alert’s details in Microsoft Purview. Below is an example for the File Accessed alert, where you cannot see which files were accessed or on which site.
Not all activities are available
You cannot create Alert policies for all the activities recorded in the Microsoft 365 audit log. Some workloads have more significant delays when they feed events in the audit logs, and the idea behind alerts is to be close to real-time. Only a small subset of activities is available for alerts compared to the full list of activities recorded by the audit logs.
Lack of delegation to content owners
Figuring out which management role has access to which alert category is no easy task. You‘ll see that when you take a look at the matrix with all the access levels. But even with all those roles, it is still impossible to empower group owners to create alert policies for their sites. Nor can they view triggered alerts for their sites.
Summary
Microsoft 365 security automation is one of the most important things a company can do to detect data breaches as early as possible and minimize the risk of substantial financial losses. Alert policies inside Microsoft Purview will help you secure your environment with a set of built-in policies. You can also use the tools to build custom alert policies according to your company policies.
It helps if you plan on which activities you should monitor inside your organization. It will take you some time to find the right balance between getting notifications when something serious happens and avoiding being spammed.
We also mentioned some of the downsides of Alert policies. To tackle some of them, we have built the alert feature inside Syskit Point! It is a simple but powerful solution to automate your security alerts. It does not require you to have expensive Office 365 Enterprise E5 licenses. It also helps your site, Teams, and Groups owners to set up their own alerts. Since they have hands-on knowledge of their content, they are the best people to identify risky sharing or unauthorized access.