Microsoft Graph: The essential API for Microsoft 365 integration
Table of contents
Today, we are going to dive into a topic that’s shaking up how we interact with Microsoft 365—Microsoft Graph. Now, I know what you’re thinking: “Another way? Do I really need to learn this?” The short answer is “yes,” and the long answer is “heck yes!”
You see, Microsoft Graph isn’t just another API that Microsoft is throwing at us. It’s the API. It’s like that cool kid in high school that everyone wants to be around because of its connections to all the good stuff. We’re talking Microsoft 365, Teams, SharePoint, Entra ID, and OneDrive. Basically, if it lives in Microsoft’s ecosystem, Graph’s got its fingers in it. Think of it as the master key to unlocking your tenant.
The Graph can be a bit intimidating, but we’ve got your back. We’ll break down the confusing permissions model and we’ll give you some tools that’ll make your life a lot easier; Graph Explorer, the Graph SDKs, and PnP.PowerShell.
By the time we’re done, you’ll not only understand what Graph is, but you’ll also know how to harness its power to impress your boss or automate the boring stuff you do every day. Either way, it’s a win!
The history of the Microsoft Graph
Something as vast and powerful as the Microsoft Graph usually doesn’t just happen. It’s the product of years of refinement and improvement. The first glimmer of the Graph came in 2008 when Microsoft acquired the Norwegian search company FAST. SharePoint search was already best in class for corporate intranets, but FAST took it to a whole new level and opened up functionality that wasn’t possible before the acquisition. The Graph would also draw from another of Microsoft’s acquisitions, Yammer. It had a similar Enterprise Graph.
In November of 2015 the Microsoft Graph made its first public appearance as the Office 365 Unified API. This gave Office 365 applications the ability to be intelligent when interacting with users. Once they knew who a user was, and had the user’s permission, they could get information about them regardless of where it was in Office 365. The Graph unified it all. Eventually, the rest of the online Microsoft world was rolled in, and the Office Graph became the Microsoft Graph.
Why Microsoft Graph is a game changer
Before the days of the Graph, the world was a scary place. Every Microsoft application had its own API. These APIs were developed completely independently inside of each product group. This meant they had very little in common when it came to how they stored information, how you accessed that information, or even how you get authenticated.
These APIs were also not very robust, often requiring clever hacks to get what we wanted out of them. This made it tough, if not impossible, for developers to write applications that could take advantage of everything a user was working on and what they were doing online. The Graph fixes this by giving us one unified API.
The benefits of Microsoft Graph
What are the advantages of that? We have a single service to interact with, and it’s a generally consistent experience as you move from product to product inside the Graph. Also, by using the Graph APIs, we have a promise from Microsoft that what we’re using will work. Before, at any time, our clever hacks could quit working as Microsoft changed things. With the Graph that’s less likely to happen.
We’ve seen how the Microsoft Graph is a good thing for us, but what’s in it for Microsoft? A lot. They can spend their resources improving product functionality instead of duplicating writing APIs for us. Also, the more open they are, the less likely we are to cause trouble by poking around looking for more clever hacks.
Understanding the Substrate
Before we go any further, let’s take a minute to focus on another term, you might see when you’re reading about the Microsoft Graph, the Substrate. What is the Substrate? How is it different than the Microsoft Graph? I’m glad you asked.
The Substrate is the collection of objects and services that the Graph surfaces when you interact with it. Think of the Substrate as the actual data and the Microsoft Graph as the interface you use to access data in the Substrate. In practice, the terms get used interchangeably, but it is good to understand the difference between them.
Data Microsoft Graph exposes
The Microsoft Graph exposes data from all of your favorite places in M365. You can find the whole list in this article, so I won’t list them all here. However, some of the most popular services it surfaces are SharePoint, Teams, Exchange, Planner, Search, and Entra ID.
Depending on where the data is coming from, some of it is copied from its primary location to the substrate, and some of it is referenced directly. Microsoft has not published which is synced and which is referenced, and it is constantly changing. You can see it sometimes when you make a change in one application, and it’s not immediately visible in the Microsoft Graph.
Referenced data is always up to date, while the synced data might lag a bit. The good news is that Microsoft has been steadily improving the timeliness of the data in the Microsoft Graph.
Depending on where the data is coming from, some of it is copied from its primary location to the substrate, and some of it is referenced directly. Microsoft has not published which is synced and which is referenced, and it is constantly changing.
You can see it sometimes when you make a change in one application, and it’s not immediately visible in the Microsoft Graph. Referenced data is always up to date, while the synced data might lag a bit. The good news is that Microsoft has been steadily improving the timeliness of the data in the Microsoft Graph.
Microsoft Graph permissions
With an application as big and complex as the Graph, I’m sure there are no surprised faces when I say that Graph Permissions are complicated. Like most apps, permissions can first be broken down into two main areas: Authentication and Authorization.
Authentication vs. authorization
While those might seem the same, they have very different roles. Authentication answers the question, “Are you who you say you are?” Entering a username and password is the easiest example of authentication. It’s not enough to say you’re Todd; you have to prove you’re Todd. Provide something only Todd can provide, like an MFA token, or answer something only Todd can answer, like a password. Once you’ve done that, you’re authenticated.
Authorization answers the question, “I believe you are who you say you are, but do you have permission to access the thing you’re trying to access?” I know you’re Todd, but are you supposed to be looking at John’s email inbox?
Delegated access vs. app-only access
There are two ways to authenticate to the Graph:
- Delegated Access, also known as “User Scopes” or “User Access”. They’re all ways of saying access to the graph is on behalf of a signed-in user. This means whatever app is using Delegated Access for authentication will only ever have access to whatever that user has access to. If an application has been granted the “Sites.Read.All” delegated permission, it will still only be able to access the sites the logged-in user has access to.
- App-only access, also called “App Roles, ” is used in cases where the work doesn’t happen in the context of a user. They are somewhat like service accounts or daemons. If an application has app-only access and has been given the “Sites.Read.All” permission, it can see every site.
How Microsoft Graph permissions work
I keep referencing permissions like “Sites.Read.All,” but what is that? That’s the Authorization part of Graph permissions. This is how the Graph controls what a user or application can access once they’ve been authenticated. Permissions are in this form:
Resource.Operation.Constraint
In the examples I’ve given above, Sites is the Resource, Read is the Operation, and All is the Constraint. The list of permissions is quite exhaustive. You can see them all on the Microsoft Graph permissions reference page. We’ll cover some of the common ones here to give you an example of how they work.
Sites is the Resource for SharePoint and OneDrive sites. You use it when you want to create or delete sites or get a list of all the sites in your tenant, among other things. This is also how you access all the objects below the site, like lists, libraries, files, and metadata.
If you want to create or edit users in your organization, give access to the User resource. It’s the one that lets you interact with user objects you’re used to seeing in Entra ID. If you want to work with Groups in Entra ID, you’ll need access to the Groups resource.
The operation and constraint names are self-explanatory, for the most part. If you’re given the permission User.Read.All your app has permission to read details about all the users in Entra ID. The permission Group.ReadWrite.All means you can create, read, update, and delete groups.
I know all of this is confusing. Let’s grab my favorite tool for interacting with the Graph, the Graph Explorer, and try some of this out.
Using the Microsoft Graph Explorer
At the base level, when you interact with the Graph it’s with RESTful API calls. That’s pretty ugly to deal with, so you need a nice tool to make it easier while you’re learning. My favorite is Microsoft’s Graph Explorer. Graph Explorer is a web page with a friendly UI that you can use to explore what’s in the Graph, and which API calls to use to get it. When you just open it up, the Graph Explorer looks like this:
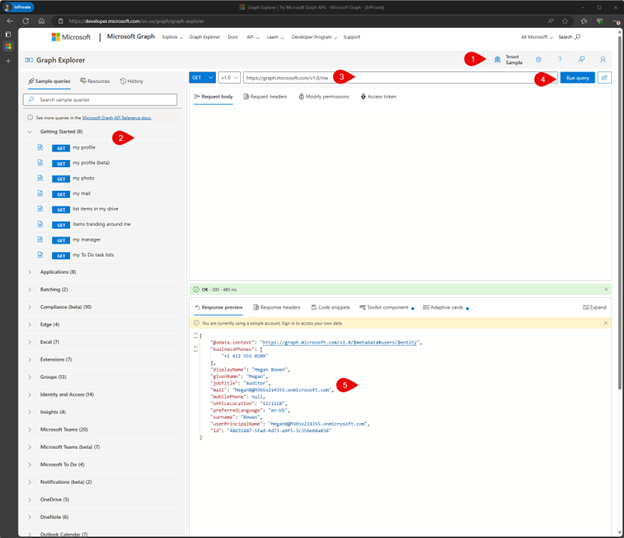
At sticker #1, you’ll notice we’re using a sample tenant by default. This is handy for poking around, but if you want to sign in to your own tenant, you can do that too. Just click the pawn to the right of #1.
At #2 you’ll see all the Microsoft Graph calls you can make. You can scroll through the list and find the ones you’re interested in or you can search for things like “site” or “user” and find them that way. Notice there’s also a history tab at the top. That’s handy for finding a Graph object you were using in the past but can’t remember the name of later on.
#3 is the raw RESTful API call the Graph Explorer is going to make to get you the information you picked in #2. The calls you’re able to perform in #2 are dependent on what permissions you have. This is one of the trickiest pieces to using the Graph. Fortunately, the Graph Explorer is here to help.
Once you have a query loaded, you can click “Modify Permissions” under #3 to see what permissions are needed for that call and to add them if you don’t have them. This is invaluable when you’re trying to do something with the Graph, and you get permission (also referred to as “scope”) errors.
Bring that same query up in Graph Explorer and see what you need. Underneath the #4 sticker is a button that will show you the documentation for that query. It will also explain what the query does and which permissions you need to execute it.
After you’ve loaded your query, click “Run query” by #4 to see how it goes.
#5 is where all the fun is. After all that work, #5 is where you get your results. You’ll notice the output is formatted as JSON, so it’s easy to work with regardless of what tools you’re familiar with. Speaking of other tools, once you’ve used the UI to get exactly what information you want from the Microsoft Graph, you can click the “Code snippets” button to see how to make that same call with the language of your choice. The languages included are C#, the M365 CLI, Go, Java, JavaScript, PHP, the PowerShell Graph SDK, and Python. If you’re building adaptive cards, there’s even an example of that.
Earlier we talked about scopes, and what scopes you’ll need for an application. We didn’t talk about how you’d know which scopes to give your application. This is one way to find out. Load up the query you’re trying to make in the Graph Explorer and hit the documentation button beneath the #4 sticker.
Among other things, it will tell you which scopes that call needs. If you’re hitting the /sites endpoint to read a site, you need a scope like Sites.Read.All to be able to do that. Remember that delegated permissions don’t give any backdoors around security. If the user you’re running an app as doesn’t have permission to a site, no permission scope to the Graph will get around that.
Access the Microsoft Graph with other tools
Finding Graph calls in the Graph Explorer is nice, but you can’t really use it in any applications. How do you actually use the information in the Graph? You can access it directly through RESTful API calls. While that works perfectly fine, there is often a better way. Many application frameworks also have a way to access the Graph. There are too many of those to list in this blog post; however, I will give you two to get started.
Microsoft Graph SDK
An easy way to get started interacting with the Microsoft Graph is through one of the official SDKs from Microsoft. They support eight languages; C#, CLI, PowerShell, TypeScript/Javascript, Java, Go, PHP, and Python. You can find all the downloads at the SDK landing page. They’ve made it pretty easy to install the SDK for your language of choice and start interacting with the Graph. These SDKs are generated with Kiota and are very comprehensive. While they’re full-featured, that results in them being a little unwieldy to use. If you choose, you can also use Kiota to roll your own bespoke SDK to use with your project.
PnP.PowerShell
While it’s not directly a tool to interact with the Graph, if you’re using it already, the PnP.PowerShell is a pretty handy tool. It allows you to query and post to the Graph using the same endpoints you see in the Graph Explorer, using Invoke-PnPGraphMethod.
For instance, to get a list of all the SharePoint sites you can see, you would use this query in Graph Explorer:
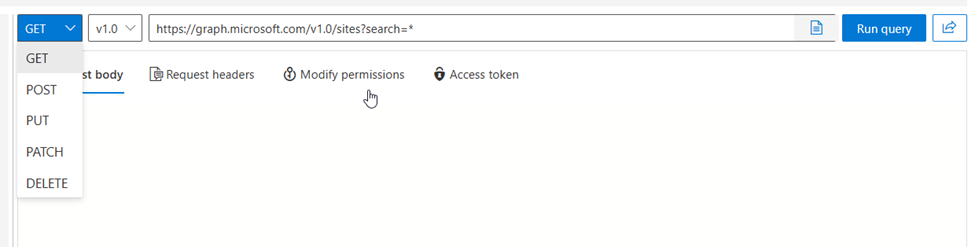
Once you’ve tweaked the query in Graph Explorer, you can take the query, https://graph.microsoft.com/v1.0/sites?search=*, and use it directly with PnP.PowerShell like this:
(Invoke-PnPGraphMethod -Url “https://graph.microsoft.com/v1.0/sites?search=*”).value
The results look like this:
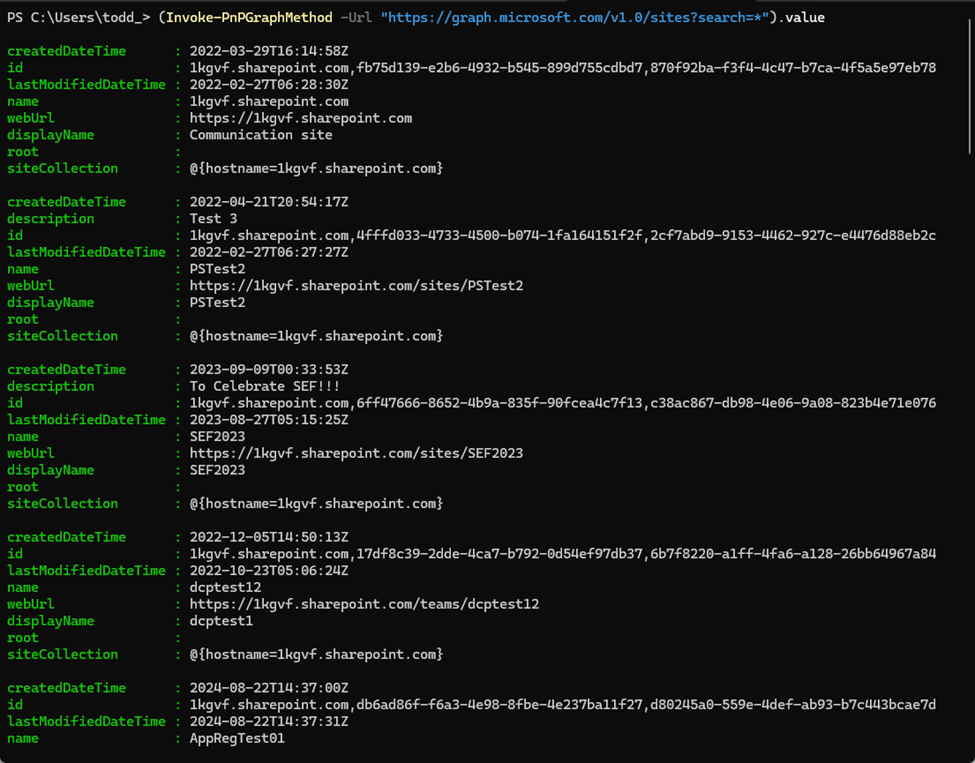
The value property is a collection and each site is an object in that collection. This works with any Graph endpoint and call that the user you connected with has permission for. This, combined with the Graph Explorer, is a great way to add Graph functionality to your PowerShell scripts without a ton of work.
Conclusion
The Microsoft Graph can be intimidating, especially to folks who haven’t worked with it. Its terminology and purpose can be confusing if you’re not using it on a regular basis. And its permission model can seem downright hostile when you’re first trying to work with it. Thankfully, all of this can be overcome by using the Graph and getting familiar with it.
Tools like the Graph Explorer can help demystify the Graph’s permissions and open up a whole new world by showing you what the Graph can do for you. Then, you can use tools from the SDK to work that functionality into your next big project. Before long, you will have mastered the Graph and leveled up any Microsoft 365 project you’re working on.