Office 365 Groups – 3 best practices for admins to avoid clutter
Table of contents
By default, every user from your organization has the right to create an Office 365 Group. It’s a big plus for collaboration, but it’s an even bigger headache for management.
Just picture it: everyone is creating groups without any standardization or consulting with others. It’s like in that Old McDonald song: Groups here, groups there, everywhere—groups!
Best practice #1: Set up the Office 365 Groups naming policy
It’s a good practice to use a group naming policy to enforce a standardized naming strategy. Having in place a naming policy will help your users identify the function of the group, its membership, geographic region, or the group creator. There are two naming policies, which we describe below.
1. Prefixes and suffixes
The easiest way to define your naming conventions is to use prefixes and suffixes. These can be either fixed strings, like ‘_Name’, or user attributes, like [Department], which will get substituted depending on the group creator.
For example, let’s imagine a company that operates all around the globe and has multiple marketing departments. If a user from the US wants to create a group named “Promo content”, it would be a good idea to set up a policy like this one:
Policy = “[Department] [Country] [GroupName]”
In this case, the group creator’s Azure Active Directory (AAD) attributes will be:
Department = “Marketing”Country = “US”
This would result in a creation of a group with this name:
Group name = “Marketing US Promo content”
With just a quick glance at the group name and you can identify the location and the function of the group.
Some important things to note:
- This feature requires an AAD Premium license.
- The supported user attributes in AAD are: [Department], [Company], [Office], [StateOrProvince], [CountryOrRegion], [Title].
- Any other user attributes are considered as fixed strings, e.g., “[PostalCode]”.
- You cannot add extension attributes or custom attributes.
- You can write up to 53 characters in suffixes and prefixes.
2. Blocked words
For safety or decency reasons, you might want to create a list of blocked words—separated by commas— that cannot be used for group names. A common scenario is to block the profanities and obscenities, or specific words you want only certain users to have the right to use. So, if a user from an HR department wants to enter the word “Payroll” without permission from an admin, the group name will fail because the admin has restricted the use of that word only to users from Finance.
Things to bear in mind
- This feature requires an AAD premium license.
- Blocked words work only as an exact match.
- Blocked words are not case-sensitive.
- You can block up to 5000 words.
Admin override
Usually, a selective group of administrators will be exempted from these policies and are allowed to create groups with any desired naming conventions, even with blocked words. Administrators that may typically be exempted from these policies include:
- Global admin.
- Partner Tier 1 Support.
- Partner Tier 2 Support.
- User account admin.
- Directory writers.
Check how to configure the naming policy with the Azure AD PowerShell.
Best practice #2: Set up the Office 365 Groups expiration policy
Before Office 365, only admins had a right to create groups, but now, by default, every tenant user can auto-provision a new group with just a couple of clicks. This can increase the number of groups in your tenant, potentially making their management almost impossible. At some point in time, you’ll need to clean up the mess and remove some of your groups – groups that may not be in use any more or duplicated groups. One easy way to do this is to use an expiration policy to delete your unwanted groups. Removing unnecessary groups will also clean up storage and save you some money.
What is an Expiration Policy?
Administrators can specify an expiration period after which time the group will be deleted. Group owners will automatically get an email before the expiration that allows them to renew the group for another expiration interval. When a group expires, it is soft-deleted, which means you can restore it for up to 30 days.
Who can set it up?
There are three levels of permissions regarding the expiration policy. Office 365 global admin can create, read, update, or delete the Office 365 Groups expiration policy settings. Owners of the groups can renew or restore groups they owned.
How can they set it up?
The expiration is turned off by default, so if you want to use it, the administrator will need to enable it for your tenant. To enable it, follow these steps:
- Open the Azure Active Directory (AAD) admin center;
- Navigate to the Groups;
- Under Settings,click the Expiration option.
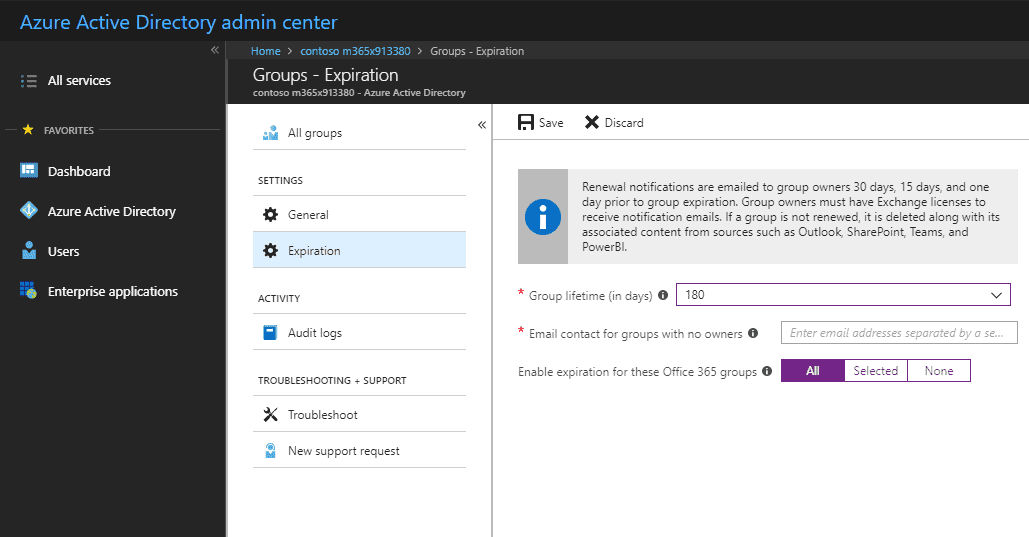
Here you can set the default group lifetime and specify how far in advance you want to trigger the first and second expiration notifications. The group lifetime can be set to 180 days, 365 days or to a custom value that you specify.
Best practice #3: Set up the Office 365 Groups Allow/Block list
Allow guest users
Let’s say your company has a partnership or collaborates regularly with another company. You can add the partner company domain to your Allow list, so your users can add those guests to their groups.
Block guest users
If you don’t want your users to add people from certain domains, like private emails, to their groups, you can add those domains to the Block list. For example, you can add Gmail.com, Yahoo.com, or other popular email providers’ domains to your Block list.
Important things to note:
- You cannot set up both Allow and Block lists for a single group. By default, whatever domain is not in the Allow list, is in Block list, and vice versa.
- This feature is only available with a premium AAD license.
- You can currently set only one Allow/Block list per organization. However, you can update the existing list countless times.
- A group Allow/Block list works independently from a SharePoint Allow/Block list.
- The list doesn’t apply to guests already added to the group, but you can remove them through the script or using our permissions tool: Syskit Point.
Manage your Office 365 Groups with ease
Syskit Point can help you manage your Office 365 Groups and avoid clutter. With this tool you can:
- List all Office 365 Groups in the tenant and get an overview of each group’s owners and members.
- Quickly manage group owners and members.
- See who has access to the content inside the group site collection and manage permissions from a single screen.