Microsoft SharePoint permission levels explained
Table of contents
Microsoft SharePoint allows companies to tightly control employee access to data through a complex and layered system of SharePoint permission levels settings. While this is undoubtedly one of the most useful functionalities of SharePoint, it can also be the most difficult to wrap your head around. Keep reading our guide below for everything you need to know about SharePoint permission levels.
What are SharePoint permission levels?
There are two meanings of the term ‘permission levels’ when discussing access control in SharePoint.
The first is about the permission levels of a specific site, folder, or file in SharePoint. Every piece of data has its own unique permission levels, which can be controlled and customized by its owner.
The second refers to the permission levels held by a particular SharePoint user or group of users. For example, an employee working in accounting might have the permission levels necessary to view that month’s expense reports, but not the permission levels needed to see the minutes of a colleague’s supervisory meeting.
SharePoint site owners and administrators can fully control both types of permission levels.
Why are SharePoint permission levels important?
Permission levels in SharePoint are vital to keeping your company’s sensitive data secure. In most companies, not all employees require access to every level of company data. It’s considered best practice for teams to operate a limited access policy, where the default setting is that employees cannot view data unless they need it for their work.
What are the 3 default permission groups in SharePoint?
In SharePoint, users can be grouped into separate groups depending on their data access level.
There are three types of default permission groups:
Visitors
Visitors are read-only users. They are permitted only to read and download documents.
Members
Members can also read and download documents and add, edit, and delete document content. They are also permitted to share content with others.
Owners
Owners have full control over a SharePoint site and possess the highest permission levels. They can do everything Visitors and Members can do and can also oversee site security, add more web parts, and manage navigation controls.
At least one ‘owner’ must be selected when creating a new SharePoint site.
How to create custom groups in SharePoint
In addition to the default groups listed above, you can also create your own custom security groups. Each custom group can be assigned either one or multiple permission levels.
Here’s how to create a custom group:
1. Under Advanced Permission Settings, click Create Group.
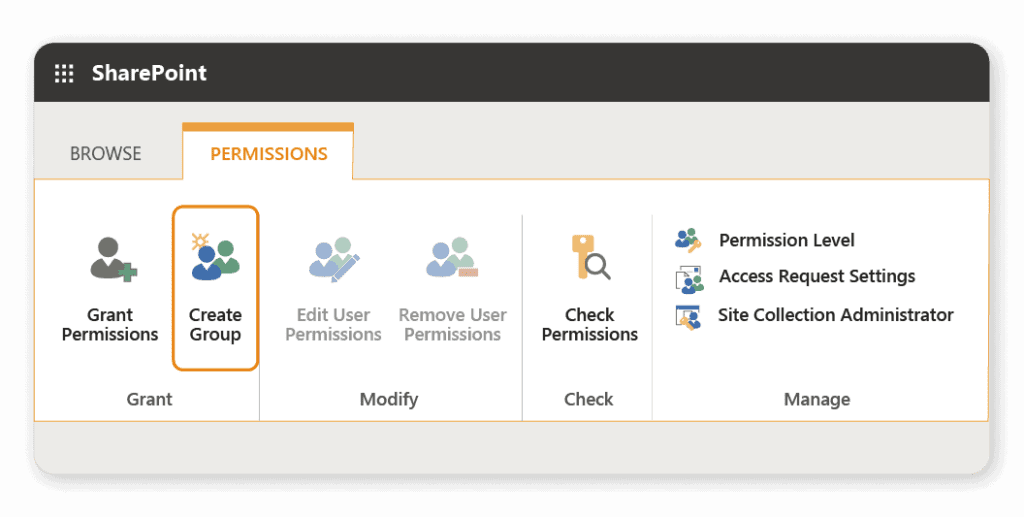
2. You can now assign your new group a name and select who has permission to view and add members to the group.
3. Choose the permission level you wish to assign to the group. You can select from any of the 7 default permission levels.
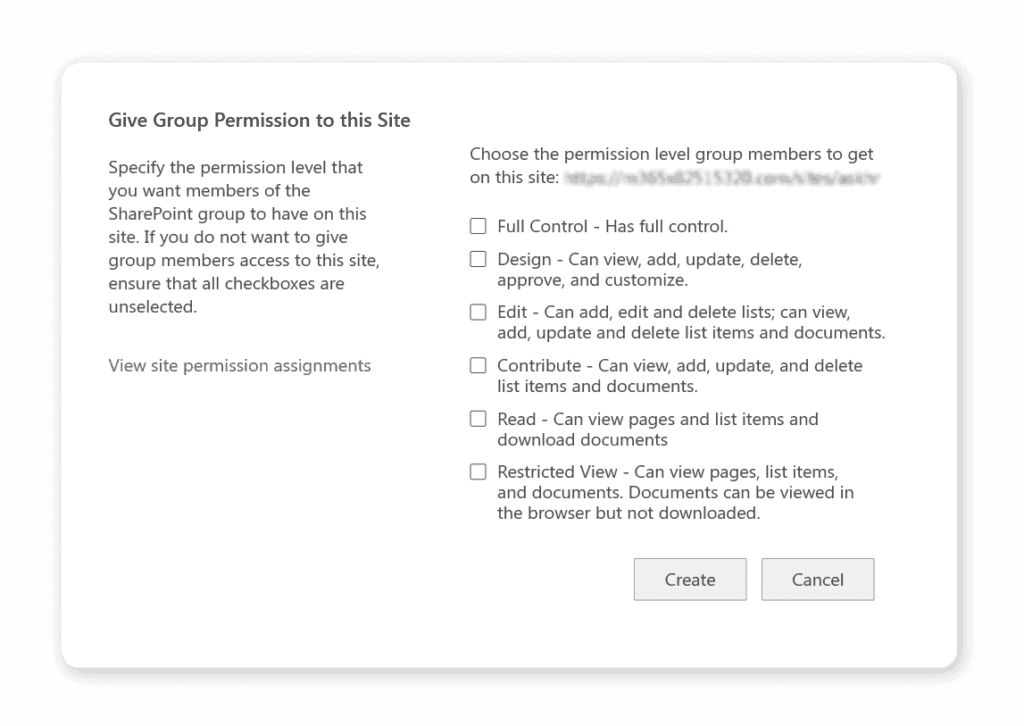
4. Navigate back to the permissions page. You can now assign users to your newly created group.
How can you change a user’s permission levels in SharePoint?
To add or remove a user or group’s ability to access data on SharePoint, you must be an owner of the site, folder, or file in question.
There are two ways for owners to grant users permission levels:
- Add the user to a specific SharePoint site, list or document with a named permission level.
- Add the user to a SharePoint group which has already been granted specific permission levels.
Suppose you want to grant a user access to a set of documents. In that case, the best practice in SharePoint is to add them to a group that already has access to these documents instead of giving access to each document individually.
This makes access control easier to manage – if an employee leaves the company, you can easily remove from them the groups they are in, instead of manually revoking their access to every single document.
What are the 7 default permission levels in SharePoint?
Every group in SharePoint is assigned a default permission level. The three default groups have the following default permission levels.
Site visitors – Read-only
Site members– Edit
Site owners– Full Control
In addition to the three listed above, four more default permission levels exist, meaning there are 7 permission levels in total:
View Only: Users can view application pages.
Limited Access: Users can access shared resources and specific assets. This level grants them access to specific data without enabling them access to the whole site.
Read: Users can read and download pages and list items.
Contribute: Users can manage personal views, edit items and user information, delete versions in existing lists and document libraries, and add, remove, and update personal web parts.
Edit: Users can manage lists.
Design: Users can view, add, update, delete, approve, and customize items or site pages.
Full Control: Users have full control of the site.
What are the default permission levels for a publishing site template?
If you use a site template different from the team site template, you will see a different list of default SharePoint permission levels.
A publishing site template typically used to build company intranets will show the following three permission level settings instead of the 7 listed above:
Restricted Read: Users can view pages and documents.
Approve: Users can edit and approve pages, list items, and documents.
Manage Hierarchy: In addition to the above, users can create sites and change site permissions.
What are SharePoint custom permission levels?
You can customize nearly all of the 7 default permission levels according to your needs. For example, you might want to set a new permission level that would allow users to create alerts, but not allow them to edit the document.
Limited Access and Full Control are the only settings that cannot be customized in any way.
How to create new permission levels in SharePoint
If you want to customize permission levels in SharePoint, the best practice is to create a new permission level instead of making changes to the default options.
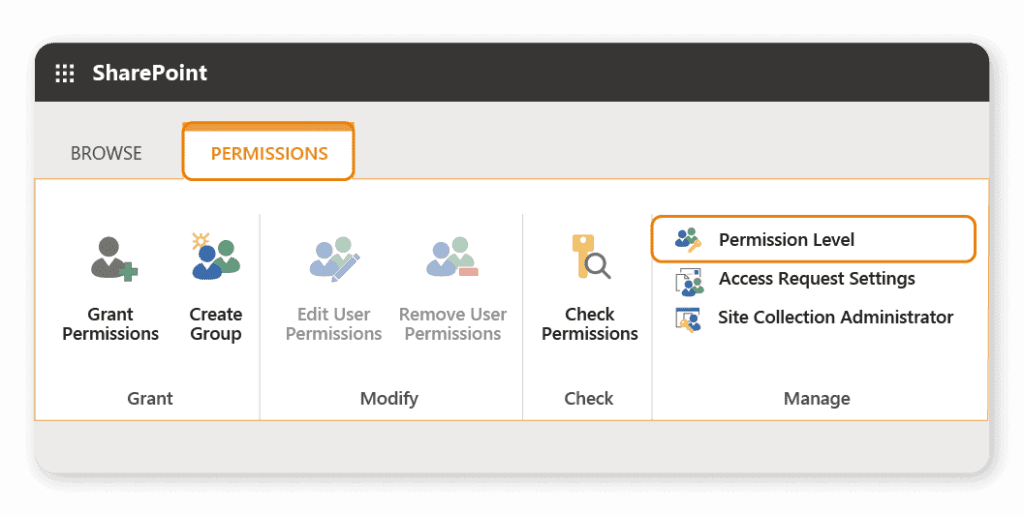
- Click on the gear icon in the top right-hand corner of your site, and select ‘Advanced Permissions’.
- Under the ‘Permissions’ tab, click ‘Permissions Levels’ and then ‘Add a Permission Level’.
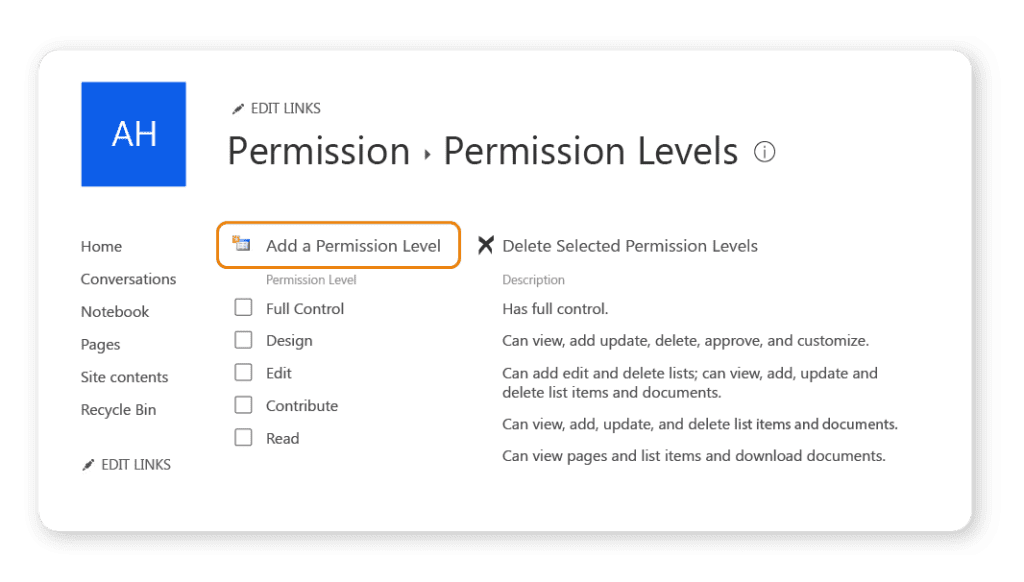
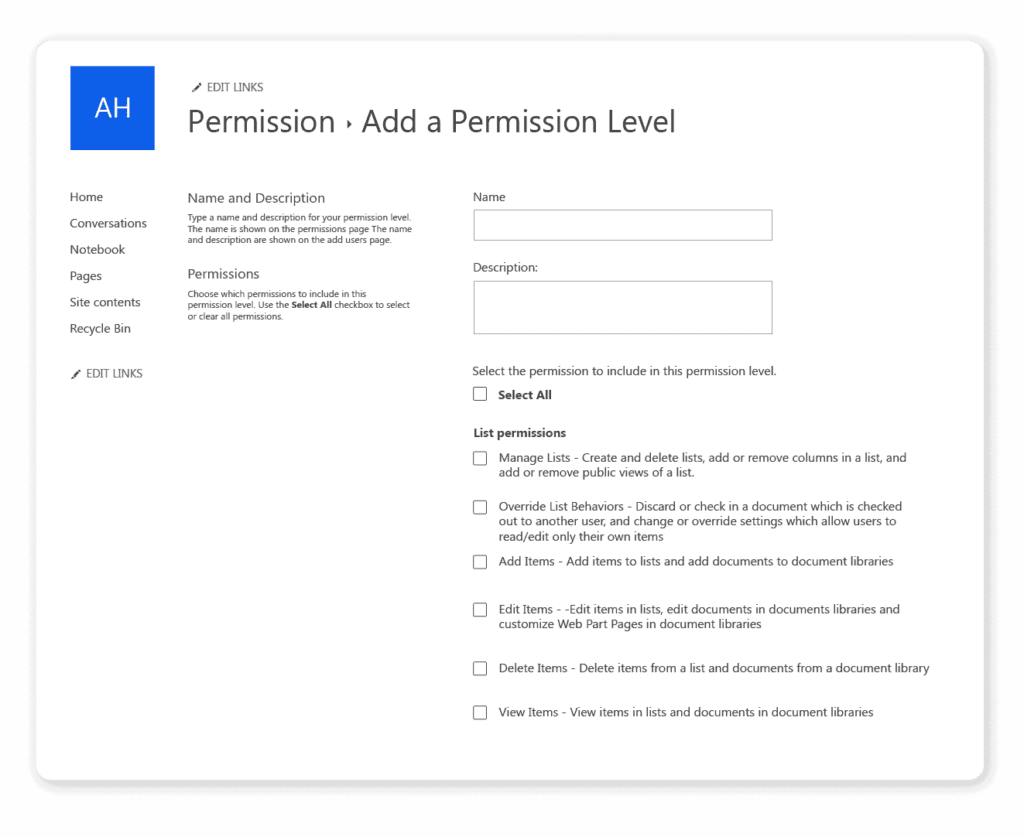
3. You can now select the permissions you would like to add to your new permissions level.
You will notice that when you select permissions, other options may also automatically be selected. For example, if you select ‘Create Alert’, then ‘View Items’, ‘View Pages’, and ‘Open’ are also selected, since these are necessary to create an alert.
List and library level permissions in SharePoint
In cases where site-level permissions aren’t suitable, you can also set permission levels for specific document lists or libraries within them.
While the terms ‘list’ and ‘libraries’ may appear interchangeable, they are not. A ‘library’ essentially refers to a ‘document library’, which acts like a filing cabinet for documents. Every SharePoint site has at least one library, but could have multiple. On the other hand, a list is used for holding non-document information, typically stored in a spreadsheet, such as client information or contact numbers.
How to set permission levels for a list or library in SharePoint
If you’re an administrator or owner of a list or library, you can set its permission levels to ensure that the right people can access the data, while restricting everyone else:
- Open the list or library, click on settings (the gear icon), and select ‘Library Settings’ or ‘List Settings’.
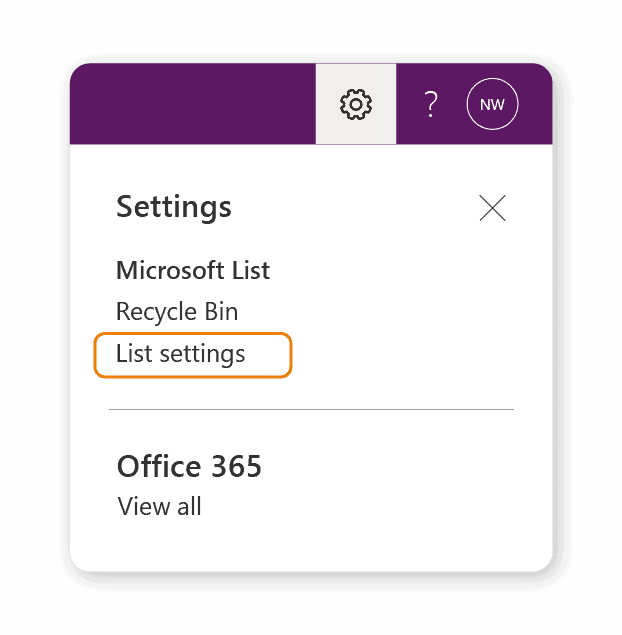
2. Click on ‘Permissions for this document library’ or ‘Permissions for this list’.
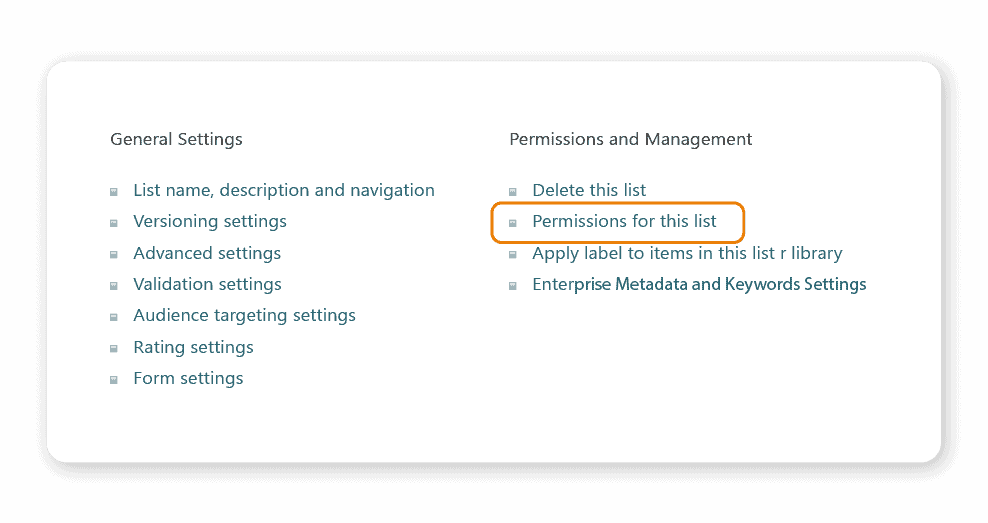
- You will now see the same permissions that you have set at site level. To disinherit these settings, click ‘Stop Inheriting Permissions’.
- You can now modify the list or library’s permission settings as you wish.
Folder and file level permissions in SharePoint
Just like with lists and libraries, owners and administrators can also manage and customize the permission levels of individual folders and files within a site.
How to set folder permissions in SharePoint
To set unique permissions for a folder in SharePoint, follow the steps below:
- Select or hover over the relevant folder.
- Click on the three dots icon and select ‘Manage Access’.
- Here you can either create and copy a sharing link to the folder, or search for a user to add to the ‘Direct Access’ section.
- To create custom permissions, select ‘Advanced’ in the bottom right-hand corner.
- Click ‘Stop Inheriting Permissions’. You can now create new permissions and change the permissions of existing groups.
How to set file permissions in SharePoint
You can even set unique permission levels for individual files in SharePoint. While this feature is useful, it’s advisable to use it only when necessary since it can be easy to lose track of multiple individual file permissions.
- Click on the three dots icon next to a file name to show actions.
- Select ‘Manage Access’. You can now manage the file’s sharing links and any users who have been granted direct access.
- To create custom permissions, click ‘Advanced’ and then ‘Stop Inheriting Permissions’. You now have a blank slate from which you can add new permission levels.
How are permission levels inherited in SharePoint?
Permission levels in SharePoint are inherited from the top down. This means that any changes made to the permission levels of a site will also affect the permission levels of any subsites within it.
All lists, libraries, folders and files also inherit permission settings from the site that contains them, which is known as their ‘parent site’.
If there is specific data that you don’t want to inherit the permission levels of its parent, you can select ‘Stop Inheriting Permissions’ within its settings and create new custom permissions.
What is ‘Permission-driven security’ in SharePoint?
SharePoint operates using a security concept known as either ‘Security Trimming’ or ‘Permission-Driven Security’. In short, these concepts mean that only users granted permission to see specific SharePoint objects will even know they exist. They won’t appear in keyword searches, and the names of sites, libraries, or files will not be visible. Employees at different security levels in a company will see different SharePoint search results depending on their permission levels.
How can you unshare sites, folders, and files in SharePoint?
If you’re a member of a site, folder, or file in SharePoint, you might have noticed that once you have shared a document within your organization, you cannot undo this action and unshare the document. This is because only owners have the permission levels required to unshare a document, and members do not. If you’re the owner of a site, folder, or file, you can manually revoke access to them for groups or individual users for SharePoint permissions cleanup.
To manage your company’s SharePoint Online ecosystem, check out Syskit Point, a platform that will help you govern and secure your Microsoft 365 environment and give you deep visibility into your entire inventory.

