The ultimate security audit guide for Microsoft Office 365 and SharePoint
Table of contents
Why is SharePoint audit important
Guarding your intellectual property
One of the major political crises in the world today was caused by a former SharePoint admin, who downloaded and published those documents upon terminating his contract. While there are ways and methods to prevent that from happening, none of those methods can make a hundred percent guarantee that something like this will not occur. A SharePoint change log can provide information if and when this has happened, so you can react quickly and contain the potential damage.
Governance and Legal Requirements
Many strict regulations out there are very specific regarding how companies need to protect sensitive information and what they need to do in case of a data breach. The European GDPR (General Data Protection Regulation), heavily based on the German BDSG law, foresees draconian punishments for not reporting breaches in personal data safeguarding. We see now that more and more states in the USA are making similar policies, like the California Consumer Privacy Act (CCPA) or even stricter laws, leaning on European GDPR legislation. Besides that, the Health Insurance Portability and Accountability Act (HIPAA) in the United States is equally strict regarding personal data breaches. Similar regulations in other parts of the world require similar or even stricter data-guarding policies, so it is evident that SharePoint, as the market leader in document storage, needs to give answers and provide possibilities to comply with those regulations.
The most important national, regional, or industry-specific laws that require auditing are:
- GDPR: Most famous compliance that aims to protect EU citizens’ data and give a person more control over the data that different organizations are storing about a person.
- SOX: So-called Sarbanes-Oxley is created to enhance public corporations’ responsibility and financial disclosure and to combat accounting fraud. This is important in the states where all public companies, without exception, are subject to this compliance.
- FedRAMP: Federal Risk and Authorization Management Program is a USA government program that is a standardized approach to security in cloud products and services. All major cloud providers are supporting it, and so is Office 365.
- FERPA: Family Educational Rights and Privacy Act where the law protests student records and confidentiality and ensures that any parent has the right to inspect and review education records.
- FISMA: Federal Information Security Management Act is a framework that ensures security control over information and content that support federal operations.
- HIPAA/HITECH: The famous Health Insurance Portability and Accountability Act is an important standard to protect and secure personal electronic health data. The compliance applies to all the healthcare providers in the USA and businesses associated with health that store or transmit personal health information.
- ISO 27001 and ISO 27018: Information security management system that is not required by law but a standard that you apply voluntarily, but it applies to all the various organizations worldwide in all the industries, and it is not industry-specific.
- PCI DSS Level One: Security standard for cardholders that defines different combinations of policies, procedures, technical measures, and how to secure physical data.
- CCPA (California Consumer Privacy Act): A USA version of the GDPR that is focused on personal privacy and data. It aims to grant California residents more control over what companies store about a person. It lets consumers force companies to delete what they have collected about a person. Technically it applies only to companies doing business in California, but in reality, all US companies will comply because they don’t want to create separate systems for every other state.
Auditing SharePoint data, access, and people through monitoring and assessment of SharePoint Change Logs can help detect such breaches, establish what has happened, and prevent similar breaches in the future.
Understanding Your Content
While the previous points are based on legal requirements and fear – that are both very valid reasons – auditing SharePoint is just as important for the reasons that have nothing to do with governments, policies, and compliance. Auditing SharePoint content can help you understand your content: you will want to know which content is actually being used, in which ways, and by whom. That knowledge can and will help you understand what is important for your company and in what areas you need to improve that content. In the same way, it is going to tell you which content is not used, which might help you decide where to put your future investments.
Think of intranets and learning portals: you will want to know which areas are well visited and which are not, that will give you an idea of what your employees want to see and what is irrelevant for them. Once you have this information, you will want to understand and improve that content, but the first step in that process is obtaining that information. SharePoint Audit logs can and will greatly help you in that process.
Understanding Your Teams
From the beginning, SharePoint was a platform for business app development. Numerous apps, solutions, and projects have been based on SharePoint, and nowadays, with new development techniques such as SharePoint Apps and especially SharePoint Framework, this is still the truth.
Understanding the use of those solutions can help you understand your teams and how they work. The answer to the question “Which solutions are often used, and which are not?” can help you understand and support your teams and also direct your investments. You might want to retire unused solutions and save money that is spent on their support or invest more resources and money into solutions that are well adopted and used. Auditing SharePoint solutions can give you the exact information of who is using your solutions, how much they are used, and what are the most used parts of those solutions. This way, you can understand how those solutions are important for your team members and specific individuals, which can help you make the right decisions on where to direct your investments.
Quickly Repair Mistakes and Avoid Repeating Them
One of the common scenarios in SharePoint is that an important file is deleted or moved to another location by a team member, and other team members are not able to find or access it. This does not even have to be a voluntary action by the team member, the file could have been deleted or moved by accident. This can easily happen nowadays with OneDrive Sync, one mouse click done by mistake, and the document is gone from the library and possibly from SharePoint.
SharePoint auditing helps you detect what happened and determine the reasons for the possible incidents. Once you detect what has happened, you might contact the person who performed the action to see the reasons and, if necessary, to recover the changes. Furthermore, you can take preemptive action to avoid those mistakes in the future – such as adjusting permission levels or turning off sync for sites and libraries. Auditing SharePoint will, in any case, help you to determine the right causes and decide on the right course of action.
The Fear of SharePoint Auditing
One of the common discussions when deciding to turn SharePoint auditing on and collect information is if the audit logs are compliant with company policies and best practices. Very often, the objections are coming from the Worker Councils and other worker-protection organizations, through that, auditing can be used for tight monitoring of workers’ behavior. When SharePoint Auditing was first included in the SharePoint Server, comments such as “they will not be able to sell this spying feature in Europe” could be heard.
Regardless of the debate, companies should be able to be in the know of who is actually working on the documents and cases, SharePoint auditing is not an espionage feature. It is, first and foremost, a compliance feature, and the legislation will often demand that it be turned on, if not everywhere, then at least on critical parts of SharePoint.
True, information can be misused – including the checking in and out of when people enter the office building – and SharePoint Change Logs are no exception here. But in the grand scheme of things, the legislation, the compliance, and better insights about content and productivity should overweigh the fear of being tightly monitored.
Auditing events and generating reports: What can SharePoint audit do?
SharePoint server can audit ten different events that happen with the data and one event that audits audit events itself. Sounds complicated? It’s actually not.
On the one hand, we want to know what happens with our content – is it used, how it is used, what employees are looking for, etc. On the other hand, we want to know if audit logs themselves have been manipulated – there is no proper compliance report without it.
Audited Events
Opened and downloaded documents, viewed items in lists, viewed item properties
An auditing record is produced each time a user interacts with SharePoint content. Since we differentiate between two main types of content in SharePoint – Documents and List items, this event behaves slightly differently on both of those types.
For the Documents, the “opened and downloaded” event will be recorded in the SharePoint audit logs when a user opens a document, downloads it, or views its properties. For the list item, where there is obviously no download, the open/view properties event will be tracked here. Beware: viewing “secondary” properties of a SharePoint Document or List Item, such as viewing the version history, or permissions, is also considered a “view properties” event.
Edited items
The edited items event is somewhat misleading for people who are new to SharePoint since it collects both edited and created events for a document and a list item. The SharePoint veterans know that the Edited event is always triggered immediately after the created event, so this is no surprise. Still, good to know: this event in auditing SharePoint will collect info for both documents and items being created and when they are modified.
Checked out and checked in items
Even if it seems that checking the documents in and out has lost its importance in the last few years, it is still an important part of the collaboration and document management process for many companies. Each check-in or check-out of an item will be stored in the audit logs by this event.
Items that have been moved and copied to another location in the site collection
Users can move or copy documents into another location inside the same Site Collection (which is a security boundary), and that move/copy action will be tracked to the SharePoint Audit logs with this event. If a user downloads the document and reuploads it into a location in another Site Collection or even Web Application, the appropriate open/download and edit/create events will be audited instead.
Deleted and restored items
Each time an item or a document is deleted or restored from the recycle bin, the action is going to be stored in the SharePoint audit logs.
Changes to content types and columns
Each time a column or a content type is modified, this information is going to be stored in the SharePoint audit logs.
Search queries
SharePoint Audit Logs will record all search queries performed by the users. This can be extremely useful later when you will want to know what your users are searching for in your SharePoint.
Changes to user accounts and permissions
One of the most important things when auditing SharePoint is to track and analyze permission changes. Each time permissions are changed, a user has been granted permissions on a document or list item, permissions have been revoked, or the group membership has been changed, an event is tracked in the SharePoint audit logs, which helps you to later identify which changes have happened, and who has initiated them.
Workflow events
SharePoint content – documents, list items, etc – can also be modified by SharePoint Workflows. This is where these types of events come in place, each time the content has been changed by the workflow, there will be a record in the SharePoint Audit logs.
Custom events
Custom software that runs on top of the SharePoint Server can also create events that are logged in the SharePoint audit logs. Developers can then decide what events to expose for SharePoint auditing and in which format. Those events are then found under your SharePoint audit log’s “Custom events” section.
Changed Audit Settings and Deleted Audit Log Events
If auditing SharePoint is to be complete and flawless, the Audit Log must also protect itself from being altered, or, at least audit the changes to the audit log. If anyone changes the SharePoint audit log settings (e.g. what is logged), or deletes SharePoint audit log records, those events will be logged as well.
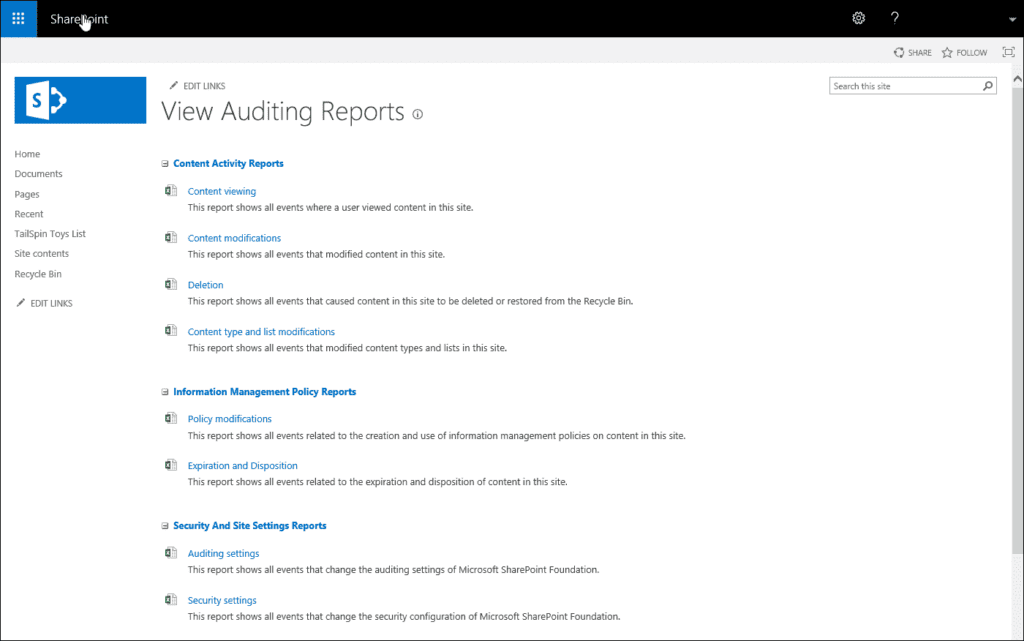
Available SharePoint Audit Reports
There are a number of predefined Audit reports that are available as soon as you activate SharePoint Auditing. You can use those reports to help determine who is taking what actions with the SharePoint content.
- Content modifications: Reports changes to content, such as modifying, deleting, and checking documents in and out.
- Content type and list modifications: Reports additions, edits, and deletions to content types and SharePoint Lists.
- Content viewing: Reports users who have viewed content on a site.
- Deletion: Reports what content has been deleted.
- Custom reports: Besides predefined reports, you can create your own reports. You can specify the filters for your custom reports, such as limiting the report to a specific set of events, items in a particular list, a particular date range, or events performed by particular users.
Configuring SharePoint 2016 auditing
Enable audit on the SharePoint 2016 Farm level
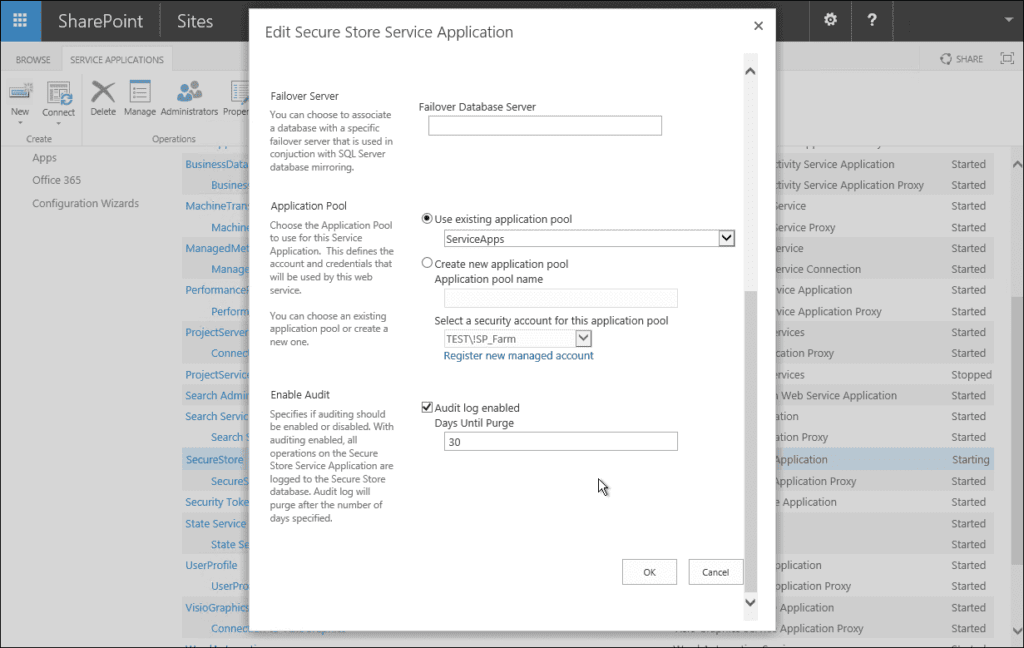
SharePoint 2016 auditing settings need to be enabled first at the farm level. We will start with the Central Administration for the Secure Store Service application.
Open Central Administration > Manage Service Applications > Select Secure Store Service Application > in the ribbon, select properties > then scroll to the bottom of the window and tick audit log enabled. This enables SharePoint 2016 on the farm-wide level; after this, you can enable auditing for each site collection on the SharePoint 2016 farm.
Enabling SharePoint auditing on the Site collections level
To enable auditing for the site collection, follow these steps:
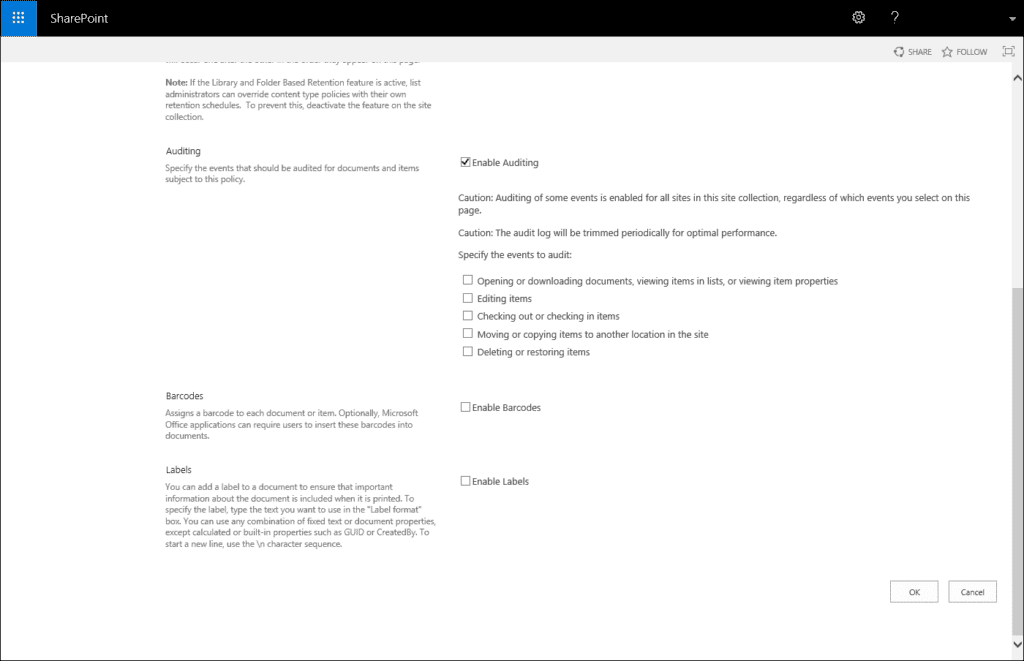
Navigate to Settings > Site Settings > Site Collection Administration > Site Collection audit settings.
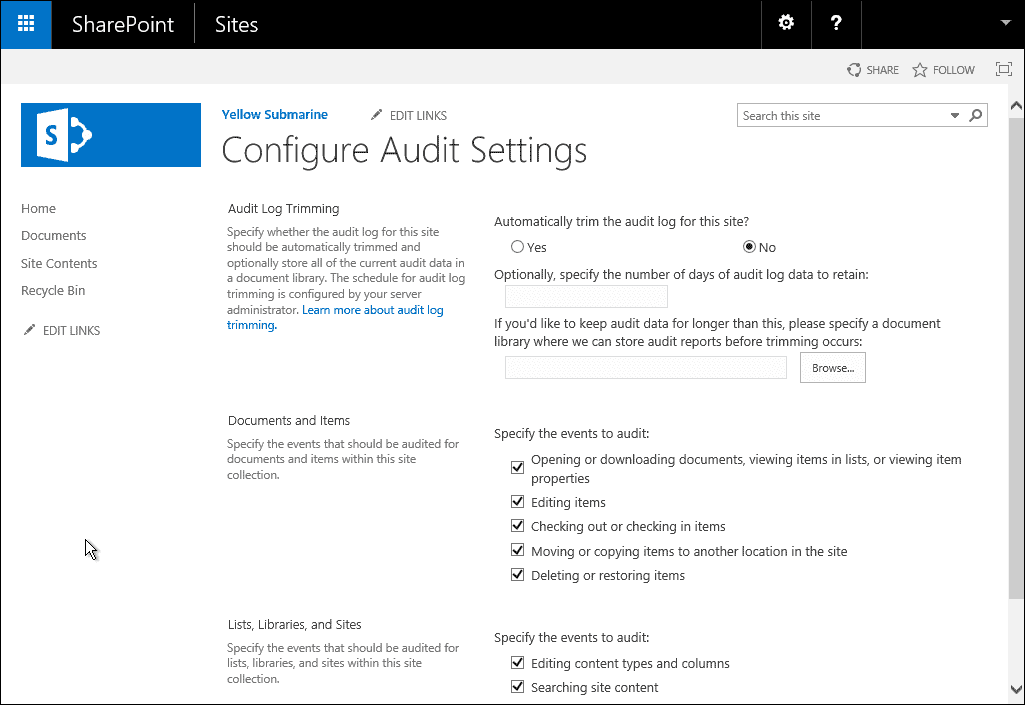
Under Documents and Items, you can specify the events that you would like to be audited. The following options are available:
- Opening or downloading documents, viewing items in lists, or viewing item properties (please enable this setting with caution as this can generate quite a lot of events on a busy farm)
- Editing items
- Checking out or checking in items
- Moving or copying items to another location on the site
- Deleting or restoring items
Under Lists, Libraries, and Sites, you can specify the events that you would like to be audited:
- Editing content types and columns
- Searching site content
- Editing users and permissions
- Once you have clicked all the events that you need to audit, click OK to confirm changes.
Configuring SharePoint 2019 auditing
Enable Audit on the SharePoint 2019 farm level
Enabling auditing on a SharePoint 2019 farm is very similar to a SharePoint 2016 farm.
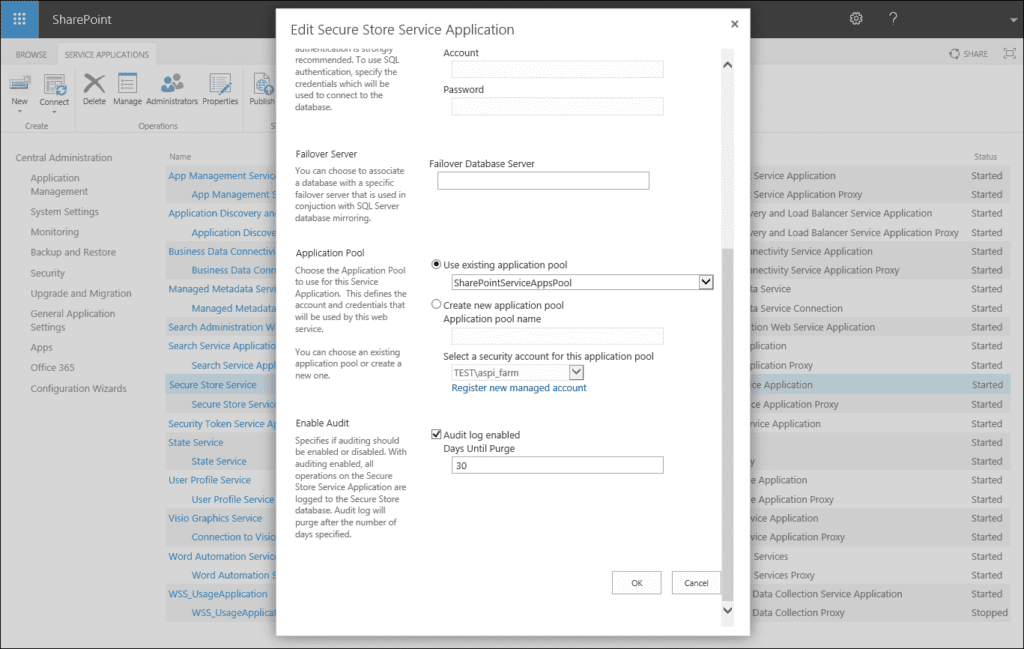
SharePoint 2019 auditing settings need to be enabled first at the farm level. We will start from the Central Administration for the Secure Store Service application.
Open Central Administration > Manage Service Applications > Select Secure Store Service Application > in the ribbon select properties > then scroll to the bottom of the window and tick audit log enabled. This enables SharePoint 2019 on the farm-wide level and after this, you are able to enable auditing for each site collection on the SharePoint 2019 farm.
Enabling SharePoint Auditing on the Site Collections Level
To enable auditing for the site collection, follow these steps:
Navigate to Settings > Site Information > View all site settings > Site Collection Administration > Site Collection audit settings.
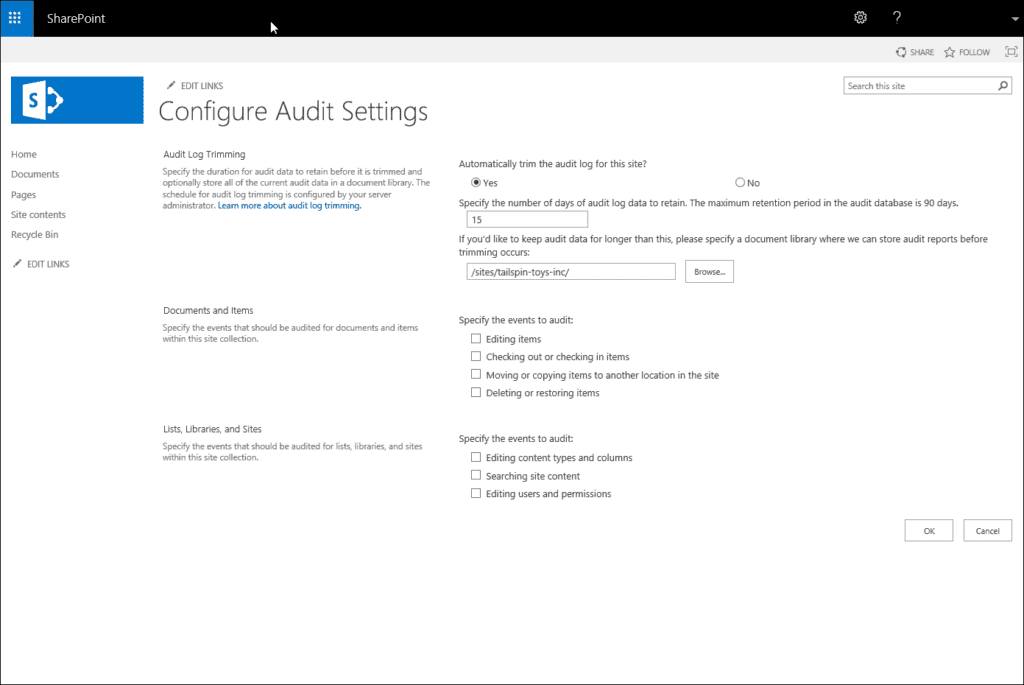
Under Documents and Items, you can specify the events that you would like to be audited.
The following options are available:
- Editing items
- Checking out or checking in items
- Moving or copying items to another location in the site
- Deleting or restoring items
Under Lists, Libraries, and Sites you can specify the events that you would like to be audited:
- Editing content types and columns
- Searching site content
- Editing users and permissions
Once you have clicked all the events that you need to audit, click OK to confirm changes.
Enabling SharePoint Auditing for Libraries or Lists
Open your library in the browser as in the screenshot and then navigate to:
Your list > Settings > List settings > Permissions and Management > Information Management Policy Settings > Select item level.
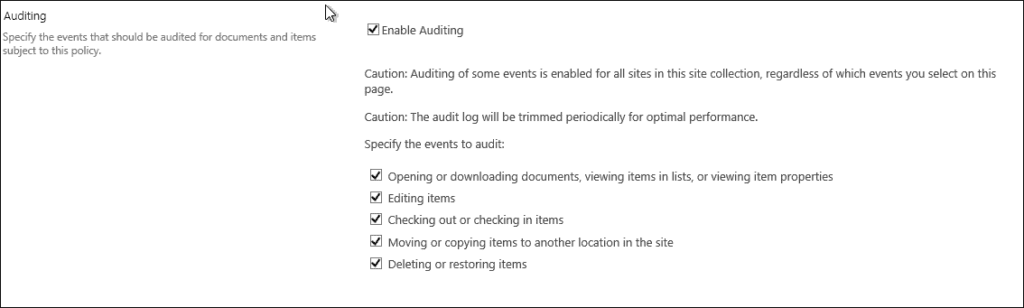
Under Auditing we have the following options available:
- Opening or downloading documents, viewing items in lists or viewing item properties (please enable this setting with caution as this can generate quite a lot of events on a busy farm)
- Editing items
- Checking out or checking in items
- Moving or copying items to another location in the site
- Deleting or restoring items
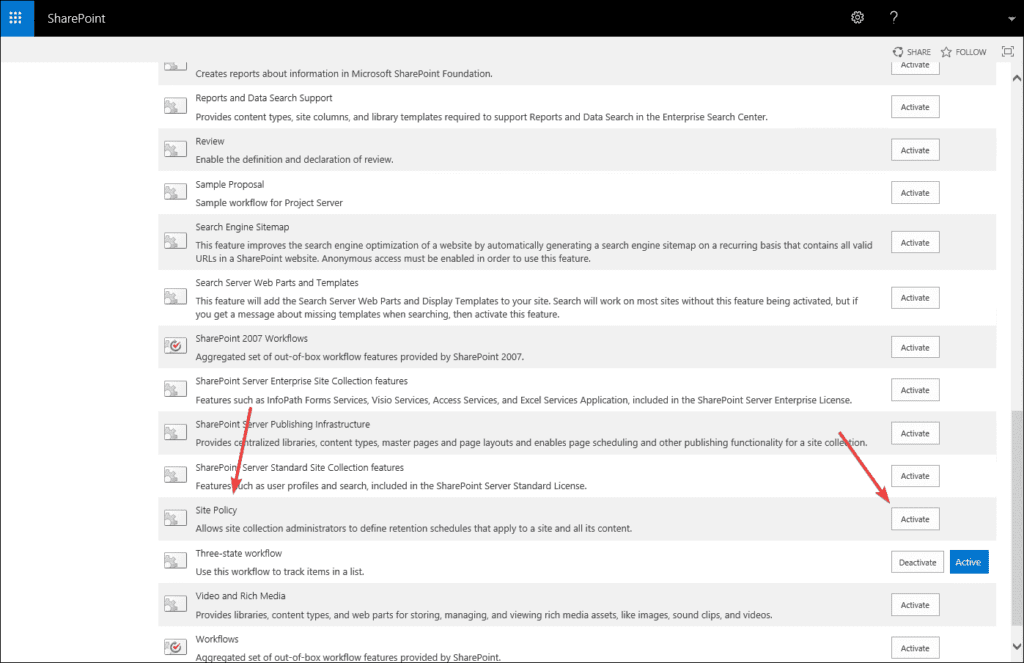
Please note
If you are missing Information Management Policy Settings, we first need to enable the Site policy feature on the site collection level.
Enabling SharePoint auditing for the content type
Go to Settings > Site Settings > Galleries > Site Content Types > Scroll down to Document Content Types and click on Document > Under Settings click on Information management policy settings and here we can specify the events that should be audited.

Enabling SharePoint auditing for folders
A folder is like another content type in the library and, just like you, we enabled auditing for the particular content type, so we can do the same for the folders.

SharePoint audit log trimming
In case you have a busy farm you need to enable audit log trimming on the farm level. This will help you avoid getting flushed by the SharePoint 2019 audit log events that your users generate. In order to set site collection audit log trimming, navigate to Settings> Site Settings > Site Collection Administration > Site Collection audit settings.

If you would like, you can configure trimming to be enabled or not and the optional fields of how many days the log will be retained. I would recommend that the best thing to do here is to leave this setting empty as a Farm Administrator can configure this on the Farm level, as it could happen that one site collection has more or fewer days than the other and it will create unnecessary confusion.
SharePoint audit reports
Here we will focus or generating reports for all SharePoint versions, what options you have, and the most interesting custom reports where you can pick only the events that you need.
The generated reports can be required by:
- Compliance officers to check if you are compliant with a variety of regulations.
- Administrators to track how documents and items are used in your SharePoint on-premises environment.
- Security officers to investigate user activity when the security of the company and company assets are put at risk.
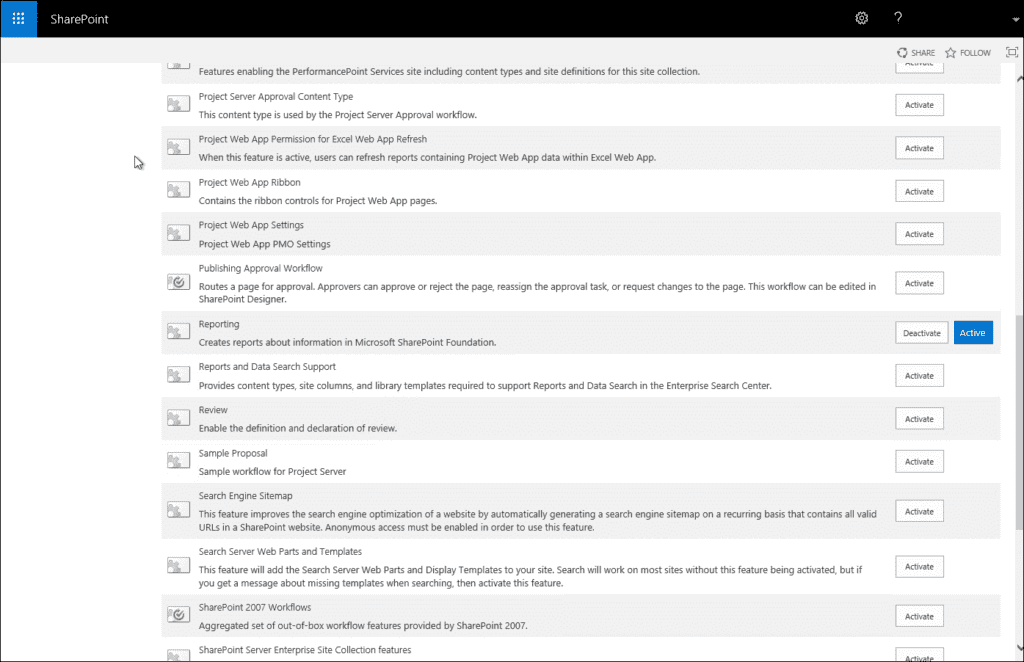
To enable SharePoint audit log reports, we first need to enable feature reporting. You need to go to Site settings > Site Collection Features and activate the “Reporting” feature. Then you will find the “Audit log reports” link in the enterprise wiki site collection’s settings.
After you have enabled the reporting feature, a new link “Audit Log reports” will appear under Site Collection Administration and then you will be able to generate different reports to report the auditing on your SharePoint environments.
List of SharePoint audit reports
When you click to generate the SharePoint Audit report the following screen will be available for you:
The following SharePoint Audit reports are available:
- Content viewing – this allows you to view who has access to specific content on the site collection, if somebody opens any file, an excel will be populated with the SharePoint audit log data. There is a difference for viewing audit reports on SharePoint 2019, as Microsoft has removed Opened and downloaded documents, viewed items in lists, or viewed item properties. The same goes for SharePoint Online.
- Content modifications – If somebody makes any changes to the content on the SharePoint site collection this will be populated. All SharePoint audit actions such as modify, deleting an item or checking in/out a file will be logged here.
- Deletion – If somebody deleted content on the SharePoint site collections it will be logged here, who has exactly deleted, and when. This is usually the most critical report for most businesses.
- Content type and list modifications – If somebody made any additions, edits or deletions to the SharePoint content types it will be logged here.
- Policy modifications – If somebody made changes on the SharePoint Information Management policies, all the changes users or administrators did to those SharePoint policies will be logged here.
- Expiration and Disposition – If you have policies for the content expiration it will be logged here on how content is removed when it reaches the expiration date.
- Auditing settings – when you set auditing settings, you want to make sure if somebody made any changes to these settings. If fellow administrators or somebody else made any changes to the baseline auditing settings, it will be logged here.
- Security settings – It will report changes to the SharePoint security settings, for example, the user or SharePoint groups event, role, and rights.
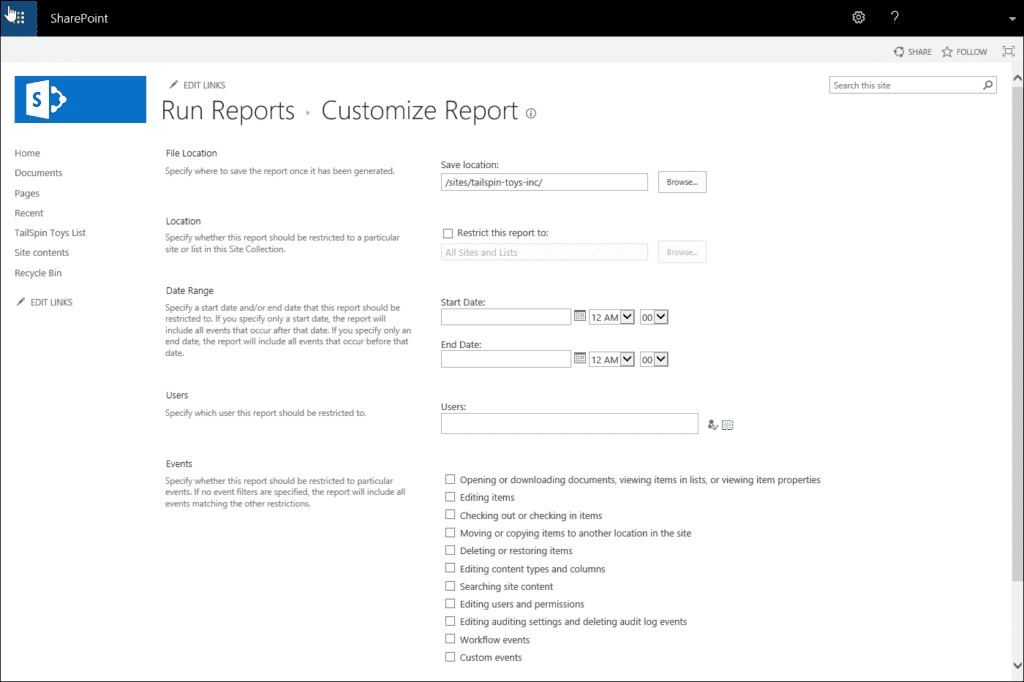
- Run a custom report – This is a report that most users will use. This basically allows you to handpick the events that you want to have on the report and the most important thing is you can select the date range for the specific reports. If you don’t need the reports all the time, you can use this SharePoint custom audit report to create a tailor-made event for your compliance officer or manager.
The biggest downside of viewing SharePoint 2013 audit reports is you need to generate this on the level of the site collection. If you have a lot of site collections, you get the idea it can take quite a while if you need to generate all these reports from a large number of site collections. Remember, SharePoint’s best friend is PowerShell which allows you to automate quite a lot of repetitive tasks and helps you do the job faster and more efficiently.
SharePoint auditing best practices
As with many things in SharePoint, it is important to have a good plan before you turn auditing on, because if you are not careful it could go bad really fast. You need to plan ahead and set the goals you want to accomplish with SharePoint Auditing, including:
- Which governance and legal requirements do you want to meet?
- Which audit events do you need to track?
- How long do you need to store the audit data?
Firstly, as you have already learned you need to turn on auditing site collection by site collection. Doing so through the SharePoint UI can be tiresome and slow, it is highly recommended that you use PowerShell to automate this. Here is a script sample showing how this can be done:
#enable "Editing users and permissions" audit logs
$site = Get-SPSite http://contoso.com
$site.Audit.AuditFlags = $site.Audit.AuditFlags -bor [Microsoft.SharePoint.SPAuditMaskType]::SecurityChange
$site.Audit.Update()
$site.Dispose()Before turning on SharePoint auditing, be aware that it can have a major impact on your storage needs. Keep in mind that audit logs are stored inside the same SharePoint Content Databases where your site collections live. Your site collection storage might start to grow a lot faster, and this can give you a headache during future migrations when you have to deal with huge databases. With these concerns in mind, you might want to look at these best practices:
Set a strong retention policy
What retention policy will you set? Keep in mind that according to an IBM study, the average number of days to detect a breach is around 150-200 days varying by industry. You want to be well above that limit.
Choose the events you track wisely
Which events will you track? This selection can significantly increase the number of events logged in the audit log. You can expect that the biggest impact will come from turning on the option to log “Opened and downloaded documents, viewed items in lists, and viewed item properties“.
Adjust the retention policy to your specific needs
Do you need to use the same policy for the entire farm? Think about where the sensitive content is being stored across your sites. Do you need to use the same retention policy and audit log options selection for all your site collections?
Save your audit logs to secure external location
To mitigate those issues it is a good practice to move your audit logs out of the content databases in a secure centralized location. Unfortunately, there is no such out-of-the-box solution inside SharePoint and you will have to go for a custom solution or a 3rd party vendor.
The last thing you need to figure out is how are you going to view and generate SharePoint audit logs reports. One straightforward approach is to generate Excel reports from the Site Collection Administration page. The benefit of this approach is you can use Excel features like filtering and sorting to find the specific changes you are looking for. The downside of this approach is that you have to do this one site collection at a time, which is very time-consuming. You can save some time by using PowerShell scripts to accumulate data from multiple site collections, but that data format is very hard to read. Most of this event data will be in an XML format unique to each event type. See the example below:
$site = Get-SPSite http://contoso.com
$auditQuery = New-Object Microsoft.SharePoint.SPAuditQuery($site)
$auditLogs = $site.Audit.GetEntries($auditQuery)
foreach($logEntry in $auditLogs)
{
$user = $site.RootWeb.SiteUsers.GetByID($logEntry.UserId).Name
Write-Host "Document: " $logEntry.DocLocation " Event: " $logEntry.Event ” User: " $user " Details: " $logEntry.EventData
}
$site.Dispose()Performing advanced SharePoint auditing tasks
SharePoint audit logs can prove to be an invaluable source of knowledge, here we will cover some basic use cases and how to solve them.
Task: SharePoint security audit
Security inside SharePoint is no easy thing and the same applies when you try to do a security audit. You have to take into account all the things like directly assigned permissions, SharePoint groups, permission levels (roles), and permission inheritance. Luckily, SharePoint does provide an out-of-the-box solution for this problem. Once you turn on auditing as we mentioned previously, under Site settings > Site Collection Administration you will find a link to Audit log reports. There you will find the Security settings report under the section Security and Site Settings Reports. You will be able to view the following changes on this report:
- Security inside SharePoint is no easy thing and the same applies when you try to do a security audit. You have to take into account all the things like directly assigned permissions, SharePoint groups, permission levels (roles), and permission inheritance. Luckily, SharePoint does provide an out-of-the-box solution for this problem. Once you turn on auditing as we mentioned previously, under Site settings > Site Collection Administration you will find a link to Audit log reports. There you will find the Security settings report under the section Security and Site Settings Reports. You will be able to view the following changes on this report:
- SharePoint group created
- SharePoint group deleted
- SharePoint group member added
- SharePoint group member removed
- Permission inheritance broken
- Permission inheritance restored
- Permission level created
- Permission level deleted
- Permission level modified
- Permissions granted
- Permissions removed
- User deleted from site collection
Task: SharePoint permissions audit
This task is very similar to auditing all security changes as mentioned in 9.1. Task: SharePoint security audit. It just has a smaller scope and only focuses on Permissions granted and Permissions removed events. To generate a report, follow the same steps, under Site settings > Site Collection Administration, you will find a link to Audit log reports. There you will find the Security settings report under the section Security and Site Settings Reports. Once the Excel report is generated, you can use the built-in Excel filtering on the Event column to filter only the required events. Just don’t forget that permissions can be granted to users, SharePoint groups, and AD Groups so figuring out how a user gained access is not as straightforward as just searching for a username in the logs.
Task: SharePoint site auditing
SharePoint offers a set of different built-in reports to audit all site changes as discussed in 7.1. List of Audit Reports. Under Site settings > Site Collection Administration, you will find a link to Audit log reports. You have three main sections where you will find the appropriate reports: Content Activity Reports, Information Management Policy Reports and Security and Site Settings Reports. Once you find and generate an Excel report you need, you can use Excel features like filtering and sorting to find the specific changes you are looking for.
Task: Track SharePoint usage
Having good insights into your users’ behavior and what they find relevant can help you optimize your site structure and search experience. Under Site settings > Site Collection Administration, you will find a link to Audit log reports. There you will find a section Content Activity Reports with several reports related to viewing, modifying or deleting content from the site collection. By analyzing those logs, it is easy to figure out what is the most popular content on the one side, and identify stale content on the other side.
Task: Track user actions
Under Site settings > Site Collection Administration you will find a link to Audit log reports. There you will find the Security settings report under the section Security and Site Settings Reports. This report will show you all the events related to user actions that caused any security changes on the site collection level. This will help you detect any possible security issues before it causes any serious damage to your environment.
Extending SharePoint Auditing
In the previous chapters, we have seen how auditing SharePoint works. We have seen what can be audited, how to configure auditing, and how to download and use SharePoint audit logs. However, very often, SharePoint auditing functionality that is offered out-of-the-box is not enough. Let’s imagine a few possible scenarios:
Excel is quite a handy medium, but not suitable for all use cases. If you want to display SharePoint Audit Logs in some other format, dashboard, etc., you will need to do custom extending.
If you are using older versions of SharePoint Server, you might still have a SharePoint Foundation running somewhere. If that is the case, you will not have a UI for your SharePoint Audit Logs, so you will have to build one yourself.
You need to log custom events to the SharePoint audit logs. This is very often the case with SharePoint custom development.
You are using SharePoint Audit Logs as a replacement for the Workflow History List. Storing huge amounts of data in a SharePoint list is never a good idea, and Workflow history lists tend to overgrow. Storing that data in a SharePoint Audit Log instead of a SharePoint List is not the craziest idea in the world.
You need to clean up your audit logs in a custom way (not just time-triggered SharePoint audit data deletion).
These are just some of the scenarios when you will want to make use of SharePoint auditing beyond what is possible out-of-the-box, I am sure you will have many more ideas once you delve into the topic of SharePoint auditing. Luckily, it is possible to work with SharePoint audit logs behind-the-scenes: to use SharePoint APIs to configure, query, read, write, and delete SharePoint audit logs data.
Where is SharePoint audit logs data stored?
First things first: Where is the SharePoint Audit Logs data stored? The logs are stored in the “dbo.AuditData” table of the respective content database and that location can be neither configured nor changed. The fact that it is stored in the Content Database makes it more complicated for backup and maintenance since SharePoint Audit Log Data can grow extremely fast.
Think of the number of “view” events logged into SharePoint Audit Logs in a SharePoint-based public-facing website or an intranet site in a large corporation. If the ”Opening or downloading documents, viewing items in lists, or viewing item properties” audit setting has been turned on, then for every hit to a page more than 100 entries will be recorded in the AuditData table in your content database (this will depend on images, stylesheets and other elements you have on your page). If you take all the data, the AuditData can grow 64KB per click on such a page. 5000 clicks per day (and that is a moderate number) leads you to 300 MB per day. That makes it 10 GB a month, or 120 GB a year. And that was a moderate number of 5000 clicks on only one page!
With those numbers in mind, you need to plan your SharePoint auditing and its storage even better. If you are compliance-bound and need to keep that data for years, but can’t afford to explode Content Databases (sincerely, who can?), you will need to think of getting that data out of the content DBs and storing it externally in a way that can be backed up on cheap storage.
All of that, and much more, can be achieved through SharePoint auditing APIs.
Reading SharePoint audit logs data and creating custom audit queries
The most common use case when extending SharePoint Audit Logs is reading from SharePoint Audit Logs data. As mentioned above, there are different use cases when this is needed:
- integrating data into custom reporting/dashboards
- making more complex queries than SharePoint GUI allows
- SharePoint Foundation Server auditing is only exposed programmatically (SharePoint Foundation Server is a free version that doesn’t have auditing exposed through GUI but only programmatically)
The only way to extend Audit Logs on the SharePoint Server is with SharePoint Server-Side Object Model (SSOM). There is no Client-Side Object Model (CSOM) equivalent for extending SharePoint Audit Logs. For SharePoint Online, which is a part of the Office 365 suite, there is a completely different set of APIs that are going to be discussed in the next chapter.
The “native” programming language for SharePoint SSOM APIs is C#, and all of the examples you will find in the documentation will be in C#. However, it is possible to use SSOM with PowerShell, and we will see how to do that later in this chapter.
To work with SharePoint Audit Logs, you will use the SPAudit class. That class contains all the necessary methods for reading, writing, deleting and configuring SharePoint auditing.
In order to read from the SharePoint Audit Logs, you will use the SPAuditQuery class. Since SharePoint Audit Logs are always configured and kept on the site collection level, you will also initialize the SPAuditQuery class by passing a Site Collection as a parameter:
SPAuditQuery query = new SPAuditQuery(SPSite site);
You will probably want to pass some filters to your query, to narrow the data that is returned. These are the filters you can use:
- AddEventRestriction – Limits the results only to a certain type of event. Look at the SPAuditEventType enumeration to see what can be used with this filter. You can use multiple event types in your query – this filter is not limited to only one value.
- RestrictToList – Limits the results to the events which are relevant for the specific SharePoint list.
- RestrictToListItem – Limits the results to the events which are relevant for the specific SharePoint list item.
- RestrictToUser – Limits the results to the events which are relevant for the specific user.
- RowLimit – Limits the results to a maximum number of rows. Warning: if you are using MOSS 2007, you will need to have SP2 installed in order for this filter to work.
- SetRangeEnd – Limits the results to the events which occurred before a specified date and time.
- SetRangeStart – Limits the results to the events which occurred after a specified date and time.
This code, written in C#, using SharePoint Server Side Object Model, reads the SharePoint Audit Logs from a site collection, using the “SecRoleBindUpdate” event type (which basically looks for the permission changes) with a limit of the last 30 days.
using(SPSite spSite = new SPSite("http://contoso"))
{
using (SPWeb spWeb = spSite.OpenWeb())
{
SPAuditQuery spAuditQuery = new SPAuditQuery(spSite);
spAuditQuery.AddEventTrstriction(SPAuditEventType.SecRoleBindUpdate);
spAuditQuery.SetRangeStart(DateTime.Now.AddDays(-30);
spAuditQuery.SetRangeEnd(DateTime.Now);
SPAuditEntryCollection auditCol = spSite.Audit.GetEntries(spAuditQuery);
System.Xml.XmlDocument xdoc = new System.Xml.XmlDocument();
foreach(SPAuditEntry entry in auditCol)
{
string test = "<EventData>" + entry.EventData + "</EventData>";
xdoc.LoadXml(test);
string principalid = xdoc.DocumentElement.SelectSingleNode("principalid").InnerText;
SPUser user= spWeb.Users.GetByID((int)principalid);
if (user != null)
{
Console.WriteLine(user.Name);
}
}
}
}
The result of this code will be a list of all users, whose permissions on this site collection have changed in the past 30 days.
So, this is how flexible we can be, and how we can run custom queries to get results which can then be presented to interested authorities.
Since this code is in C#, and needs to be compiled and run on the server, let’s take a short look at how we can achieve the same by using PowerShell and SSOM:
Add-PSSnapin Microsoft.SharePoint.PowerShell -ErrorAction SilentlyContinue;
$xdoc = new-object System.Xml.XmlDocument
$spSite=Get-SPSite -Identity "http://contoso"
$spWeb=$spSite.OpenWeb()
$spAuditQuery=New-Object Microsoft.SharePoint.SPAuditQuery($spSite)
$Today = [DateTime]::Today
$eventType = [Microsoft.SharePoint.SPAuditEventType]::SecRoleBindUpdate
$DateLimit = $Today.AddDays(-30)
$spAuditQuery.SetRangeStart($DateLimit)
$spAuditQuery.SetRangeEnd(($Today))
$spAuditQuery.AddEventRestriction($eventType)
$spAuditEntries=$spSite.Audit.GetEntries($spAuditQuery)
foreach($entry in $spAuditEntries)
{
$test="<EventData>" + $entry.EventData + "</EventData>"
$xdoc.LoadXml($test)
$principalid = $xdoc.DocumentElement.SelectSingleNode("principalid").InnerText
$user= $spWeb.Users.GetByID([int]$principalid)
if ($user -ne $null)
{
Write-Host($user.Name)
}
}
$spWeb.Dispose()
$spSite.Dispose()The code above basically does the same – getting the list of users whose permissions have changed in the past 30 days, but it is doing it using PowerShell.
Writing into SharePoint audit logs
There are various reasons why you would want to write into SharePoint Audit Logs. The most common scenario is logging from custom applications that are developed on top of the SharePoint Server and need to be included in the auditing process. The variation of this topic is using SharePoint Audit Logs to store Workflow History. You would do this when the workflow history auditing is relevant, but sometimes and due to its size, workflow history is not practical for storing it into SharePoint lists.
That is the reason why there is a “Custom” type of the event in SharePoint Audit Logs: this event type can be used by custom applications running on top of SharePoint, or you can even choose your own event type name, that is then stored as a string. Furthermore, there you can also state the ID of the user who triggered the event if it is relevant for auditing. Event details then need to be stored in the event body.
This can all be controlled through the different overloads of the WriteAuditEvent method:
|
|
|
|---|---|
|
WriteAuditEvent(SPAuditEventType, String, String)
|
Logs an auditing event under “Custom” Event Type. Event name and details are passed as custom strings.
|
|
|
|
|
WriteAuditEvent(String, String, String)
|
Logs an auditing event under own event type. Event type name, Event name and Event details are passed as custom strings.
|
|
|
|
|
WriteAuditEvent(String, String, Int32, String)
|
Logs an auditing event under own event type, but including the User ID. Event type name, Event name, UserId and Event details are passed as custom strings and integers.
|
|
|
|
|
WriteAuditEvent(SPWeb, String, SPAuditItemType, SPAuditEventType, String, String, String)
|
This overload is to be used for auditing custom own events on SharePoint Artifacts (lists, items…). You need to pass the SPWeb object where the artifact is stored, server relative url to the artifact as a string, SPAuditItemType (Document, Folder, List, ListItem, SPSite, SPWeb), Event Type (any of the supported event types) and then event name, event source and event data as strings.
|
For example, writing under the “Custom” category into the SharePoint Audit log would look like:
audit.WriteAuditEvent(SPAuditEventType.Custom, "MySource", "<xml/>");
And writing under your own category would look like:
audit.WriteAuditEvent("MyCategory", "MySource", "<xml/>";
Configuring SharePoint audit logs programmatically
Sometimes in your projects, you will need to dynamically control what is being audited into SharePoint. That means you will not be able to rely on a Site Collection admin’s goodwill to turn on the auditing and configure it properly. This is also where we can use some server-side (SSOM) code magic to do this programmatically.
To turn on auditing on a SharePoint artifact, you will use a similar code. Please add all the flags you might need, that way defining what is being audited:
The way around it is to merge existing auditing settings with the new ones:
SPAudit spAudit = spSite.Audit;
spAudit.AuditFlags = SPAuditMaskType.CheckIn | SPAuditMaskType.CheckOut;
spAudit.Update();
The code above will turn on auditing on the site collection level and tell the audit log to collect all check-ins and check-outs on the documents inside that site collection. Please note: if the auditing has already been configured on that site collection prior to running this code, this new setting will overwrite the old setting – if you had set up auditing the security changes, or document updates, that will be gone.
The way around it is to merge existing auditing settings with the new ones:
SPAudit spAudit = spSite.Audit;
spAudit.AuditFlags = siteCollection.Audit.AuditFlags | SPAuditMaskType.CheckIn | SPAuditMaskType.CheckOut;
spAudit.Update();This will keep whatever SharePoint auditing settings were available before on the site collection and add auditing for check-ins and check-outs.
Please note: even if auditing SharePoint and SharePoint Audit Logs are configured and maintained on the Site Collection level, you can actually configure auditing for any SharePoint Artifact (object) folder that lays under a site collection. That means that we can also turn on auditing on SPWeb (SharePoint Web), SPList (SharePoint Lists and Libraries), SPFolder (Folders in SharePoint Lists and Libraries) and SPListItem (a list item or a document).
Do you want to only audit changes on one single document, or on documents inside one folder? Yes, that is possible. All of the classes mentioned above have the Audit property that enables you to do that.
Understand audit in SharePoint Online and Office 365
Audit logs are your go-to resource if you’re interested in what’s going on in your SharePoint Online environment, be that managing Microsoft 365 Groups, or what’s going on with your various resources on Azure, or even who is accessing and moving files around.
In some cases, because of regulations, you might need to keep a record of the various actions that are performed on the environment. Since Microsoft 365 has a fairly rigid data retention period for audit logs, you might even need to handle and store them using a custom solution.
Now, if we can call SharePoint On-premises a complex platform, Microsoft 365 is a huge ecosystem containing multiple interconnected services (Exchange, Teams, Azure, and OneDrive, just to name the more popular ones). Any solution that tracks Office 365 activity for the purposes of auditing must include activity made on the services that make up the platform.
Now, what options do we have when we’re tasked with an Office 365 audit log? A few actually, and I’ll try to give an overview of SharePoint’s audit log reports, and Office 365 admin audit logs.
SharePoint Online and Office 365 audit log reports
If you’ve worked with SharePoint On-premises and have seen its audit logs, you’ll notice not much has changed in its move to the cloud. These logs can answer most of the questions you might have regarding your SharePoint sites, including information about:
- Edited items
- Checked-out and checked-in items
- Items that have been moved and copied to other locations in the site collection
- Deleted and restored items
- Changes to content types and columns
- Search queries
- Changes to user accounts and permissions
- Changed audit settings and deleted audit log events
- Workflow events
- Custom events
There is no longer an option to record opened, downloaded, and viewed items in the cloud version. I would guess that was changed in order to reduce the resource cost on Microsoft’s side since those events are the most frequently occurring and usually the least critical, but I can’t find any official article on this omission.
How to enable Office 365 auditing
SharePoint audit logging needs to be set up for each site collection separately, but it can be automated with a simple PowerShell script and a list of your site collections.
SharePoint Online’s audit logs have a few constraints. The minor one is that you cannot access the raw audit log data programmatically. Unlike on-premises, there is no endpoint you can connect to if you want to access the collected records to create custom reports.
You can, however, choose from a selection of Excel reports that should satisfy most of your needs, but you’ll have to generate reports for each site collection separately.
The bigger constraint is related to what is not collected: everything outside of SharePoint is ignored. In an environment such as Office 365, this means a large number of actions, for example, any performed in Azure Active Directory or Exchange, will not be visible here.
Note that these logs have a maximum data retention period of 90 days.
Using Powershell to Enable Auditing for All SharePoint Online Sites
Please use the following PowerShell script to enable auditing for all the site collections on your tenant. Note that you need to be the SC admin to enable these audit events.
Function Set-SPOSiteAudit($SiteURL, $AuditFlags )
{
#Setup Credentials to connect
$Credentials = New-Object Microsoft.SharePoint.Client.SharePointOnlineCredentials($AdminCred.Username, $AdminCred.Password)
Try {
$Context = New-Object Microsoft.SharePoint.Client.ClientContext($SiteURL)
$Context.Credentials = $credentials
#Get the Site Collection and Audit Actions
$Site = $Context.Site
$Context.Load($Site)
$Audit = $Site.Audit
$Context.Load($Audit)
$Context.ExecuteQuery()
#sharepoint online audit settings powershell
$Audit.AuditFlags = $AuditFlags
$Audit.Update()
$Context.ExecuteQuery()
Write-host -ForegroundColor Green "Audit Settings enabled for the Site Collection:" $SiteURL
}
catch {
write-host -Foregroundcolor Red "Error Enabling Audit for Site Collection $($_.Exception.Message) - Please check your are SC admin"
}
}
#Set parameter values
$AdminSiteURL = "https://yourtenant-Admin.sharepoint.com/"
$AuditFlags="All"
#I have used all flags here but you can apply specific like "ChildDelete, ObjectDelete, Undelete, Update, Move, SecurityChange"
#Check full list of flags here: https://docs.microsoft.com/en-us/dotnet/api/microsoft.sharepoint.spauditmasktype?view=sharepoint-server
#Credentials for connecting to the tenant
$AdminCred = Get-Credential
#Connect to SharePoint Online Admin
Connect-SPOService -URL $AdminSiteURL -Credential $AdminCred
#Get all SC
$SitesCollection = Get-SPOSite -Limit ALL
#Iterate all collections
ForEach($Site in $SitesCollection)
{
Write-host -f Yellow "Applying Audit Settings for Site Collection:"$Site.URL
#Call the function to set auditing for site collection
Set-SPOSiteAudit -SiteURL $Site.URL -AuditFlags $AuditFlags
}Office 365 Audit Logs
Office 365 audit logs are found in the Microsoft 365 compliance center. While other logs are limited in scope to a particular service, these are collected from multiple Microsoft 365 services and consolidated into a single, searchable log (and they catch page and file views).
To start using this log, you first have to turn it on by navigating to the Audit log search and then click the Turn on auditing button. You’ll need to do this only once per tenant, but you will have to wait a few hours for the service to prepare itself for use.
Once the preparation on the Microsoft 365 side is complete, audited events will start appearing in the log. Depending on the particular service, it can take up to 30 minutes, or even up to 24 hours for an event to be shown in the audit log. The full list of services and actions audited can be found here.
Logs are kept for 90 or 365 days, depending on the license. To enable the full year, you’ll need to have an Office 365 E5 subscription or an Microsoft Office 365 Advanced Compliance add-on license with an E3/Exchange Online Plan 1, and you’ll need to send a request to Microsoft support to enroll in the program.
Lastly, you can export the results of a search into a CSV file to store and analyze further. The format is not pretty and won’t be easy to read unless you know exactly what you’re looking for, but it’s easy to use if you want to process the data further.
The main issue you’ll come across is that most of the properties are lumped into a simple AuditData JSON, that can contain very different properties depending on the audit event, and a lot of noise to parse through to get to the important stuff.
There’s also the option of programmatically downloading the audit logs for use in your solutions. This way, you can regularly download the newly available events using the available API’s, using either PowerShell or REST.
Accessing Office 365 audit logs through Exchange management tools
This method is easier to use since you’ll only need to have PowerShell installed and have either the Audit Logs or View-Only Audit Logs role assigned in Exchange (global admins should have this by default).
To start an Exchange Online PowerShell remote session, this is the script you’ll want to run:
$userCredential = Get-Credential $connectionUri =
'https://outlook.office365.com/powershell-liveid/' $session = New-PSSession -
ConfigurationName Microsoft.Exchange -ConnectionUri $connectionUri -Authentication Basic -
Credential $userCredential -AllowRedirection Import-PSSession $session -DisableNameCheckingThis will establish a connection to Exchange Online and allow you to run cmdlets associated with Exchange. After you’re done with the session, it’s usually advised to close it using:
Remove-PSSession $sessionIf you’re having trouble with the execution policy on your machine, you will need to first run:
Set-ExecutionPolicy RemoteSignedThe only Exchange cmdlet we’re interested in right now is Search-UnifiedAuditLog. It has a simple basic signature, but allows for a lot of customization:
Search-UnifiedAuditLog -StartDate 04/24/2019 -EndDate 04/25/2019This command will return audit records for the specified date, up to a maximum of 100. You can specify a larger number of records to return, or you can use paging by specifying a SessionId and using the ReturnNextPreviewPage SessionCommand.
All the data contained in the Security & Compliance Search can be queried from here, which effectively means they share the same data retention period.
Office 365 management API
This API provides access to events from the Office 365 audit logs. The data available here is more or less the same as shown in the search log, with very few differences. The major one being you can only get data for the last 7 days, while others make the data available for up to 90 days.
The audit data is made available using blobs – the service periodically collects events and organizes them into these collections (or blobs) which can then be downloaded. The events contained in the blobs are not in any particular order but are bunched up according to the time when they were collected by the service.
This means that an older event might appear in a very recent blob (according to Microsoft, in case of a service outage this might mean a delay of 5 days or more). What this means is that this service cannot be used for alerts, since there is no guarantee an event will be made available in a timely manner.
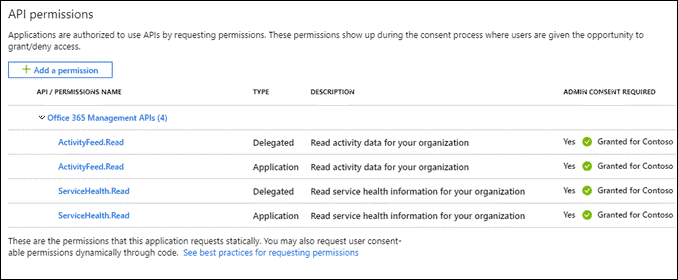
To start collecting this data you will need to first create a new application on your Azure, and then using that application we’ll start subscriptions for the various event content types available. The application requires ActivityFeed.Read and ServiceHealth.Read application and delegated permissions, and you’ll need to generate a client secret to be able to authenticate your application.
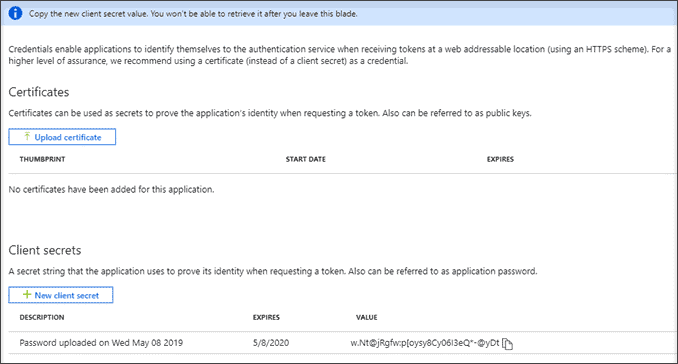
We’ll use the client secret in the next steps, so make sure to store it somewhere.
The following examples will be written in PowerShell, but they can be easily rewritten in almost any other programming language.
By using the following script and the values of your own clientId, clientSecret and tenant domain, we’ll get an access token which we can then use in subsequent calls to the API.
$clientID = "00000000-0000-0000-0000-000000000000"
$clientSecret = "]t;{K!.;andsomemoregibberish"
$tenant = "contoso"
$tenantdomain = "$tenant.onmicrosoft.com"
$loginURL = "https://login.microsoftonline.com/"
$resource = "https://manage.office.com"
$body = @{grant_type="client_credentials";resource=$resource;client_id=$clientID;client_secret=$clientSecret}
$oauth = Invoke-RestMethod -Method Post -Uri $loginURL/$tenantdomain/oauth2/token?api-version=1.0 -Body $body
$headerParams = @{'Authorization'="$($oauth.token_type) $($oauth.access_token)"}The headerParams attribute now contains the access token. Using this token, we’ll be able to start the subscriptions to each of the audit types (Audit.AzureActiveDirectory, Audit.Exchange, Audit.SharePoint, Audit.General, and DLP.All).
To start a subscription run this command:
"https://manage.office.com/api/v1.0/$tenant/activity/feed/subscriptions/start?contentType=Audit.AzureActiveDirectory"To start a subscription for the other audit types, simply replace the contentType parameter value with the names of the other audit types.
You can check the activated subscriptions with:
Invoke-WebRequest -Headers $headerParams -Uri "https://manage.office.com/api/v1.0/$tenant/activity/feed/subscriptions/list"Assuming the scripts ran successfully, you should now be able to query for audit blobs and download their contents like so:
Invoke-WebRequest -Method GET -Headers $headerParams -Uri "https://manage.office.com/api/v1.0/$tenant/activity/feed/subscriptions/content?contentType=Audit.AzureActiveDirectory"This request will return a JSON object containing content uris for events that have been made available today. You can choose a different time period by specifying a startTime and endTime parameter (both need to be specified and must not span more than 24 hours).
Invoke-WebRequest -Method GET -Headers $headerParams -Uri "https://manage.office.com/api/v1.0/$tenant/activity/feed/subscriptions/content?contentType=Audit.AzureActiveDirectory&startTime=2019-04-25T00:00&endTime=2019-04-25T11:59"In any case, the returned JSON object should contain uris we can use to collect events collected in the time period (remember, we don’t have a guarantee the event actually occurred in that time period, only that it was collected then). An example of such a request and uri would look like this:
Invoke-WebRequest -Method GET -Headers $headerParams -Uri "Invoke-WebRequest -Method GET -Headers $headerParams -Uri 'https://manage.office.com/api/v1.0/00000000-0000-0000-0000-000000000000/activity/feed/audit/20190425071547312049798$20190425071747444061084$audit_azureactivedirectory$Audit_AzureActiveDirectory$emea0035'This will return a collection of events in a JSON format. The events have schemas depending on the audit event type they’re describing, and Microsoft has defined about two dozen different schemas (a couple more or less, depending on how you count them since a few schemas are considered base and aren’t used independently of others). Each event will have CreationTime, RecordType, Operation, and ResultStatus properties.
According to its type, it will also have a number of other properties used to describe the details of the action that created the record (these extra details can be found by examining a single row in the Audit log search and expanding the More information tab). This can be anything from the user that initiated the action, where the action was made, or what the target was.
Some of these properties are easier to make sense of than others since it’s straightforward to connect an email to a particular user, but it’s much less so to connect a group id to a group name or a team site id to a Microsoft 365 Group.
If we compare the PowerShell API to the REST one, we can see that the Search-UnifiedAuditLog cmdlet, with its numerous optional parameters, is more suited for searching and filtering logs in search of a specific record, but not so much for collecting new records as they’re coming in since a record’s creation time is not the same time the record was made available. For collecting and storing audit records, the REST API is much more appropriate, since the collection of events in the blobs does not change, you only need to collect new blobs as they become available.
Conclusion
Getting the right and prompt information about user activity needs a lot of work. Nevertheless, we can all agree that having a defined auditing process is inevitable in today’s business world.
As much as that path is long and winding, it starts with a clear SharePoint auditing strategy. Without a SharePoint auditing strategy that includes tracking content modifications, permissions changes, and login attempts there is no safe and stable environment. SharePoint has recognized that need and has been improving the auditing feature through the years, so now companies can track virtually any user or admin activity in the environment – from file edits to changes of sharing policies.
Different companies impose the task of defining and implementing an auditing strategy to people with different roles. Sometimes, a Compliance Officer is responsible for that task, and sometimes it’s a task for a SharePoint administrator. No matter who is carrying out that role, the strategy should be transparent and understandable to every person involved.
The implementation and configuration of SharePoint auditing is a complex process. It involves several tasks: enabling auditing for your environment, choosing the types of events that you want to track, configuring retention policies, collecting and monitoring logs, and making audit reports. Each company has different demands and each SharePoint version has its own specifics, which makes those tasks even more complex.
Like any extensive process, SharePoint auditing is also prone to errors and misconfigurations. We have collected these SharePoint auditing best practices throughout the years of practice, to help young and inexperienced admins tackle their auditing processes easier.
Even though SharePoint out-of-the-box auditing has evolved, there are still a lot of areas left for improvement, such as friendlier reporting and longer audit logs retention. Luckily, there are 3rd party tools that specialize in this area, like SysKit’s own Point – a tool for Office 365 auditing and governance. Schedule a demo for Syskit Point and see how it works for you!