Implementing OWASP Dependency-Track in Azure DevOps
Table of contents
Security is an important aspect of software development, but it is becoming more challenging every day. External dependencies are an excellent way to speed up development, but they also become an additional attack surface. Vulnerabilities are discovered daily, and keeping track of the dependencies and updates takes effort.
Staying ahead of any issues is of utmost importance.
Here at Syskit, we spend our time working with Azure DevOps. Azure DevOps has GitHub Advanced Security that does solve the issue, but it is costly at $49 per active committer. It does have other benefits in addition to dependency scanning, such as code static analysis and secret scanning but since we are already using SonarCloud we wanted to avoid incurring extra expenses.
We decided to go with an open-source solution, the OWASP Dependency-Track platform.
What is OWASP Dependency-Track?
OWASP Dependency-Track is best described with this excerpt from the official documentation:
“Dependency-Track is an intelligent Component Analysis platform that allows organizations to identify and reduce risk in the software supply chain. Dependency-Track takes a unique and highly beneficial approach by leveraging the capabilities of Software Bill of Materials (SBOM). This approach provides capabilities that traditional Software Composition Analysis (SCA) solutions cannot achieve.”
What is SBOM?
SBOM stands for Software Bill of Materials. It is a list of all dependencies and libraries that make up an application and are present in the codebase. More than a list, it is a nested inventory that describes and helps us understand which components and their versions are being used, either directly or transitively.
The end goal of SBOM is to reduce cybersecurity risks and the associated costs.
Standard formats for SBOMs include SPDX (Software Package Data Exchange), CycloneDX, SWID (Software Identification) Tags and CPE (Common Platform Enumeration).
Dependency-Track currently supports the CycloneDX standard.
Dependency-Track infrastructure setup
Dependency-Track is available as a Docker Compose file. There is nothing complex about this Compose file. The solution consists of two containers, one for the API and one for the frontend.
If you are going to be setting up Dependency-Track, keep in mind that high availability for the Dependency-Track API container is not supported. You will have to ensure that only one container instance is running for the API.
Since we at Syskit are closely tied to the Microsoft ecosystem in our line of work, the only logical solution is to set up the infrastructure in Azure.
For running containers, we have these options in Azure:
- Azure Kubernetes Service (AKS)
- Azure Container Instances
- Azure Container Apps
- And the good old Azure App Services also have support for container and orchestration via a compose file
The decision fell on Azure Container apps mostly because we haven’t yet tried them out, and this was the perfect opportunity.
API Container
Creating container apps is pretty straightforward.
We start by creating a container app for the API.
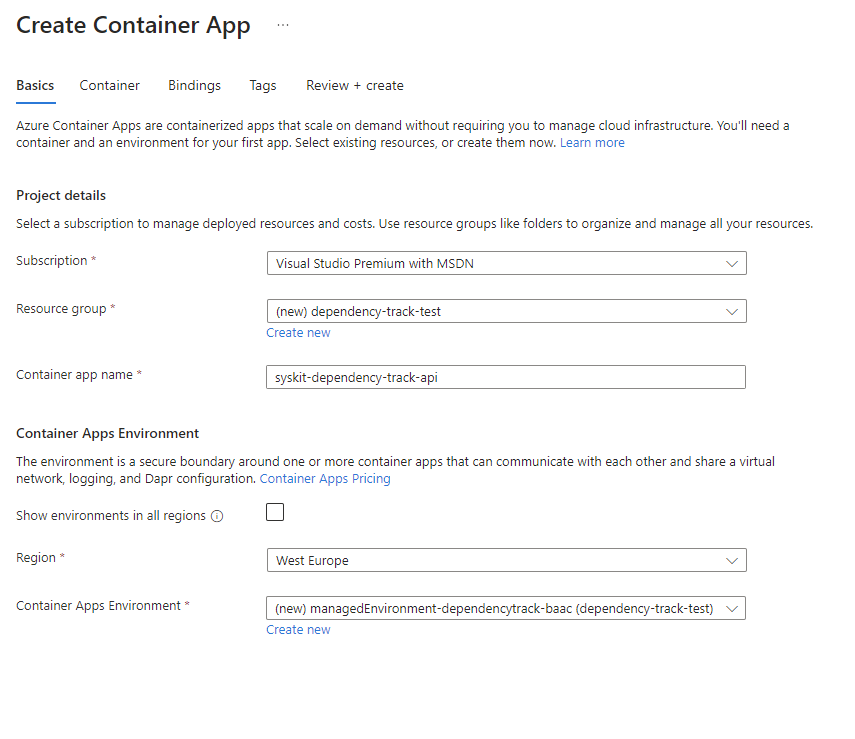
Instead of letting the Wizard create the new Container Apps Environment, we will create it manually by clicking Create New on the Container Apps Environment field.
We want to keep things secure if the container were to access any other systems (like a database), so instead of using the default options, a bit of setup is required.
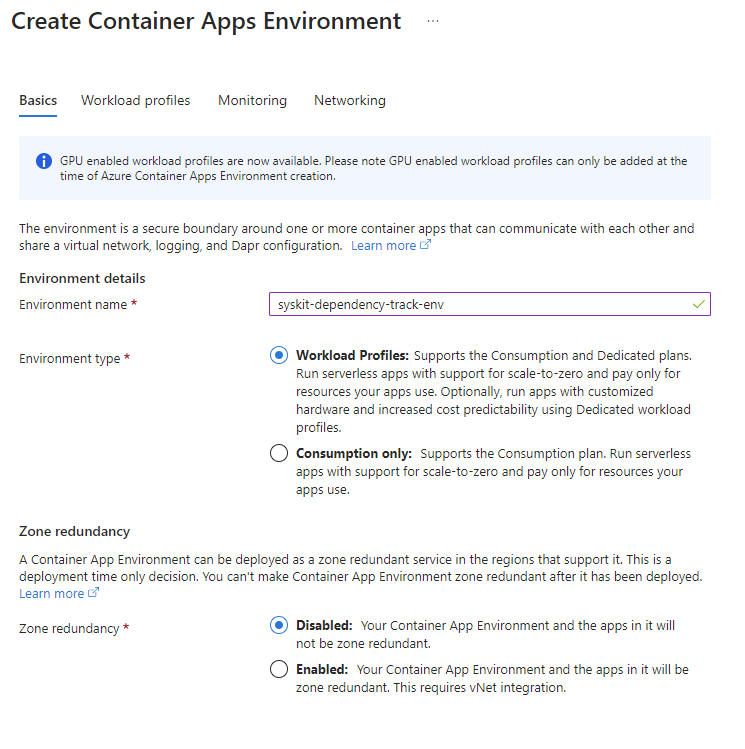
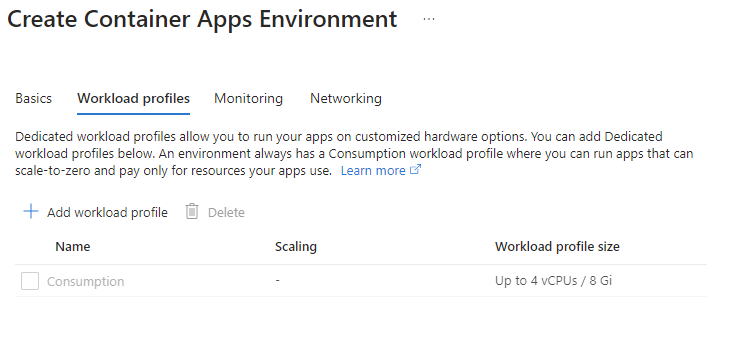
On the Create Container Apps Environment screen, we have the option to either select the Workload Profiles environment type or the Consumption only. We should select Workload Profiles. We will still use a consumption workload profile since this is a profile used even when choosing the Workload Profiles environment type, but the default profile created with the Workload profiles option gives 2x the resources for the consumption profile. The Workload Profiles environment type gives up to 4vCPUs/8 Gi in the Consumption profile, and the Consumption only type gives up to 2vCores/ 4Gi.
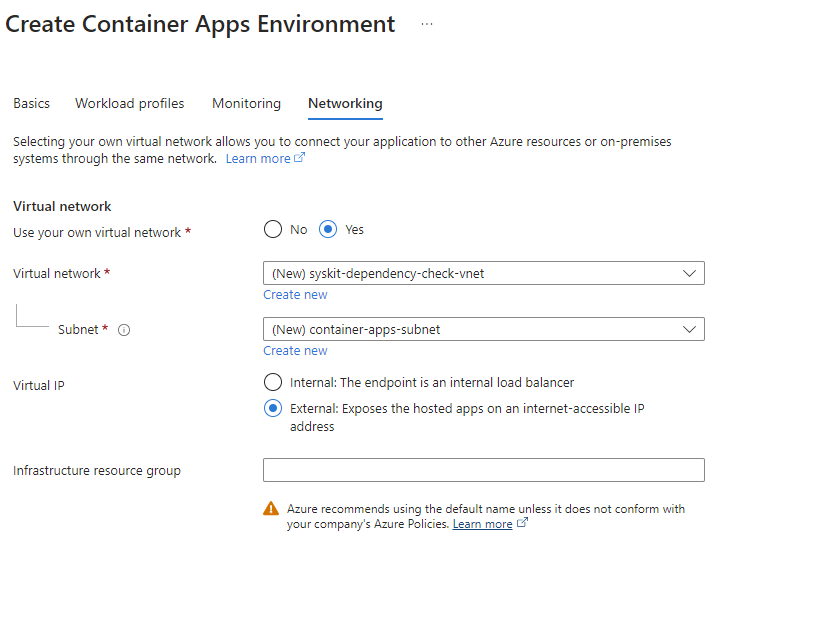
We will also set up the networking options since we will have additional resources that we want to access within the network.
On the Container tab we set the correct docker image, dependencytrack/apiserver and give it resources per the documentation. A bit resource hungry in my opinion, will need to try it out with a bit less.
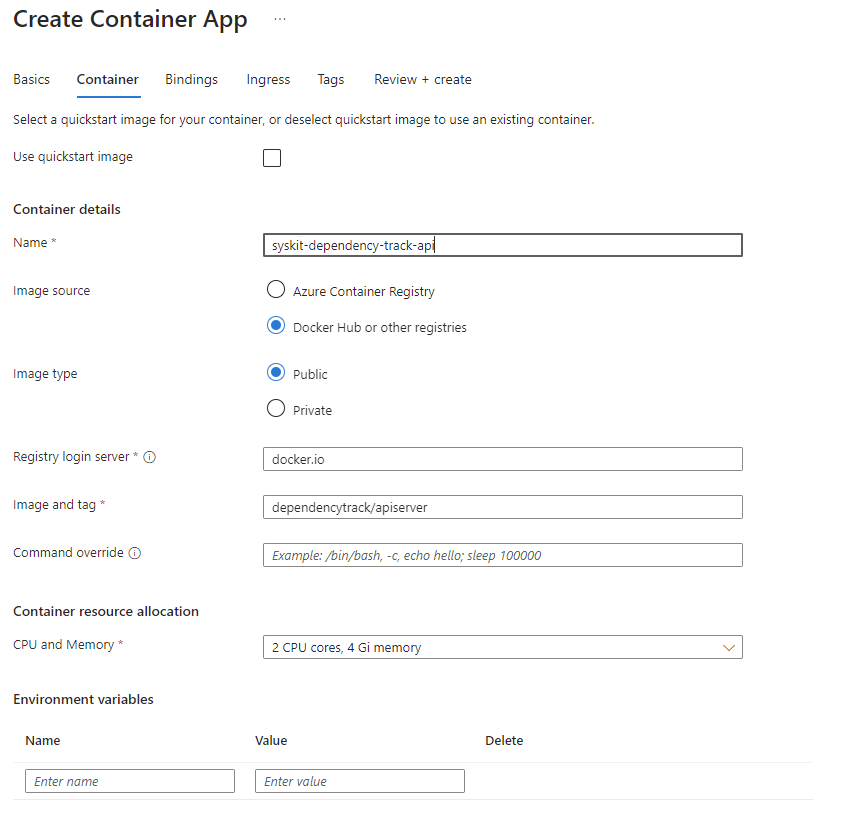
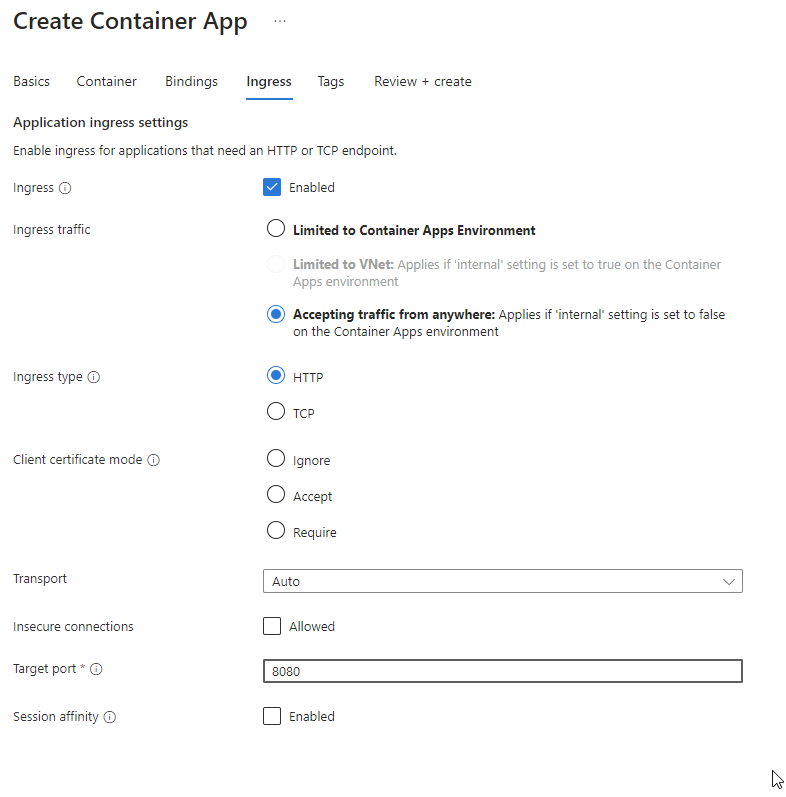
Ingress should be enabled, and port 8080 should be exposed. This will map to 443 once the container is running.
We then return to the basics tab and create the container app. After it is complete, we will have a running Dependecy-Track API container app.
Frontend container
To create the frontend container, we can go to the created Container app environment -> Apps -> Apps -> Create App.
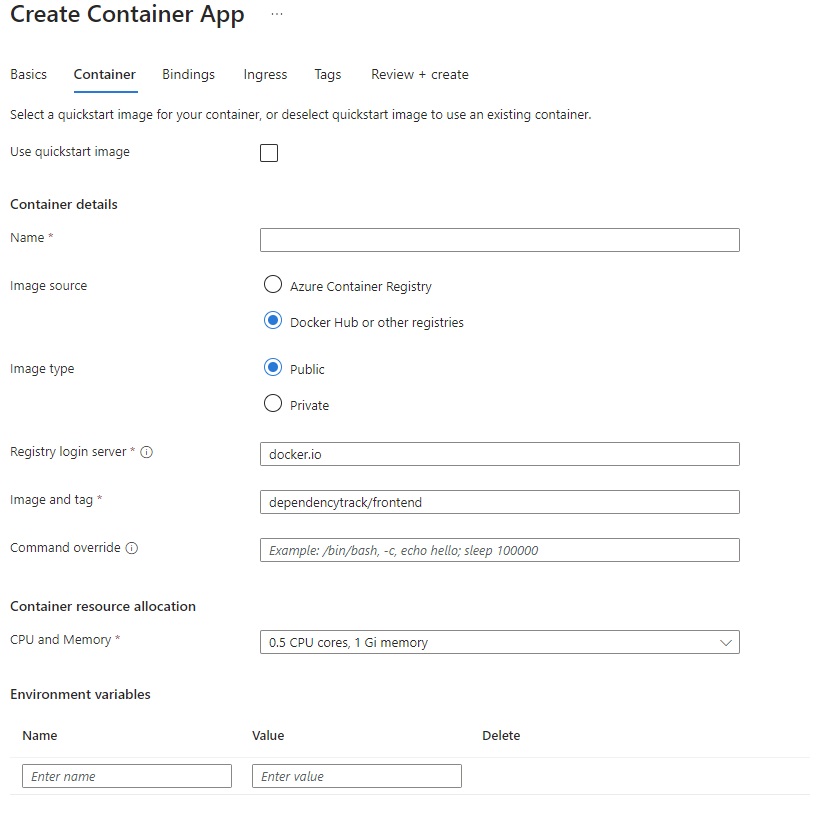
It’s important to set the container image to dependencytrack/frontend, and the API_BASE_URL environment variable needs to point to the API container app application URI (it is visible on the container app resource overview page, if ingress is set up correctly).
We can go light on the resources here since this will just serve static files for the frontend.
For the ingress we should set it up exactly as the API server with port 8080.
Once the frontend container is created, the Dependency-Track is usable but cannot be called production-ready since any data will disappear once the API container is restarted.
We will need to set up an external database. Ideally, we would map the Dependency-Track data directory to a file share as well to persist the internal index and the Dependency-Track instance encryption key, but it is usable without that.
The database
Dependency-Track uses an H2 database and they themselves state that this is not meant for production use.
To avoid any issues, we can create an Azure SQL server and SQL database.
To keep things secure, we use a private endpoint to the SQL server within the Azure Container and set it within the private network that we created together with the container app environment.
Adding the external database is simple and can be done by configuring the following environment variables to the container:
|
Container variables: |
|
|---|---|
|
ALPINE_DATABASE_MODE
|
external
|
|
ALPINE_DATABASE_URL
|
jdbc:sqlserver://[SQLServerName].database.windows.net:1433;databaseName=[DatabaseName];sendStr
|
|
ALPINE_DATABASE_DRIVER
|
com.microsoft.sqlserver.jdbc.SQLServerDriver
|
|
ALPINE_DATABASE_USERNAME
|
[dbUsername]
|
|
ALPINE_DATABASE_PASSWORD
|
[dbPassword]
|
Unfortunately, there is no support within Dependency-Track for Azure Managed Identity which would be preferable in an Azure environment to avoid any passwords/secrets.
The password can be added as a secret on the container (Settings -> Secrets) and referenced when setting up environment variables for a new revision.
Authentication support
For authentication, we leveraged OpenID Connect support within Dependency-Track. Having single sign-on is a must in today’s work environment.
In Entra ID, we need to register a new app registration as a Single page app and put https://dependencytrack.example.com/static/oidc-callback.html as the redirect URI.
It’s important to go to token configuration and add the groups claim so that group memberships are propagated correctly.
In API permissions we must add the following Microsoft Graph permissions:
- OpenId permissions -> email
- OpenId permissions -> openid
- OpenId permissions -> profile
- GroupMember -> GroupMember.Read.All
Once we have the app registration, enabling single sign-on with Entra ID is just a matter of setting some additional environment variables on the container apps.
|
For the API container: |
|
|---|---|
|
ALPINE_OIDC_ENABLED
|
true
|
|
ALPINE_OIDC_ISSUER
|
https://login.microsoftonline.com/[DirectoryID]/v2.0
|
|
ALPINE_OIDC_USERNAME_CLAIM
|
preferred_username
|
|
ALPINE_OIDC_USER_PROVISIONING
|
true
|
|
ALPINE_OIDC_TEAMS_CLAIM
|
groups
|
|
ALPINE_OIDC_TEAM_SYNCHRONIZATION
|
true
|
|
For the frontend container: |
|
|---|---|
|
OIDC_CLIENT_ID
|
[AppRegistrationClientID]
|
|
OIDC_ISSUER
|
https://login.microsoftonline.com/[DirectoryID]/v2.0
|
Signing into Dependency-Track with the default admin account we can now set things up so users from our directory can sign in and view issues.
To do this, we go to Administration -> Access Management -> OpenID Connect Groups and add any groups we want by using the Create Group button.
To do this, we go to Administration -> Access Management -> OpenID Connect Groups and add any groups we want by using the Create Group button.
It’s important to note that we need to input the ObjectID of the Entra ID group that we want to use instead of the Entra ID group name.
Once we added the OpenID Connect Group, we can go to Administration -> Access Management -> Teams, select a team and map the created OpenID Connected Group.
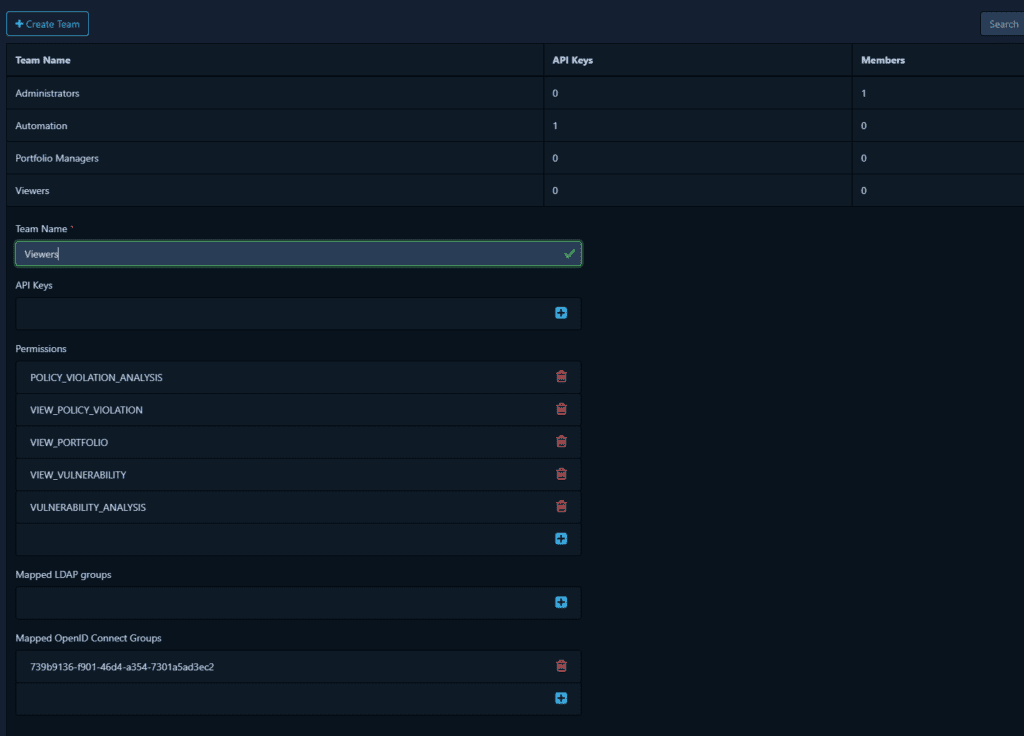
Here I have created a new Team (not to be confused with a team in Microsoft 365) named Viewers, given them the required permissions, and mapped an OpenID Connect Group.
This group is our developers M365 Team since we want all our developers to have read access to the Dependency-Track instance.
If we were to put an Entra ID user directly within a Dependency-Track Team it would not work. The memberships for the users are based on M365 groups, they will be overwritten in Dependency-Track once the user signs in again.
Azure DevOps Support
Now that we have our instance set up, we can start pushing SBOM files to it for analysis.
SBOM files can be generated in any number of ways, and their generation is not a part of Dependency-Track functionality.
But first, we create a new project within Dependency-Track.
Syskit Point is a solution that is composed of a .Net backend and a Typescript frontend.
In Dependency-Track, we decided to create separate projects for this mainly for ease of use and easier tracking.
We could go with a unified project but would need to merge the generated SBOM files. This can be achieved with i.e. the CycloneDX CLI.
Once we have the projects or better said their IDs we can start setting things up in our Azure DevOps pipelines.
The backend
The generation of the SBOM file for the backend can be handled by two tasks in the pipeline:
- script: |
dotnet tool install -g CycloneDX
displayName: 'Generate .Net SBOM'
- script: |
dotnet cyclonedx $(backendWorkingDirectory)\[Solution].sln -o $(Build.ArtifactStagingDirectory)\sbom -fn backend-bom.xml
displayName: 'Generate .Net SBOM'
Let’s also publish the generated file so that we can always download it directly from Azure DevOps:
- task: PublishBuildArtifacts@1
displayName: 'Publish background artifacts'
inputs:
PathtoPublish: '$(Build.ArtifactStagingDirectory)\sbom'
ArtifactName: 'SBOM'
publishLocation: 'Container'
The main reason why we generate the file is to track the dependencies within OWASP Dependency-Track, we will need to push it to Dependency-Track as well.
We can use the method with curl from the official documentation.
While there is nothing complex with that approach, fortunately, there is a more elegant solution in the form of the Dependency-Track Azure DevOps extension. The extension also has some additional benefits that we will get around to.
Once the extension has been installed in Azure DevOps, we can upload the SBOM files with the following task:
- task: upload-bom-dtrack-task@1
displayName: 'Upload Backend BOM'
inputs:
bomFilePath: '$(Build.ArtifactStagingDirectory)\sbom\backend-bom.xml'
dtrackProjId: '$(DependencyTrackPointApiProjectId)'
dtrackAPIKey: '$(DependencyTrackApiKey)'
dtrackURI: 'https://$(DependencyTrackApiHostname)/'
The frontend
On the frontend project, we use Yarn. This causes some headaches regarding the SBOM generation since the yarn-based tool equivalent to cyclonedx-npm has not yet been released.
Because of this, CdxGen is leveraged here. One issue with CdxGen is that it does not correctly handle devDependencies so they are included as well in the SBOM file. None of the CdxGen options to exclude devDependencies result in an acceptable SBOM file. The main issue being described here. Since other options to generate SBOM for yarn face other or similar issues, for now we decided to include the devDependecies as well in the SBOM until a better solution comes along.
Two tasks are crucial to generate the SBOM file:
- script: |
npm install -g @cyclonedx/cdxgen
displayName: 'Install CdxGen'
- script: |
if not exist "$(Build.ArtifactStagingDirectory)\sbom" mkdir $(Build.ArtifactStagingDirectory)\sbom
cdxgen -o $(Build.ArtifactStagingDirectory)\sbom\frontend-bom.json
displayName: 'Generate SBOM for Frontend'
workingDirectory: $(teamsAppWorkingDirectory)
We should also publish the generated file for the frontend:
- task: PublishBuildArtifacts@1
displayName: 'Publish Frontend SBOM'
inputs:
PathtoPublish: '$(Build.ArtifactStagingDirectory)\sbom'
ArtifactName: 'SBOM'
publishLocation: 'Container'Like the backend project, we will upload the frontend SBOM to our Dependency-Track instance.
- task: upload-bom-dtrack-task@1
displayName: 'Upload Frontend BOM'
inputs:
bomFilePath: '$(Build.ArtifactStagingDirectory)\sbom\frontend-bom.json'
dtrackProjId: '$(DependencyTrackPointSpaProjectId)'
dtrackAPIKey: '$(DependencyTrackApiKey)'
dtrackURI: 'https://$(DependencyTrackApiHostname)/'
Once the SBOM files have been uploaded, Dependency-Track will start to analyze the project dependencies. When complete, you will have a full inventory of which packages are used within your application and any vulnerabilities identified.
As a bonus, the upload-bom-dtrack-task@1 task supports thresholds for detected vulnerabilities. If a threshold is set, the task will wait for the analysis to complete and we can set it up to fail the build if there are vulnerabilities over the threshold defined by the thresholdCritical, thresholdHigh, thresholdMedium, thresholdLow, thresholdUnassigned properties.
- task: upload-bom-dtrack-task@1
displayName: 'Upload Frontend BOM'
inputs:
bomFilePath: '$(Build.ArtifactStagingDirectory)\sbom\frontend-bom.json'
dtrackProjId: '$(DependencyTrackPointSpaProjectId)'
dtrackAPIKey: '$(DependencyTrackApiKey)'
dtrackURI: 'https://$(DependencyTrackApiHostname)/'
thresholdAction: 'error'
thresholdCritical: 0
In the example above we CANNOT have any critical vulnerabilities, the build will fail.
- task: upload-bom-dtrack-task@1
displayName: 'Upload Frontend BOM'
inputs:
....
thresholdAction: 'error'
thresholdHigh: 4Here we set thresholdHigh to 4 meaning that we can have at most 4 high classified vulnerabilities. We can also set it to a warning via the thresholdAction property.
Dependency-track notifications
One Dependency-Track feature that we were excited about are the notifications about new vulnerabilities via email/Microsoft Teams.
Unfortunately, our testing showed that this does not function as expected.
Going a bit deeper, it seems that this is currently a known issue.
Emails work without issues, as long as the data directory is mapped to a file share so that the encryption key used to safeguard the smtp server password is persisted.
Final thoughts on implementing OWASP Dependency-Track
Dependency-Track is an exceptional open-source project that tracks the usage of libraries, applications, and much more. Most importantly, it will give insights into vulnerable components in your system. The tool would be even better if Teams notifications would work; hoping for a fix soon. For now, email notifications and breaking our build when the analysis is completed will have to be enough. After all, there is no ignoring that, unlike yet another notification.
The setup, while not difficult, does require some effort. The resources were deployed manually, hopefully, we will get around to writing a Bicep/ARM template in case we need to redeploy.